

DIY Reed Diffuser: Are you tired of those overpowering, chemical-laden air fresheners that promise a fresh scent but deliver a headache instead? I know I was! That’s why I dove headfirst into the world of homemade fragrance, and let me tell you, it’s been a game-changer.
The concept of diffusing scents isn’t new; in fact, ancient civilizations used aromatic oils and reeds to purify the air and create a pleasant ambiance. Think of the Egyptians with their incense or the Romans with their fragrant baths – scent has always been intertwined with well-being and luxury.
But why should you bother making your own DIY reed diffuser? Well, for starters, you have complete control over the ingredients. No more mystery chemicals! You can choose your favorite essential oils to create a custom scent that perfectly matches your mood and style. Plus, it’s incredibly cost-effective and a fun, rewarding project. Imagine crafting a beautiful, natural fragrance that fills your home with a subtle, long-lasting aroma – all while knowing exactly what’s in it. This DIY trick is perfect for anyone looking to create a healthier, more personalized, and budget-friendly home environment. Let’s get started!

DIY Reed Diffuser: Freshen Your Home Naturally
Okay, let’s ditch those store-bought air fresheners packed with mystery chemicals and create our own amazing reed diffuser! I’m going to walk you through every step, so you can have a beautifully scented home without breaking the bank or worrying about what you’re breathing in. This is a super easy project, and you can totally customize it to match your own style and fragrance preferences.
What You’ll Need: The Essential Supplies
Before we dive in, let’s gather everything we need. This will make the whole process smoother and less stressful. Trust me, having everything ready to go is half the battle!
* **A Glass Container:** This is where your fragrant oil mixture will live. Think small vases, mason jars, recycled bottles – anything with a narrow opening will work best. I personally love using small apothecary bottles for a vintage vibe. Make sure it’s clean and dry!
* **Diffuser Base Oil:** This is the carrier oil that will help the fragrance travel up the reeds. Here are a few options:
* **Safflower Oil:** A great choice because it’s odorless and has a thin consistency, allowing the fragrance to diffuse easily.
* **Sweet Almond Oil:** Another good option, but it has a slightly nutty scent, so keep that in mind when choosing your essential oils.
* **Fractionated Coconut Oil:** This is coconut oil that stays liquid at room temperature. It’s odorless and works well, but can be a bit more expensive.
* Do NOT use olive oil or vegetable oil! They are too thick and will go rancid.
* **Essential Oils or Fragrance Oils:** This is where you get to personalize your diffuser! Choose your favorite scents or create a custom blend. I’ll give you some blend ideas later.
* **Diffuser Reeds:** These are the porous sticks that will draw the oil up and release the fragrance into the air. You can find these online or at craft stores. Rattan reeds are the most common and work really well.
* **Rubbing Alcohol (Isopropyl Alcohol):** This helps the essential oils and base oil mix properly. It also thins the mixture slightly, aiding in diffusion.
* **Measuring Spoons or Cups:** For accurate measurements.
* **A Small Funnel (Optional):** This can help you pour the mixture into the container without spilling.
* **Gloves (Optional):** If you have sensitive skin, wearing gloves can protect you from the essential oils.
* **Paper Towels:** For easy cleanup.
Mixing Your Fragrant Oil: The Heart of the Diffuser
This is where the magic happens! Getting the right ratio of essential oils to base oil is key to a long-lasting and effective diffuser.
1. **Clean and Prepare Your Workspace:** Lay down some paper towels to protect your surface from spills.
2. **Measure the Base Oil:** Pour your chosen base oil into a measuring cup. The amount you need will depend on the size of your container. A good rule of thumb is to fill the container about ¾ full.
3. **Add the Essential Oils:** This is where you get to be creative! A general guideline is to use 15-30 drops of essential oil per ¼ cup of base oil. I usually start with 20 drops and adjust from there. Remember, you can always add more, but you can’t take it away!
* For a subtle scent: Use 15 drops per ¼ cup of base oil.
* For a moderate scent: Use 20-25 drops per ¼ cup of base oil.
* For a strong scent: Use 30 drops per ¼ cup of base oil.
4. Add the Rubbing Alcohol:** Add 1 teaspoon of rubbing alcohol per ¼ cup of base oil. This helps the oils mix and thins the mixture for better diffusion.
5. **Mix Thoroughly:** Gently stir the mixture with a spoon or small whisk for at least a minute to ensure the essential oils are evenly distributed.
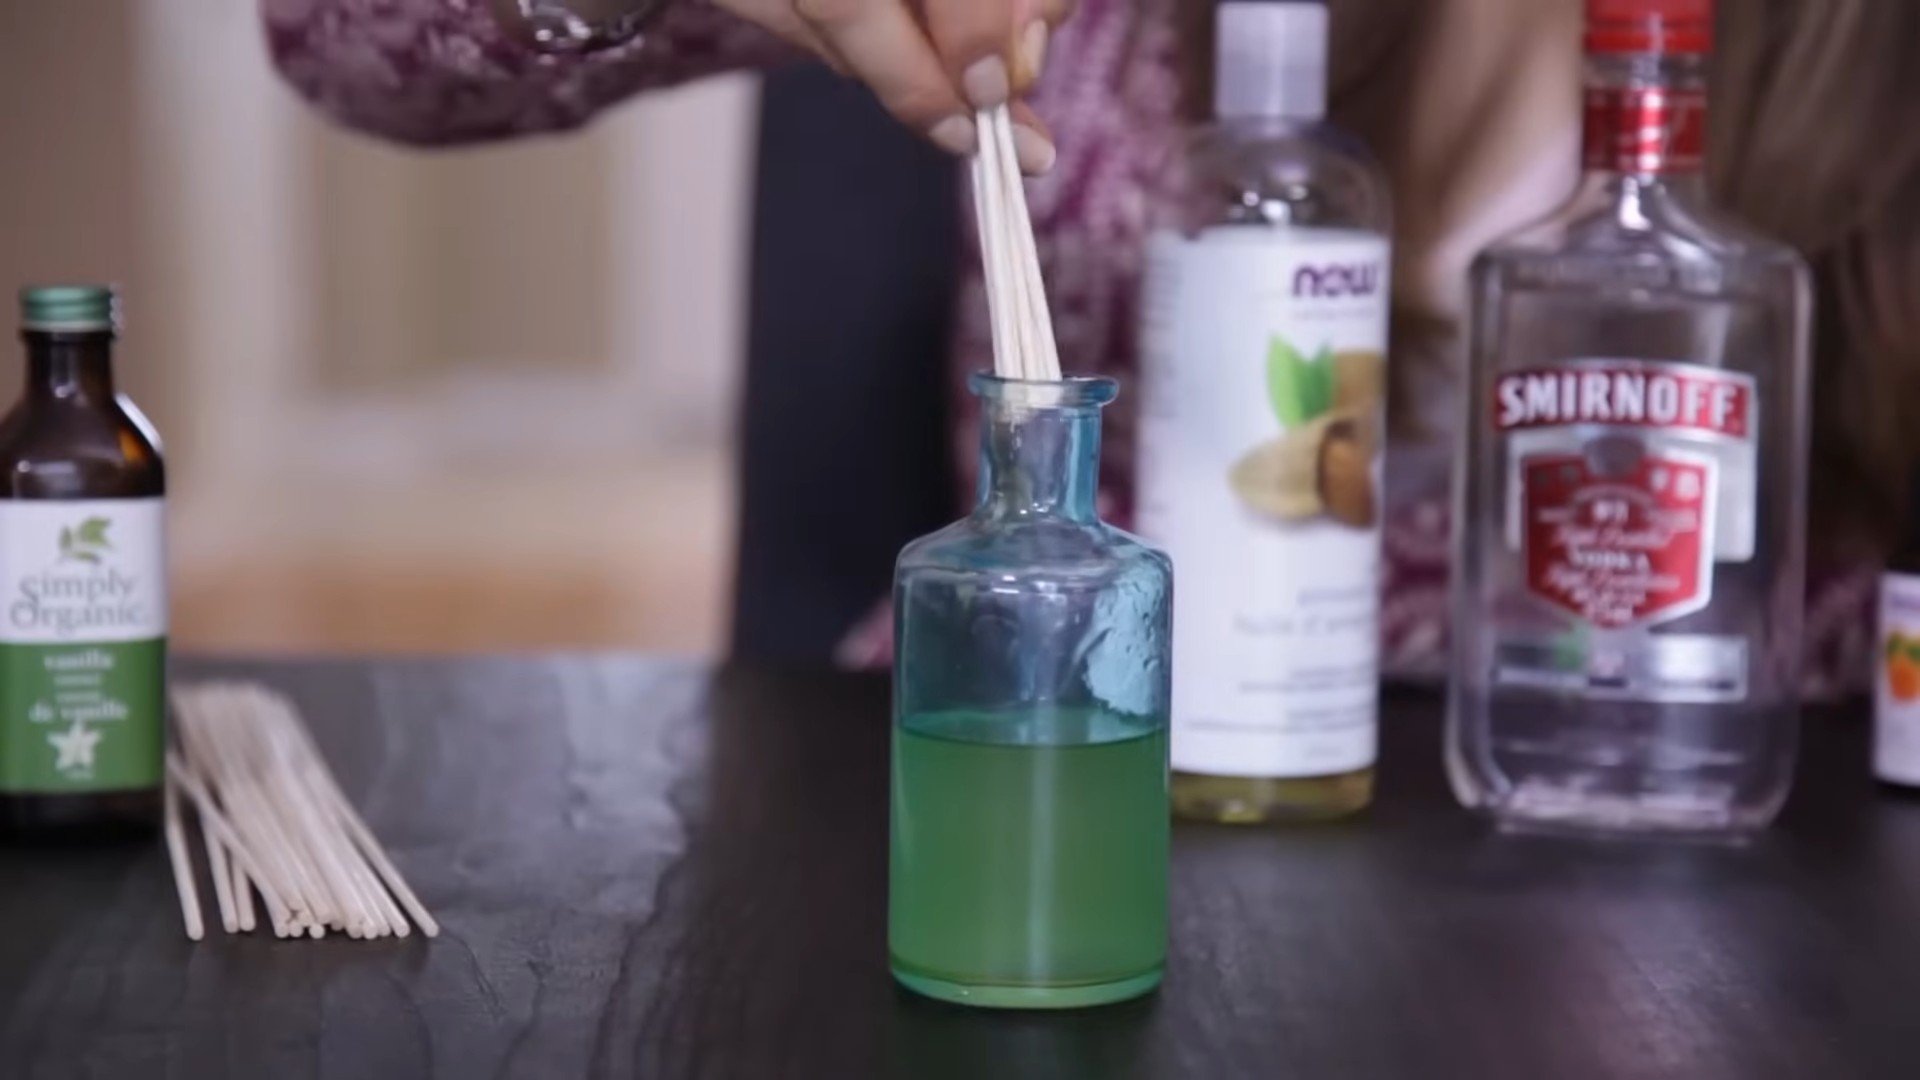
6. **Test the Scent (Optional):** Dip a reed into the mixture and wave it around to get a sense of the scent. If it’s not strong enough, add a few more drops of essential oil and mix again.
Assembling Your Reed Diffuser: Putting It All Together
Now for the fun part – putting everything together and enjoying your creation!
1. **Pour the Mixture into the Container:** Carefully pour the fragrant oil mixture into your glass container. A funnel can be helpful here to avoid spills.
2. **Insert the Reeds:** Place the diffuser reeds into the container, making sure they are submerged in the oil. Start with 5-7 reeds, and you can add more later if you want a stronger scent.
3. **Wait for the Reeds to Absorb the Oil:** It will take a few hours for the reeds to fully absorb the oil and start diffusing the fragrance. Be patient!
4. **Flip the Reeds:** After a few hours (or even overnight), flip the reeds so the saturated ends are now facing up. This will help jumpstart the diffusion process.
5. **Placement is Key:** Place your reed diffuser in a well-ventilated area where the fragrance can circulate. Avoid placing it in direct sunlight or near heat sources, as this can cause the oil to evaporate too quickly.
Maintaining Your Reed Diffuser: Keeping It Fresh
To keep your reed diffuser working its best, here are a few tips:
* **Flip the Reeds Regularly:** Flip the reeds every week or two to refresh the scent.
* **Replace the Reeds:** Over time, the reeds can become clogged with dust and oil, which will reduce their effectiveness. Replace the reeds every 1-2 months.
* **Refill the Oil:** When the oil level gets low, refill the container with a fresh batch of your fragrant oil mixture.
* **Clean the Container:** Before refilling, clean the container with soap and water to remove any residue.
* Adjust the Number of Reeds:** If the scent is too strong, remove a few reeds. If it’s not strong enough, add more.
Essential Oil Blend Ideas: Unleash Your Inner Perfumer
Here are a few of my favorite essential oil blend ideas to get you started:
* **Relaxing Lavender & Chamomile:** 15 drops Lavender, 10 drops Roman Chamomile
* **Uplifting Citrus Burst:** 10 drops Sweet Orange, 8 drops Lemon, 7 drops Grapefruit
* **Invigorating Peppermint & Eucalyptus:** 12 drops Peppermint, 13 drops Eucalyptus
* **Cozy Vanilla & Cinnamon:** 15 drops Vanilla, 10 drops Cinnamon Bark (use sparingly, as it can be strong)
* **Woodsy Cedarwood & Pine:** 15 drops Cedarwood, 10 drops Pine
* Spiced Apple Cider: 10 drops Orange, 8 drops Cinnamon, 7 drops Clove
* Tropical Getaway: 12 drops Coconut, 8 drops Lime, 5 drops Pineapple (fragrance oil)
* Fresh Linen: 15 drops Cotton Blossom, 10 drops Clean Linen (fragrance oil)
Important Note: When using essential oils, be sure to research their safety precautions, especially if you have pets or are pregnant. Some essential oils are not safe for everyone.
Troubleshooting: Common Issues and Solutions
* **No Scent:**
* **Reeds are clogged:** Replace the reeds.
* **Not enough essential oil:** Add more essential oil to the mixture.
* **Oil is too thick:** Make sure you’re using a diffuser base oil, not olive oil or vegetable oil. Add a bit more rubbing alcohol.
* **Room is too large:** The diffuser may not be strong enough to scent the entire room. Try moving it to a smaller space.
* **Scent is Too Strong:**
* **Too much essential oil:** Remove some of the oil from the container and add more base oil.
* **Too many reeds:** Remove some of the reeds.
* **Room is too small:** Move the diffuser to a larger space.
* **Oil is Evaporating Too Quickly:**
* **Diffuser is in direct sunlight or near a heat source:** Move the diffuser to a cooler location.
* **Room is too dry:** Add a humidifier to the room.
* **Oil is Cloudy:**
* **Water contamination:** Make sure your container and utensils are completely dry before using them.
* **Essential oils not fully dissolved:** Stir the mixture more thoroughly.
Safety First: Important Considerations
* **Keep out of reach of children and pets:** Essential oils can be harmful if ingested.
* **Avoid contact with skin and eyes:** If contact occurs, rinse thoroughly with water.
* **Do not ingest:** This is for external use only.
* **Be careful when handling essential oils:** Some essential oils can stain surfaces.
* **
Conclusion
So, there you have it! Crafting your own DIY reed diffuser is not just a fun project; it’s a transformative experience that allows you to curate the perfect ambiance for your home, all while saving money and reducing waste. Forget those generic, mass-produced air fresheners filled with questionable chemicals. With a few simple ingredients and a touch of creativity, you can create a personalized fragrance haven that reflects your unique style and preferences.
Why is this DIY trick a must-try? Because it empowers you to take control of your environment. You get to choose the exact essential oils that resonate with you, whether it’s the calming lavender for your bedroom, the invigorating citrus for your workspace, or the cozy cinnamon and clove for your living room during the holidays. The possibilities are truly endless. Plus, you’ll be amazed at how much money you save compared to constantly buying pre-made diffusers. Think of all the other things you can do with that extra cash!
But the benefits extend beyond just cost savings and personalization. Making your own reed diffuser is also a more sustainable choice. You’re reducing your reliance on plastic packaging and potentially harmful chemicals found in commercial air fresheners. It’s a small step towards a greener lifestyle that can make a big difference.
Ready to take your DIY reed diffuser game to the next level? Consider these variations:
* Infused Oil Base: Instead of plain carrier oil, infuse your oil with dried herbs or flowers for an extra layer of fragrance and visual appeal. For example, infuse almond oil with dried rose petals for a romantic and delicate scent.
* Decorative Vessels: Don’t limit yourself to standard glass bottles. Get creative with your vessel choices! Repurpose vintage bottles, mason jars, or even ceramic containers. Just make sure the opening is narrow enough to prevent excessive evaporation.
* Scent Blending Masterclass: Experiment with different essential oil blends to create your signature scent. Research the properties of different oils and how they complement each other. A good starting point is to combine oils from different fragrance families (e.g., floral, citrus, woody) for a well-rounded aroma.
* Seasonal Scents: Tailor your diffuser scents to the changing seasons. Think warm and spicy scents for fall and winter, and fresh and floral scents for spring and summer.
* Colored Reeds: Add a pop of color to your diffuser by using dyed reeds. You can find these online or even dye your own using food coloring.
We are confident that once you try this DIY reed diffuser trick, you’ll be hooked. It’s a simple, rewarding, and eco-friendly way to elevate your home’s ambiance. So, gather your supplies, unleash your creativity, and get ready to transform your space into a fragrant oasis.
We can’t wait to hear about your experiences! Share your DIY reed diffuser creations with us on social media using #DIYReedDiffuserMagic. Let us know your favorite essential oil blends, your creative vessel ideas, and any tips or tricks you’ve discovered along the way. Together, let’s spread the word about this amazing DIY project and inspire others to create their own personalized fragrance havens. Happy diffusing!
Frequently Asked Questions (FAQ)
What type of reeds should I use for my DIY reed diffuser?
The best reeds for a DIY reed diffuser are rattan reeds. Rattan reeds have natural channels that allow the fragrance oil to travel up the reed and diffuse into the air. Avoid using bamboo skewers or other types of wood, as they don’t have the same capillary action and won’t diffuse the scent effectively. Look for reeds specifically designed for diffusers; they are readily available online and in craft stores. The diameter of the reeds also matters; thicker reeds will generally diffuse more fragrance.
How often should I flip the reeds in my DIY reed diffuser?
Flipping the reeds helps to refresh the scent and prevent them from becoming saturated. A good rule of thumb is to flip the reeds every 1-2 weeks. However, you may need to flip them more frequently if you notice the scent fading or if the reeds appear dry. When flipping the reeds, be careful not to spill any of the oil. It’s best to do this over a sink or on a protected surface.
What type of carrier oil is best for a DIY reed diffuser?
Several carrier oils work well for DIY reed diffusers. Fractionated coconut oil is a popular choice because it’s odorless, colorless, and has a long shelf life. Sweet almond oil is another good option, but it may have a slightly nutty scent. Safflower oil and mineral oil are also suitable alternatives. Avoid using heavy oils like olive oil, as they can clog the reeds and prevent proper diffusion. The key is to choose a light, non-viscous oil that will easily travel up the reeds.
How much essential oil should I use in my DIY reed diffuser?
The amount of essential oil you use will depend on the size of your diffuser vessel and your personal preference. A good starting point is to use a 15-20% concentration of essential oil. For example, if you’re using 100ml of carrier oil, add 15-20ml of essential oil. You can always adjust the amount of essential oil to achieve your desired scent strength. Remember that some essential oils are stronger than others, so start with a smaller amount and add more as needed.
How long will my DIY reed diffuser last?
The lifespan of your DIY reed diffuser will depend on several factors, including the size of the vessel, the type of carrier oil and essential oils used, and the ambient temperature and humidity. Generally, a 100ml diffuser should last for 2-3 months. To prolong the life of your diffuser, keep it away from direct sunlight and heat sources, which can cause the oil to evaporate more quickly. Also, make sure to flip the reeds regularly to keep them saturated with fragrance.
Can I reuse the reeds in my DIY reed diffuser?
It’s generally not recommended to reuse reeds, as they can become clogged with oil and dust over time. Once the reeds are saturated, they won’t diffuse the scent as effectively. It’s best to replace the reeds when you refill your diffuser with fresh oil. You can purchase replacement reeds online or in craft stores.
What safety precautions should I take when making and using a DIY reed diffuser?
When making a DIY reed diffuser, always handle essential oils with care. Some essential oils can be irritating to the skin or cause allergic reactions. Wear gloves when handling essential oils and avoid contact with your eyes. Keep essential oils out of reach of children and pets. When using your reed diffuser, place it on a stable surface where it won’t be easily knocked over. Avoid placing it near flammable materials or heat sources. If you spill any of the oil, clean it up immediately to prevent staining or damage to surfaces.
What are some popular essential oil blends for DIY reed diffusers?
The possibilities are endless when it comes to essential oil blends! Here are a few popular combinations to get you started:
* Relaxing Blend: Lavender, chamomile, and sandalwood
* Invigorating Blend: Lemon, peppermint, and rosemary
* Cozy Blend: Cinnamon, clove, and orange
* Uplifting Blend: Grapefruit, bergamot, and lime
* Romantic Blend: Rose, jasmine, and ylang-ylang
Experiment with different blends to find your favorites! You can also research the properties of different essential oils to create blends that target specific needs, such as stress relief, improved focus, or better sleep.
How do I clean up spilled diffuser oil?
Spilled diffuser oil can be tricky to clean because it’s oily and can stain surfaces. The first step is to blot up as much of the oil as possible with a clean cloth or paper towel. Avoid rubbing the spill, as this can spread the oil further. Next, sprinkle baking soda or cornstarch over the affected area to absorb the remaining oil. Let it sit for at least 30 minutes, then vacuum or sweep it up. Finally, clean the area with a mixture of warm water and dish soap. You may need to repeat this process several times to remove all traces of the oil. For stubborn stains, you can try using a commercial stain remover or a solution of vinegar and water.
My DIY reed diffuser doesn’t seem to be diffusing much scent. What can I do?
If your DIY reed diffuser isn’t diffusing much scent, there are several things you can try:
* Flip the reeds: As mentioned earlier, flipping the reeds helps to refresh the scent.
* Add more essential oil: If you’re not using enough essential oil, the scent will be weak. Try adding a few more drops of essential oil to the mixture.
* Use new reeds: Old reeds can become clogged and less effective at diffusing scent. Replace them with new reeds.
* Check the location: The location of your diffuser can affect its performance. Avoid placing it in a drafty area or near a heat source, as this can cause the oil to evaporate too quickly.
* Use a smaller vessel: If you’re using a large vessel, the scent may be too diluted. Try using a smaller vessel to concentrate the fragrance.
*
Leave a Comment