

Garbage Disposal Cleaning DIY: Let’s face it, we’ve all been there. That funky smell wafting from under the sink, a symphony of gurgling sounds that just don’t sound right… it’s your garbage disposal screaming for help! But before you reach for the phone to call a plumber, let me tell you a secret: you can tackle this yourself with a few simple household items and a little elbow grease.
For generations, resourceful homeowners have been devising clever ways to keep their homes clean and fresh. While the modern garbage disposal is a relatively recent invention, the need to manage food waste and prevent unpleasant odors is as old as civilization itself. Think of this as a modern twist on age-old cleaning wisdom!
Why is garbage disposal cleaning DIY so important? Well, a neglected disposal can become a breeding ground for bacteria, leading to those nasty smells and potentially even attracting pests. Plus, a clogged or poorly maintained disposal can lead to costly repairs down the line. I’m going to show you some easy, effective, and budget-friendly methods to keep your garbage disposal sparkling clean and running smoothly. Get ready to say goodbye to those funky smells and hello to a fresh, happy kitchen!
DIY Garbage Disposal Cleaning: Say Goodbye to Stinky Sink!
Okay, let’s face it, your garbage disposal is probably one of the most neglected appliances in your kitchen. We use it daily to grind up food scraps, but rarely do we think about actually *cleaning* it. And trust me, that neglect can lead to some seriously unpleasant odors and a breeding ground for bacteria. But don’t worry, I’m here to guide you through a simple and effective DIY cleaning process that will have your garbage disposal smelling fresh and functioning like new!
What You’ll Need
Before we dive in, let’s gather our supplies. You probably have most of these items already in your kitchen, which is a huge win!
* Baking Soda
* White Vinegar
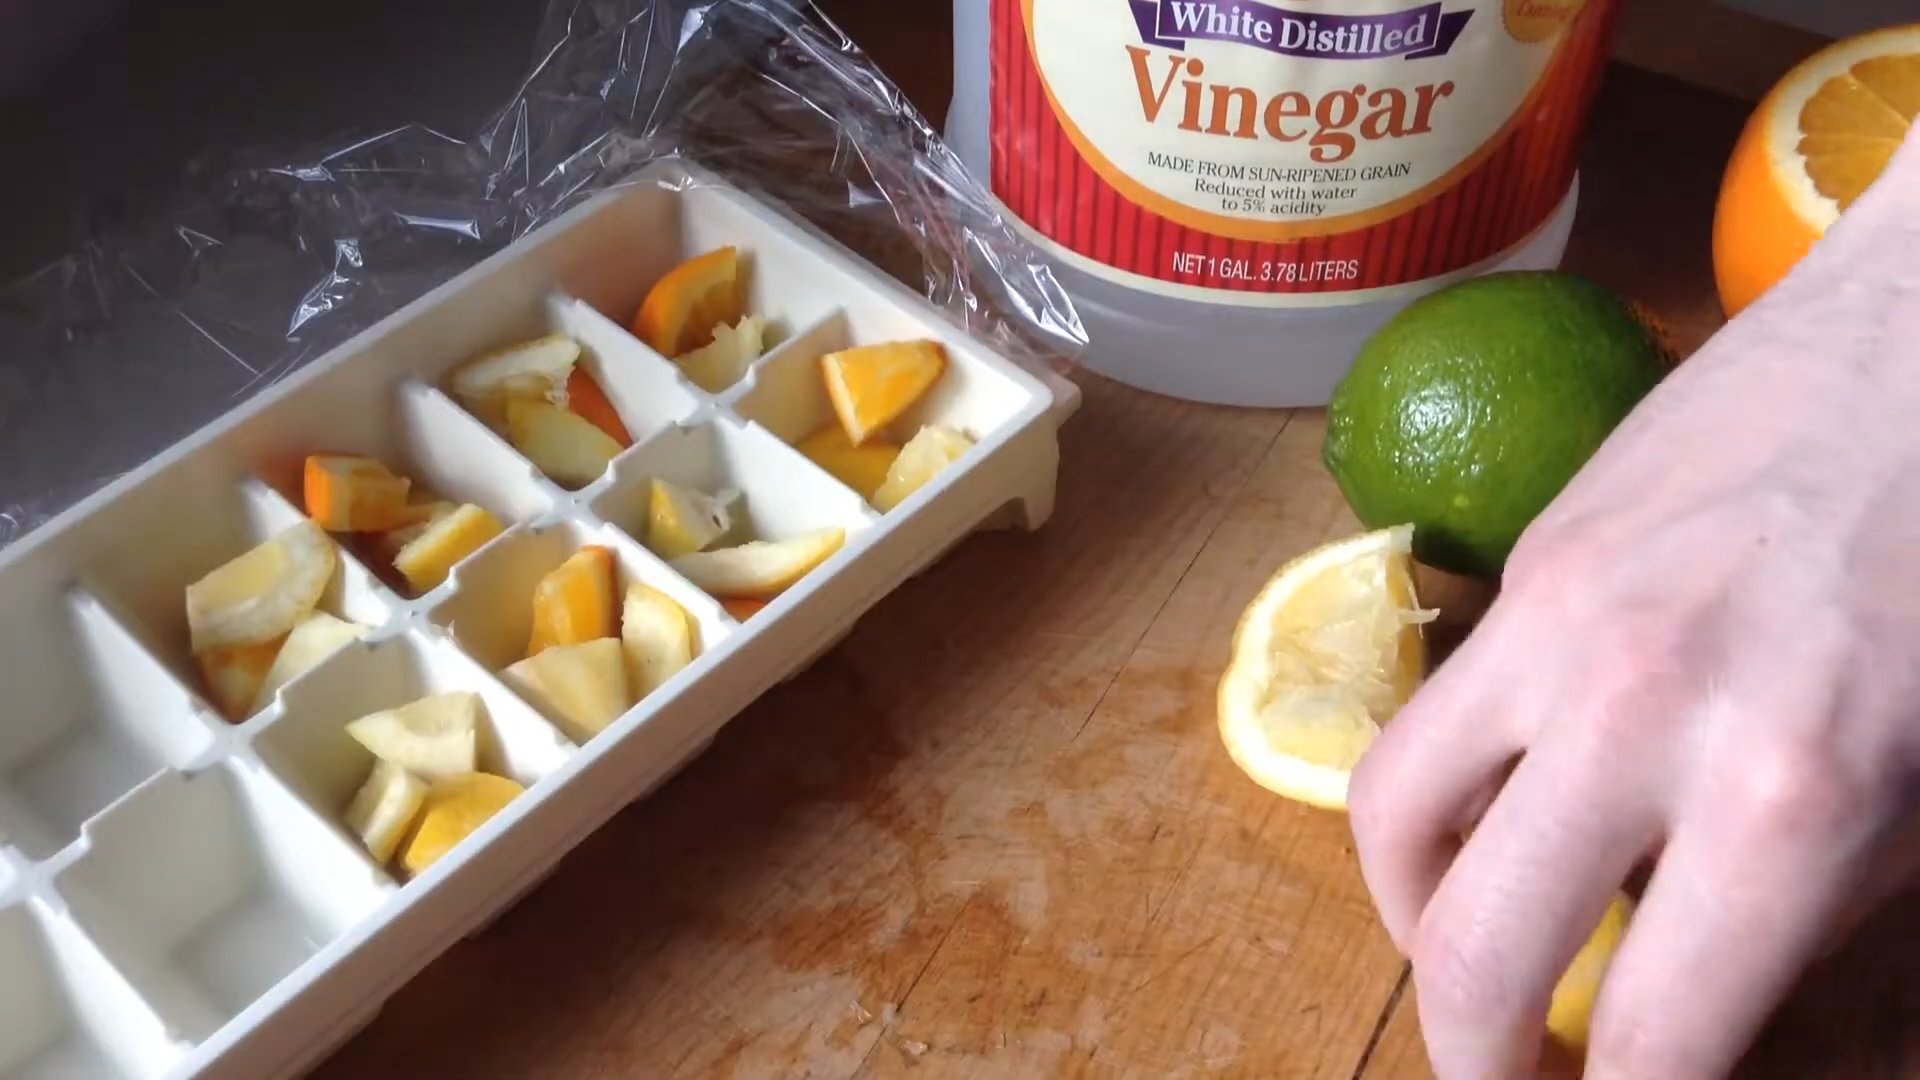
* Ice Cubes
* Lemon or Lime (optional, but highly recommended!)
* Dish Soap
* Tongs or Pliers (for removing any large debris)
* A Pot of Boiling Water
* Rubber Gloves (optional, but good for protecting your hands)
* A Scrub Brush (an old toothbrush works great!)
Safety First!
Before you do anything, make sure the garbage disposal is turned OFF! Seriously, this is the most important step. You don’t want any accidental activations while you’re poking around in there. I always double-check by flipping the breaker switch in my electrical panel just to be extra safe. Better safe than sorry, right?
Step-by-Step Cleaning Guide
Alright, now that we’ve got our supplies and safety precautions in place, let’s get down to business!
1. Remove Large Debris: This is where those tongs or pliers come in handy. Carefully reach into the disposal and remove any large pieces of food, silverware (it happens!), or anything else that shouldn’t be there. You’d be surprised what you might find! I once found a bottle cap – no idea how that got in there.
2. Baking Soda and Vinegar Power: This is my go-to cleaning combo for pretty much everything, and it works wonders on garbage disposals too.
* Pour about 1/2 cup of baking soda down the drain.
* Follow that with 1 cup of white vinegar.
* Let the mixture fizz and bubble for about 5-10 minutes. This chemical reaction helps to loosen grime and break down odors. You’ll probably hear some interesting sounds – don’t be alarmed, it’s just the magic happening!
3. Flush with Boiling Water: After the fizzing has subsided, carefully pour a pot of boiling water down the drain. This will help to flush away the loosened debris and further sanitize the disposal. Be careful when handling boiling water, of course!
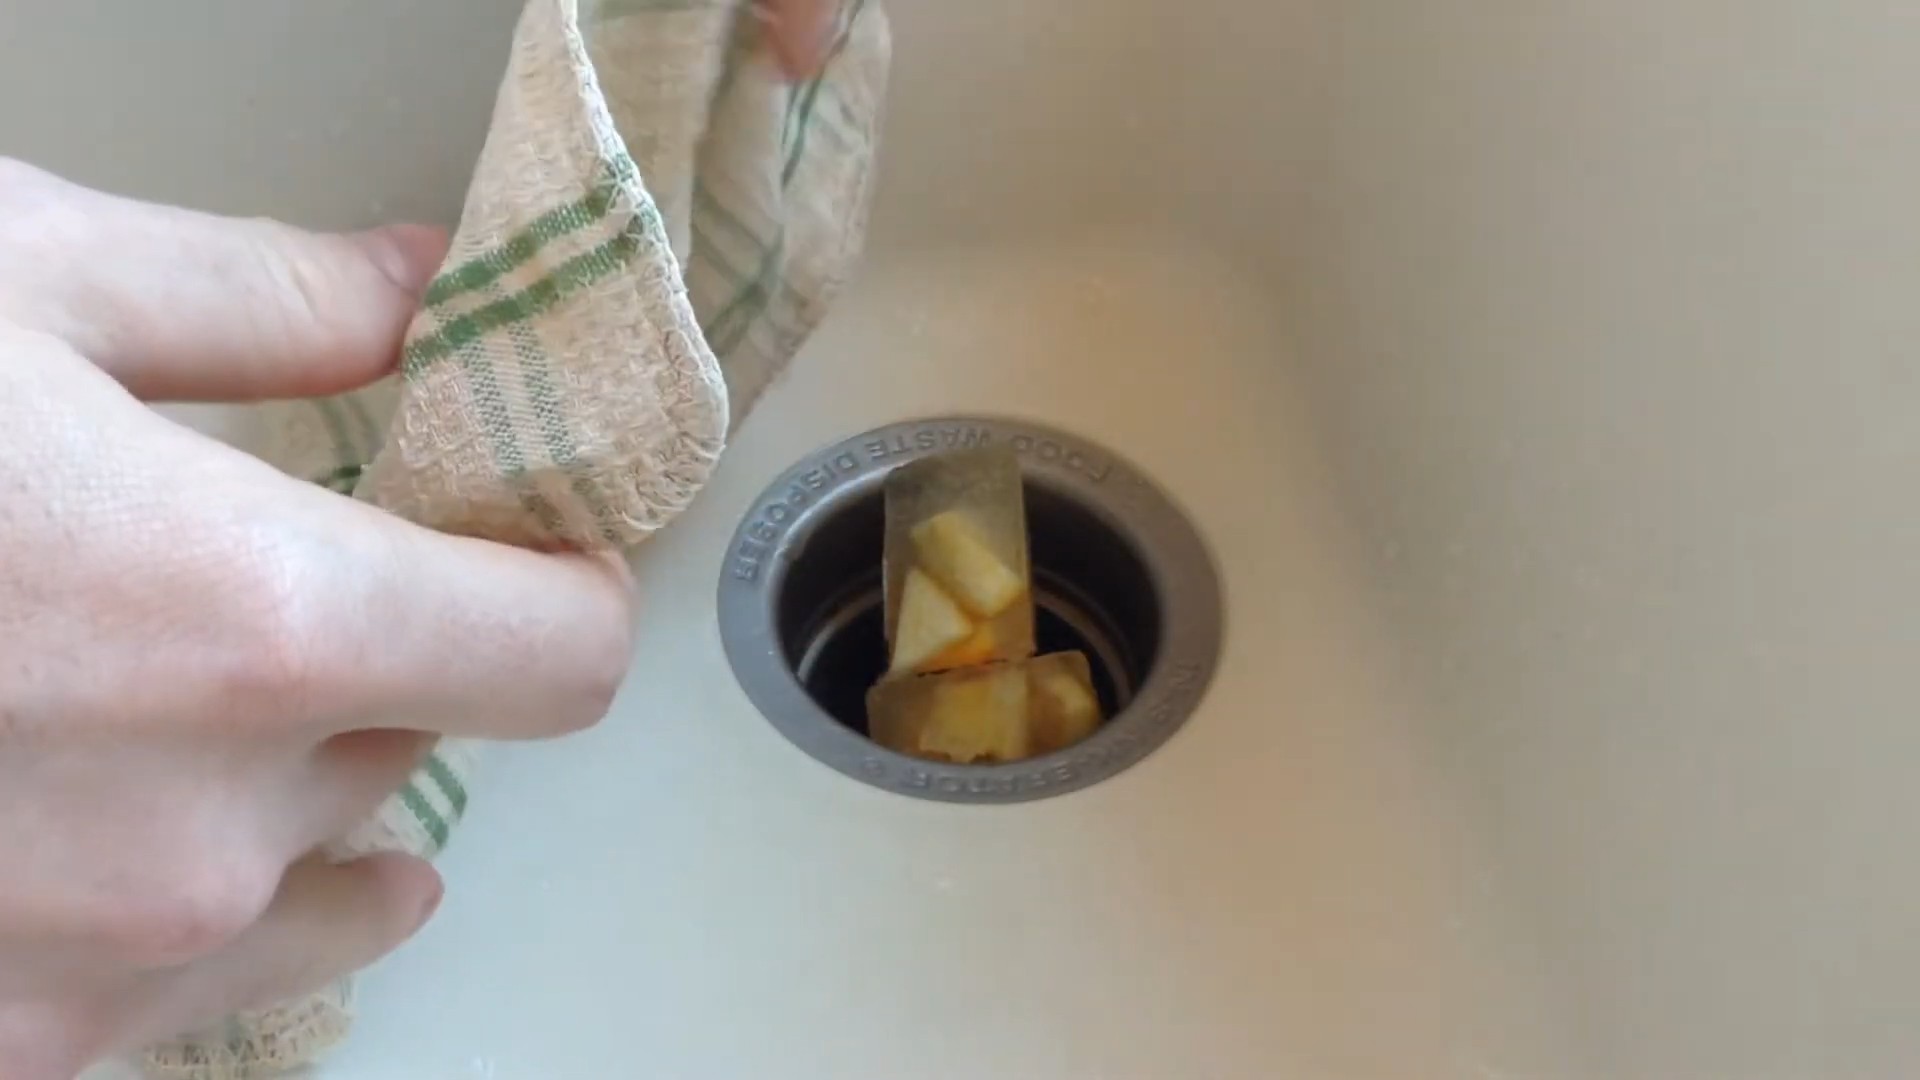
4. Ice and Salt Scrub (Optional, but Effective): This step is great for dislodging stubborn grime and sharpening the blades (although, technically, garbage disposals don’t have blades, they have impellers).
* Fill the disposal with ice cubes.
* Add about 1/2 cup of rock salt (or regular table salt if you don’t have rock salt).
* Turn on the cold water and run the disposal for about 30 seconds to a minute. The ice and salt will act as an abrasive, scrubbing the inside of the disposal.
5. Dish Soap Scrub: Now it’s time for a little manual scrubbing.
* Squirt a generous amount of dish soap into the disposal.
* Use your scrub brush (or old toothbrush) to scrub the inside of the disposal, paying attention to the rubber splash guard and any visible areas.
* Turn on the cold water and run the disposal for a few seconds to rinse away the soap.
6. Lemon or Lime Refresh: This is my favorite part! Not only does it help to deodorize the disposal, but it also leaves your kitchen smelling amazing.
* Cut a lemon or lime into wedges.
* Turn on the cold water to a slow, steady stream.
* Drop the lemon or lime wedges into the disposal, one at a time, while it’s running. The citrus oils will help to freshen the disposal and leave a pleasant scent. You can even freeze the lemon or lime wedges into ice cubes for an extra burst of freshness.
7. Final Rinse: Give the disposal one last good rinse with cold water, running it for about a minute to ensure all the debris and cleaning solutions are flushed away.
Maintaining a Fresh Disposal: Tips and Tricks
Now that your garbage disposal is sparkling clean, let’s talk about how to keep it that way! Regular maintenance is key to preventing odors and keeping your disposal functioning properly.
* Run Cold Water: Always run cold water when using the disposal. Hot water can cause grease to solidify and clog the drain.
* Avoid Certain Foods: There are certain foods that you should never put down the garbage disposal, including:
* Grease and oil (as mentioned above)
* Coffee grounds (they can clump together and clog the drain)
* Pasta and rice (they expand when wet and can cause blockages)
* Eggshells (the membrane can wrap around the impeller)
* Bones (they’re too hard for the disposal to grind)
* Fibrous vegetables like celery and corn husks (they can get tangled in the impeller)
* Regular Cleaning: Aim to clean your garbage disposal at least once a month, or more often if you notice any odors. The baking soda and vinegar method is a quick and easy way to keep it fresh.
* Use a Disposal Cleaner: There are also commercially available garbage disposal cleaners that you can use. Just be sure to follow the instructions on the label.
* Flush Regularly: Even if you’re not using the disposal to grind food, run cold water down the drain for a few seconds every day to keep the drain clear.
* Consider Enzyme Treatments: Enzyme-based drain cleaners can help break down organic matter and prevent clogs. These are a great option for regular maintenance.
Troubleshooting Common Problems
Even with regular cleaning and maintenance, you might encounter some problems with your garbage disposal. Here are a few common issues and how to troubleshoot them:
* Garbage Disposal is Humming But Not Grinding: This usually means something is stuck in the impeller. Turn off the disposal and use tongs or pliers to remove the obstruction. There’s often a reset button on the bottom of the unit. Press it after removing the obstruction.
* Garbage Disposal is Leaking: Check the connections to the sink and drainpipe. If the leak persists, you may need to replace the disposal.
* Garbage Disposal is Clogged: Try using a plunger to clear the clog. You can also try pouring a mixture of baking soda and vinegar down the drain, followed by boiling water. If that doesn’t work, you may need to call a plumber.
* Garbage Disposal Smells Bad: This is usually caused by food debris buildup. Follow the cleaning steps outlined above to eliminate the odor.
Extra Tips for a Sparkling Clean Sink
While you’re cleaning your garbage disposal, why not give your entire sink a refresh? Here are a few extra tips:
* Clean the Sink Basin: Use a non-abrasive cleaner to scrub the sink basin. For stainless steel sinks, you can use baking soda and water to remove water spots and stains.
* Clean the Faucet: Use a soft cloth and mild soap to clean the faucet. For hard water stains, you can use a mixture of vinegar and water.
* Clean the Drain Stopper: Remove the drain stopper and clean it with soap and water. You can also soak it in a mixture of vinegar and water to remove any buildup.
* Shine the Sink: For stainless steel sinks, you can use a stainless steel cleaner to give it a brilliant shine.
Conclusion
So there you have it! A comprehensive guide to cleaning your garbage disposal and keeping it fresh and functional. It might seem like a chore, but trust me, a clean garbage disposal is a happy garbage disposal (and a happy kitchen!). By following these simple steps and tips, you can say goodbye to stinky sink odors and hello to a cleaner, healthier kitchen. Happy cleaning!
Conclusion
So, there you have it! This simple, yet incredibly effective, garbage disposal cleaning DIY method is a game-changer for any homeowner. No more lingering odors, no more mysterious gurgling sounds, and no more worrying about what’s lurking down there. We’ve walked you through a straightforward process using ingredients you likely already have in your kitchen – ice, vinegar, baking soda, and lemon or orange peels. It’s a cost-effective, eco-friendly alternative to harsh chemical cleaners that can damage your pipes and the environment.
Why is this a must-try? Because a clean garbage disposal isn’t just about eliminating unpleasant smells; it’s about maintaining a healthy and hygienic kitchen. Food particles trapped in your disposal can become breeding grounds for bacteria, attracting pests and potentially contaminating your food preparation surfaces. This DIY method tackles these issues head-on, leaving your disposal fresh, clean, and functioning optimally.
But the beauty of this method lies in its adaptability. Feel free to experiment with variations to suit your preferences and needs. For instance, if you’re dealing with particularly stubborn odors, consider adding a few drops of essential oils like tea tree or eucalyptus to the ice cubes for an extra boost of freshness and antibacterial power. You can also use lime peels instead of lemon or orange peels for a slightly different citrus scent. If you don’t have vinegar on hand, you can substitute it with a solution of borax and water. Just be sure to rinse thoroughly afterward.
Another variation involves using a specialized garbage disposal cleaning brush to scrub the inside of the disposal after the ice and vinegar treatment. This can help dislodge any remaining debris and ensure a more thorough cleaning. Remember to always unplug the disposal before inserting any objects or tools.
Beyond the basic cleaning, consider preventative measures to keep your garbage disposal in top shape. Avoid putting large quantities of food scraps down the drain at once. Cut food into smaller pieces before disposing of them. Never pour grease or oil down the disposal, as it can solidify and clog the pipes. And run cold water while the disposal is running to help flush away food particles.
We are confident that this garbage disposal cleaning DIY will become a regular part of your kitchen cleaning routine. It’s quick, easy, and delivers impressive results. Don’t just take our word for it, though. Give it a try and see for yourself the difference a clean garbage disposal can make.
We encourage you to try this DIY trick and share your experience with us! Let us know in the comments below how it worked for you, what variations you tried, and any tips or tricks you discovered along the way. Your feedback is invaluable and helps us refine and improve our methods. Together, we can create a community of clean and happy kitchens! Share your before and after photos on social media using #GarbageDisposalDIY and tag us so we can see your sparkling clean disposals! We can’t wait to hear from you!
Frequently Asked Questions (FAQ)
What are the benefits of regularly cleaning my garbage disposal?
Regularly cleaning your garbage disposal offers a multitude of benefits. Firstly, it eliminates unpleasant odors that can permeate your kitchen, creating a more pleasant and inviting environment. Secondly, it prevents the buildup of food particles that can attract pests like fruit flies and cockroaches. Thirdly, it reduces the risk of bacterial growth, which can contaminate your food preparation surfaces. Fourthly, it helps maintain the optimal functioning of your garbage disposal, preventing clogs and extending its lifespan. Finally, it’s a cost-effective alternative to expensive repairs or replacements. A clean garbage disposal is a happy garbage disposal, and a happy garbage disposal contributes to a healthier and more hygienic kitchen.
How often should I clean my garbage disposal using this DIY method?
The frequency of cleaning depends on how often you use your garbage disposal. As a general guideline, we recommend cleaning it at least once a month. However, if you use your disposal frequently or notice any unpleasant odors, you may want to clean it more often, perhaps every two weeks. Pay attention to the signs – if you hear unusual noises, smell lingering odors, or notice slow drainage, it’s time for a cleaning. Regular maintenance will prevent problems from escalating and keep your disposal running smoothly.
Can I use hot water instead of cold water during the cleaning process?
No, it’s crucial to use cold water during the cleaning process, especially when using ice. Hot water can melt the ice too quickly, reducing its effectiveness in scrubbing the disposal blades and dislodging food particles. Cold water helps the ice remain solid for longer, providing a more abrasive cleaning action. Additionally, hot water can cause grease and fats to melt and solidify further down the drain, potentially leading to clogs. Always use cold water when operating your garbage disposal, both during cleaning and regular use.
Is it safe to use bleach to clean my garbage disposal?
While bleach is a powerful disinfectant, we strongly advise against using it to clean your garbage disposal. Bleach can corrode the metal components of your disposal, shortening its lifespan. It can also react with other chemicals in your plumbing system, creating harmful fumes. Furthermore, bleach is not an environmentally friendly option, as it can contaminate waterways. Our DIY method using vinegar, baking soda, and citrus peels is a safer, more effective, and more sustainable alternative.
What if I don’t have vinegar or baking soda? Are there any substitutes?
If you don’t have vinegar on hand, you can substitute it with a solution of borax and water. Mix about a quarter cup of borax with a cup of water and pour it down the disposal. Let it sit for about 30 minutes, then flush with cold water. If you don’t have baking soda, you can try using salt instead. Pour about half a cup of salt down the disposal, followed by cold water. The salt will act as an abrasive, helping to scrub away food particles. However, vinegar and baking soda are generally more effective and readily available.
My garbage disposal is making a loud grinding noise. Will this DIY cleaning method help?
A loud grinding noise can indicate several issues, including a foreign object lodged in the disposal, worn-out blades, or a motor problem. This DIY cleaning method may help if the noise is caused by food particles or debris stuck in the blades. The ice and vinegar can help dislodge these particles and quiet the noise. However, if the noise persists after cleaning, it’s best to consult a qualified plumber or appliance repair technician. They can diagnose the problem accurately and recommend the appropriate solution. Never attempt to repair a garbage disposal yourself unless you have the necessary expertise and tools.
Can I put coffee grounds down my garbage disposal?
While some people put coffee grounds down their garbage disposal without issue, it’s generally not recommended. Coffee grounds can accumulate in the pipes and form a sludge that can lead to clogs over time. It’s better to dispose of coffee grounds in the trash or compost them instead. If you do choose to put coffee grounds down the disposal, do so sparingly and flush with plenty of cold water.
How do I prevent future clogs in my garbage disposal?
Preventing clogs is key to maintaining a healthy garbage disposal. Avoid putting large quantities of food scraps down the drain at once. Cut food into smaller pieces before disposing of them. Never pour grease or oil down the disposal, as it can solidify and clog the pipes. Avoid putting fibrous foods like celery stalks, corn husks, and artichoke leaves down the disposal, as they can wrap around the blades and cause jams. Run cold water while the disposal is running to help flush away food particles. And regularly clean your garbage disposal using this DIY method to prevent the buildup of debris. By following these simple tips, you can keep your garbage disposal running smoothly for years to come.


Leave a Comment