

Clean Sterling Silver Jewelry is easier than you think! Are your favorite silver pieces looking a little dull? Don’t resign them to the back of your jewelry box just yet. I’m here to share some incredibly simple, yet effective, DIY tricks that will restore their shine and have them looking brand new again. You won’t believe how easy it is to bring back that radiant luster!
Silver jewelry has been cherished for centuries, dating back to ancient civilizations. From ornate necklaces adorning pharaohs to delicate rings worn by royalty, silver has always held a special place in our hearts and cultures. But, unlike gold, sterling silver is prone to tarnishing, a natural process that can leave it looking lackluster.
Let’s face it, professional jewelry cleaning can be expensive and time-consuming. That’s where these DIY hacks come in! I’m going to show you how to clean sterling silver jewelry using common household items you probably already have. No harsh chemicals, no expensive trips to the jeweler – just simple, effective methods that will have your silver sparkling in no time. Ready to learn the secrets? Let’s get started!
DIY Jewelry Cleaning: Revive Your Sterling Silver Sparkle!
Hey there, fellow jewelry lovers! Is your favorite sterling silver necklace looking a little dull? Don’t worry, you don’t need to rush to a professional cleaner. I’m going to show you a super easy and effective way to clean your sterling silver jewelry right at home, using things you probably already have in your kitchen! This method is gentle, affordable, and will have your pieces sparkling like new in no time.
What You’ll Need: The Supply List
Before we dive in, let’s gather our supplies. This is a pretty simple process, so you won’t need much!
* Baking Soda: This is our gentle abrasive that will help lift tarnish.
* Aluminum Foil: This is key to the chemical reaction that removes tarnish.
* Boiling Water: The hot water helps speed up the cleaning process.
* Salt: Another ingredient that aids in the cleaning reaction.
* A Glass or Ceramic Bowl: Avoid using metal bowls, as they can interfere with the cleaning process.
* Soft Cloth or Polishing Cloth: For drying and buffing your jewelry.
* Tongs or a Fork: To safely remove your jewelry from the hot water.
* Dish Soap (Optional): For pre-cleaning heavily soiled items.
The Science Behind the Sparkle: How it Works
Okay, so here’s the cool part. This method uses a chemical reaction called ion exchange to remove the tarnish (silver sulfide) from your jewelry. The aluminum foil attracts the sulfur, pulling it away from the silver and restoring its shine. The baking soda and salt act as electrolytes, helping to facilitate this process. It’s like magic, but it’s actually science!
Step-by-Step Cleaning Guide
Alright, let’s get down to business! Follow these steps carefully, and you’ll be amazed at the results.
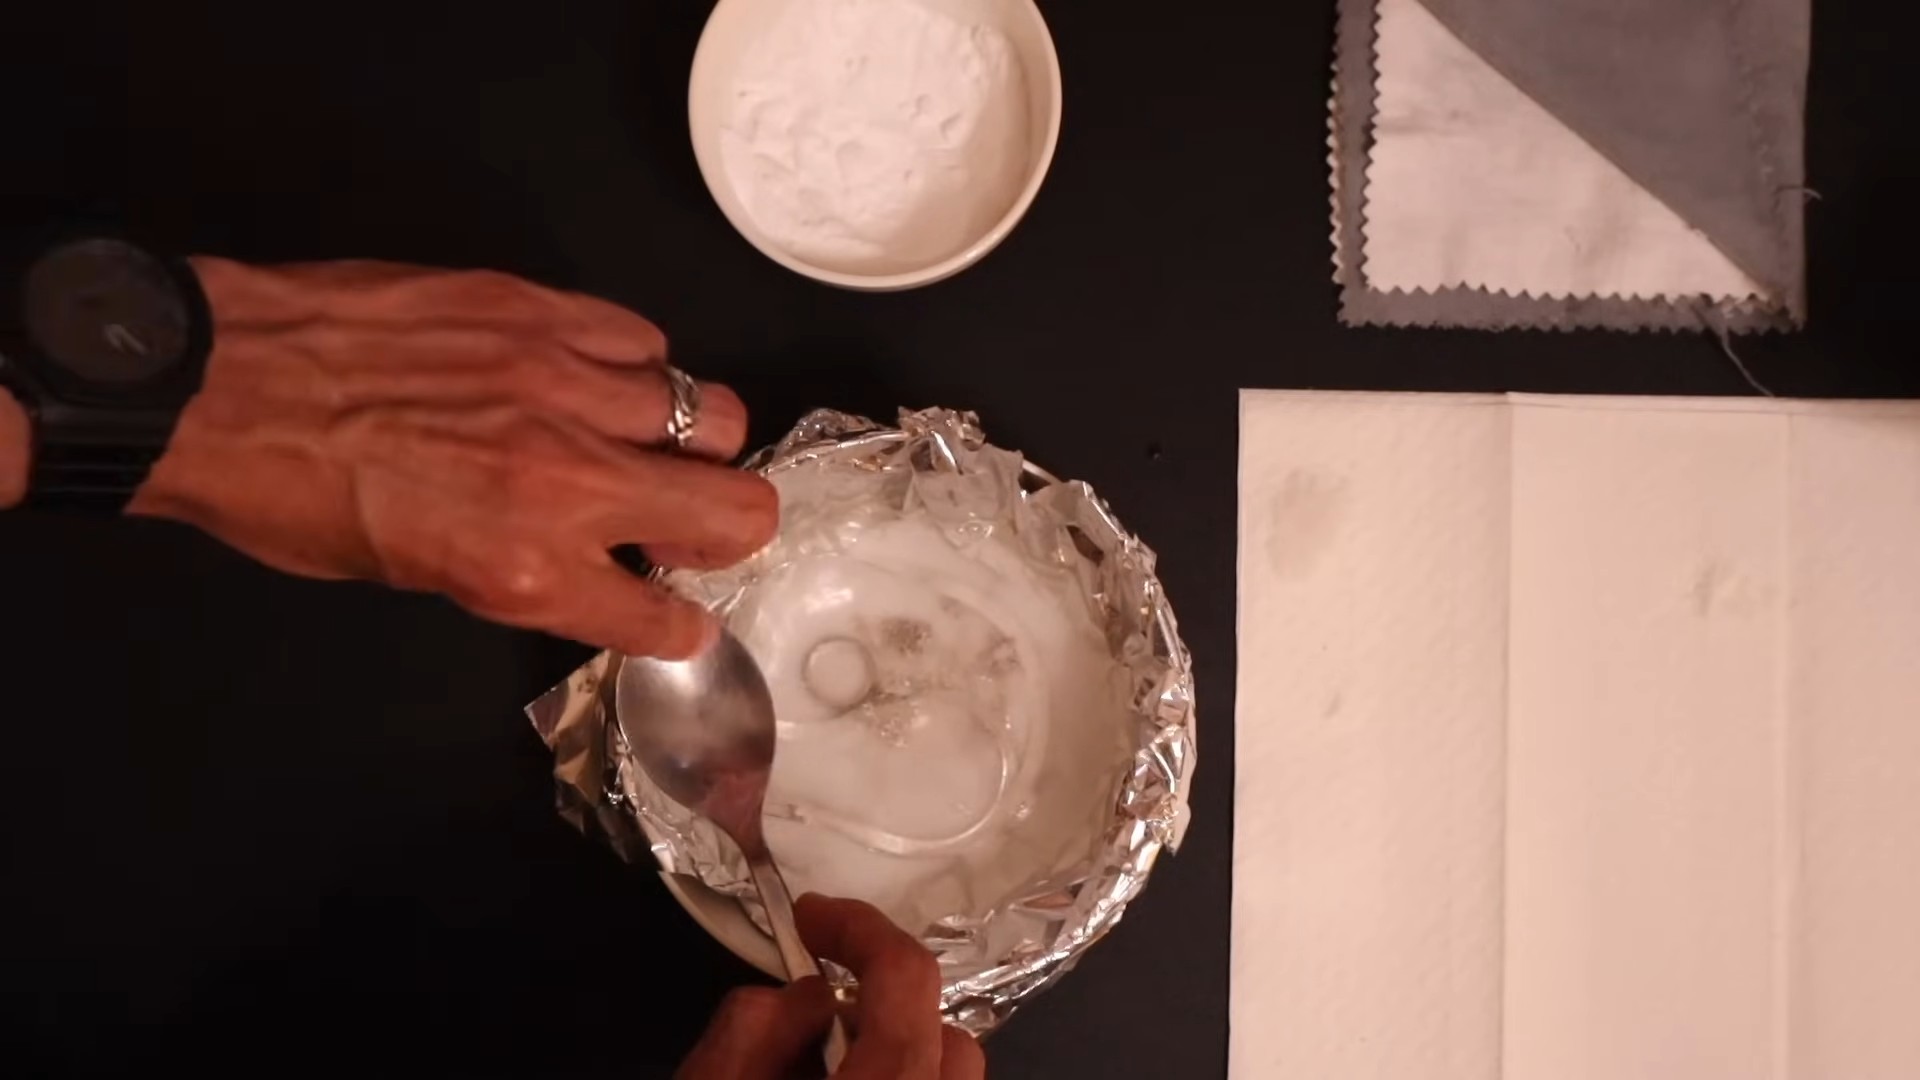
1. Prepare the Bowl: Line your glass or ceramic bowl completely with aluminum foil. Make sure the shiny side is facing up, as this is the side that will be in contact with the jewelry and the solution. The foil needs to cover the entire inside surface of the bowl to ensure proper contact.
2. Add the Cleaning Agents: Pour about 1 cup of boiling water into the foil-lined bowl. Be careful not to burn yourself! Then, add 1 tablespoon of baking soda and 1 tablespoon of salt to the hot water. You’ll see it fizz a bit – that’s normal!
3. Optional Pre-Cleaning (For Heavily Tarnished Items): If your jewelry is particularly dirty or has a lot of buildup, you might want to give it a quick pre-clean with some mild dish soap and warm water. Gently scrub the jewelry with a soft brush or cloth to remove any surface grime. Rinse thoroughly before moving on to the next step. This will help the tarnish removal process be more effective.
4. Submerge the Jewelry: Carefully place your sterling silver jewelry into the bowl, making sure each piece is touching the aluminum foil. This is crucial for the chemical reaction to work. If you have a lot of jewelry, you might need to do this in batches to ensure everything is in contact with the foil. Avoid overcrowding the bowl.
5. Let it Soak: Let the jewelry soak in the solution for 5-10 minutes. The amount of time needed will depend on the severity of the tarnish. You should start to see the tarnish disappearing and transferring to the aluminum foil. For heavily tarnished pieces, you might need to let them soak for a bit longer, up to 15 minutes. Keep an eye on it and check periodically.
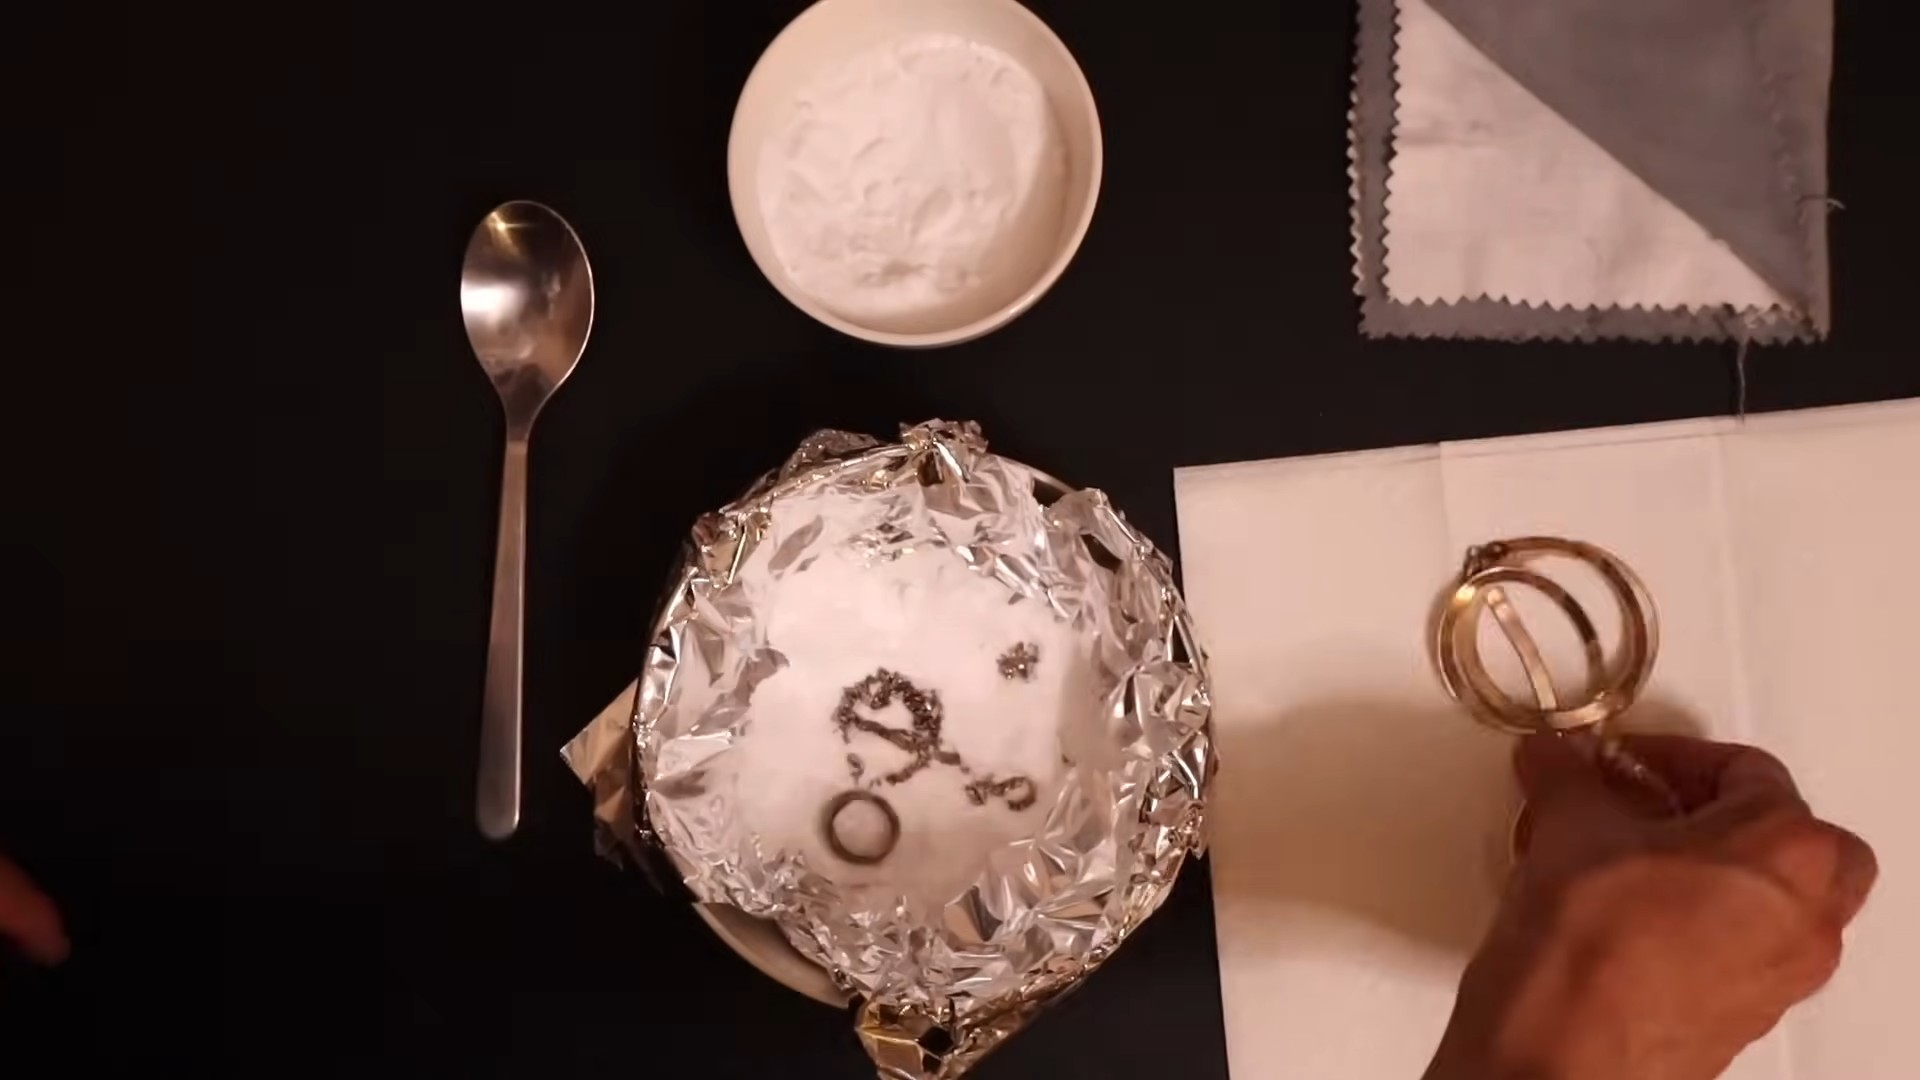
6. Remove and Rinse: Using tongs or a fork, carefully remove the jewelry from the bowl. Be careful, as the jewelry will be hot! Rinse each piece thoroughly under cool running water to remove any remaining residue from the baking soda and salt solution.
7. Dry and Buff: Gently dry each piece of jewelry with a soft cloth or polishing cloth. Buff the jewelry to restore its shine and remove any water spots. A polishing cloth specifically designed for silver will give you the best results.
8. Repeat if Necessary: If your jewelry is still tarnished after the first soak, you can repeat the process. Sometimes, heavily tarnished pieces require a second treatment. Just make sure to use fresh aluminum foil and a new batch of the baking soda and salt solution.
Dealing with Stubborn Tarnish: Troubleshooting Tips
Sometimes, you might encounter pieces with stubborn tarnish that just won’t budge. Here are a few tips to help you tackle those tricky spots:
* Make a Paste: For localized tarnish, you can make a paste of baking soda and water. Apply the paste directly to the tarnished area and gently rub it with a soft cloth. Rinse thoroughly.
* Use a Soft Brush: For intricate designs or hard-to-reach areas, use a soft-bristled brush (like an old toothbrush) to gently scrub away the tarnish.
* Increase the Concentration: If the tarnish is particularly stubborn, you can try increasing the concentration of baking soda and salt in the solution. Just be careful not to overdo it, as too much baking soda can be abrasive.
* Consider a Commercial Silver Polish: If all else fails, you can resort to a commercial silver polish. However, be sure to choose a gentle polish that is specifically designed for sterling silver. Always follow the manufacturer’s instructions carefully.
Important Considerations and Precautions
While this method is generally safe for sterling silver jewelry, there are a few things to keep in mind:
* Avoid Gemstones and Pearls: This method is not recommended for jewelry with gemstones, pearls, or other delicate materials. The hot water and baking soda can damage these materials. For these types of jewelry, it’s best to use a specialized jewelry cleaner or consult a professional.
* Don’t Use on Oxidized Silver: Oxidized silver has been intentionally darkened to create a specific look. This cleaning method can remove the oxidation, so avoid using it on pieces that are meant to have a darkened finish.
* Test on a Small Area First: If you’re unsure about using this method on a particular piece of jewelry, test it on a small, inconspicuous area first to make sure it doesn’t cause any damage.
* Handle Hot Water with Care: Be extremely careful when handling boiling water to avoid burns.
* Proper Ventilation: Ensure you are working in a well-ventilated area.
Maintaining Your Sparkle: Preventing Future Tarnish
Now that your jewelry is sparkling clean, let’s talk about how to keep it that way! Here are a few tips to prevent future tarnish:
* Store Your Jewelry Properly: Store your sterling silver jewelry in airtight containers or zip-lock bags to prevent exposure to air and moisture, which can accelerate tarnishing. You can also add a small anti-tarnish strip to the container to absorb any sulfur in the air.
* Avoid Exposure to Chemicals: Remove your jewelry before showering, swimming, or using household cleaners. Chemicals like chlorine, perfumes, and lotions can damage the silver and cause it to tarnish more quickly.
* Wear Your Jewelry Regularly: Surprisingly, wearing your jewelry can actually help prevent tarnish! The friction from wearing it helps to polish the silver and keep it shiny.
* Regular Cleaning: Give your jewelry a quick cleaning with a soft cloth after each wear to remove any oils or dirt that may have accumulated.
Alternative Cleaning Methods (When You’re in a Pinch!)
While the baking soda and aluminum foil method is my go-to, here are a couple of other quick and easy cleaning methods you can try if you’re in a pinch:
* Toothpaste: Apply a small amount of non-gel toothpaste to a soft cloth and gently rub it onto the tarnished area. Rinse thoroughly and dry with a clean cloth. Be sure to use a non-gel toothpaste, as gel toothpaste can be too abrasive.
* Lemon Juice: Soak your jewelry in lemon juice for a few minutes, then rinse and dry. The citric acid in lemon juice can help to remove mild tarnish.
Conclusion: Enjoy Your Sparkling Jewelry!
And there you have it! A simple, effective, and affordable way to clean your sterling silver jewelry at home. With a little bit of effort, you can keep your favorite pieces looking their best for years to come. Now go forth and enjoy your sparkling jewelry! I hope this guide was helpful. Happy cleaning!
Conclusion
So, there you have it! A simple, effective, and surprisingly affordable way to bring back the sparkle to your beloved sterling silver jewelry. Forget those harsh chemicals and expensive jewelry cleaning services. This DIY method, using ingredients you likely already have in your pantry, is a game-changer. It’s not just about saving money; it’s about taking control of how you care for your precious pieces and knowing exactly what’s touching them.
Why is this DIY trick a must-try? Because it works! The combination of baking soda, salt, and hot water creates a chemical reaction that gently lifts tarnish without scratching or damaging your silver. It’s a gentle yet powerful cleaning solution that restores the luster and shine you thought was long gone. Plus, it’s incredibly satisfying to watch the tarnish disappear before your eyes.
But the best part? This method is incredibly versatile. While we’ve outlined the basic recipe, feel free to experiment with variations to suit your needs. For heavily tarnished pieces, you might want to add a squeeze of lemon juice to the solution for an extra boost of cleaning power. Just be sure to rinse thoroughly afterward. Another variation involves using aluminum foil instead of a baking dish. Simply line a bowl with foil, shiny side up, and proceed with the recipe as described. The aluminum foil acts as a sacrificial metal, attracting the tarnish away from your silver.
For delicate pieces with intricate details, consider using a soft-bristled toothbrush to gently scrub away any stubborn tarnish after soaking. Be careful not to apply too much pressure, and always test the toothbrush on an inconspicuous area first. Remember, patience is key. Some pieces may require a longer soaking time than others, depending on the level of tarnish.
And if you’re looking to prevent tarnish from forming in the first place, store your sterling silver jewelry in airtight bags or containers when you’re not wearing it. You can also add anti-tarnish strips to your jewelry box to absorb moisture and prevent oxidation. Regular cleaning, even with just a soft cloth, can also help keep your silver looking its best.
We’re confident that this DIY method for cleaning sterling silver jewelry will become your go-to solution. It’s easy, effective, and environmentally friendly. So, ditch the expensive cleaners and give it a try! We’re eager to hear about your experiences. Share your before-and-after photos and tips in the comments below. Let’s build a community of sparkling silver enthusiasts! Don’t forget to tell us if you tried any variations and how they worked for you. Your feedback will help others discover the best way to care for their precious silver pieces. Happy cleaning!
Frequently Asked Questions (FAQ)
Q: What kind of baking soda and salt should I use?
A: You can use regular baking soda (sodium bicarbonate) and table salt (sodium chloride) that you typically find in your kitchen. There’s no need to buy anything fancy or specialized. Just make sure they are clean and free of any contaminants. Avoid using iodized salt if possible, as some believe it can leave a residue. Sea salt or kosher salt are excellent alternatives.
Q: Can I use this method on all types of silver jewelry?
A: This method is generally safe for most sterling silver jewelry. However, it’s not recommended for pieces that contain gemstones, pearls, or other delicate materials. The hot water and chemical reaction could potentially damage these materials. Also, avoid using this method on antique silver pieces, as it may remove the patina that gives them their unique character. If you’re unsure, it’s always best to consult a professional jeweler.
Q: How long should I soak my jewelry in the solution?
A: The soaking time will vary depending on the level of tarnish. For lightly tarnished pieces, 5-10 minutes may be sufficient. For heavily tarnished pieces, you may need to soak them for up to 30 minutes, or even longer. Check the jewelry periodically to see if the tarnish is lifting. If it’s not, you can gently scrub it with a soft-bristled toothbrush.
Q: The tarnish isn’t coming off completely. What should I do?
A: If the tarnish is stubborn, try these tips:
* Increase the concentration of baking soda and salt. Add a little more of each to the solution.
* Use hotter water. Make sure the water is hot, but not boiling.
* Soak for a longer period. Leave the jewelry in the solution for a longer time, checking periodically.
* Use a soft-bristled toothbrush. Gently scrub the tarnished areas with a soft-bristled toothbrush after soaking.
* Repeat the process. If necessary, repeat the entire process with a fresh batch of solution.
Q: Will this method scratch my silver jewelry?
A: This method is generally gentle and should not scratch your silver jewelry. However, it’s important to use a soft cloth or toothbrush and avoid applying too much pressure. Also, make sure there are no abrasive particles in the baking soda or salt.
Q: Can I use this method on silver-plated jewelry?
A: While this method can sometimes work on silver-plated jewelry, it’s important to be very careful. The silver plating is often very thin and can be easily damaged. If you choose to try this method on silver-plated jewelry, soak it for a very short time (a few minutes at most) and check it frequently. If you notice any signs of damage, remove it immediately.
Q: How often should I clean my sterling silver jewelry?
A: The frequency of cleaning will depend on how often you wear your jewelry and how it’s stored. If you wear your jewelry frequently, you may need to clean it every few weeks. If you store it in airtight bags or containers, you may only need to clean it a few times a year. Regular cleaning with a soft cloth can also help prevent tarnish from forming.
Q: What is tarnish and why does it form on silver?
A: Tarnish is a layer of corrosion that forms on the surface of silver when it reacts with sulfur-containing compounds in the air. These compounds can come from various sources, such as pollution, humidity, and even certain foods. The tarnish appears as a dark, dull coating that can make your silver jewelry look old and dirty.
Q: How can I prevent tarnish from forming on my silver jewelry?
A: Here are some tips for preventing tarnish:
* Store your jewelry in airtight bags or containers. This will help protect it from exposure to air and moisture.
* Add anti-tarnish strips to your jewelry box. These strips absorb moisture and prevent oxidation.
* Avoid wearing your jewelry in the shower or while swimming. Water and chlorine can accelerate the tarnishing process.
* Wipe your jewelry with a soft cloth after each wearing. This will remove any oils or dirt that can contribute to tarnish.
* Apply a thin layer of silver polish to your jewelry. This will create a protective barrier against tarnish.
Q: Is it safe to use aluminum foil with this method?
A: Yes, using aluminum foil is a common and effective variation of this method. The aluminum foil acts as a sacrificial metal, attracting the tarnish away from your silver. Make sure the shiny side of the foil is facing up, as this is the side that will react with the tarnish.
Q: Can I use this method to clean other metals besides sterling silver?
A: This method is specifically designed for cleaning sterling silver. It’s not recommended for other metals, as it may damage them. Always research the best cleaning methods for each type of metal before attempting to clean it.
Q: What should I do if I accidentally damage my jewelry while cleaning it?
A: If you accidentally damage your jewelry while cleaning it, it’s best to consult a professional jeweler. They can assess the damage and recommend the best course of action for repair. Don’t attempt to repair the jewelry yourself, as you could potentially make the damage worse.
Q: Where can I find more information about cleaning sterling silver jewelry?
A: There are many resources available online and in libraries that provide information about cleaning sterling silver jewelry. You can also consult a professional jeweler for advice and recommendations. Always do your research before attempting any cleaning method, and be sure to test it on an inconspicuous area first.

Leave a Comment