

Deep Clean Fridge Tips: Is your refrigerator starting to resemble a science experiment gone wrong? Don’t worry, you’re not alone! We’ve all been there – staring into the abyss of forgotten leftovers and questionable condiments. But fear not, because I’m about to share some amazing DIY tricks that will transform your fridge from a biohazard zone into a sparkling sanctuary for your food.
For generations, keeping food fresh has been a cornerstone of healthy living. While our ancestors didn’t have the luxury of refrigerators, they employed ingenious methods like root cellars and salting to preserve their harvests. Today, we rely on our trusty fridges, but they require a little TLC to function optimally. A clean fridge isn’t just about aesthetics; it’s about preventing foodborne illnesses, extending the life of your groceries, and saving money in the long run.
Let’s face it, nobody enjoys cleaning the fridge. It’s often a task we put off until it becomes absolutely necessary. But with these simple and effective deep clean fridge tips, I’ll show you how to make the process quick, easy, and even a little bit enjoyable! Get ready to say goodbye to sticky shelves, mysterious odors, and hello to a fresh, organized fridge that you’ll be proud to open.

Deep Clean Your Fridge Like a Pro: A DIY Guide
Okay, let’s face it, cleaning the fridge is nobody’s favorite chore. But a sparkling clean fridge isn’t just about aesthetics; it’s about food safety, preventing funky smells, and making your groceries last longer. I’m going to walk you through my tried-and-true method for a deep clean that will leave your fridge looking and smelling brand new. Get ready to roll up your sleeves!
What You’ll Need: Your Cleaning Arsenal
Before we dive in, let’s gather our supplies. Having everything on hand will make the process much smoother. Here’s what I recommend:
* Empty Containers or Cooler: Somewhere to temporarily store your food. A cooler with ice packs is ideal for perishables.
* Cleaning Cloths or Microfiber Towels: You’ll need several – some for washing, some for drying.
* Warm Water: The base of our cleaning solution.
* Baking Soda: A natural deodorizer and gentle abrasive cleaner.
* White Vinegar: Another natural cleaner and disinfectant.
* Dish Soap: For tackling stubborn spills and grime.
* Spray Bottle: For easy application of your cleaning solutions.
* Old Toothbrush: Perfect for getting into those hard-to-reach corners and crevices.
* Sponge: For general cleaning.
* Trash Bags: For disposing of expired food and packaging.
* Optional: Essential Oils (Lemon, Tea Tree): For a fresh, clean scent (use sparingly!).
* Optional: Refrigerator Deodorizer: Baking soda works great, but you can also use commercial options.
Step-by-Step Fridge Deep Cleaning Guide
Now that we’re armed and ready, let’s get started!
1. Unplug the Fridge: This is crucial for safety. Unplugging the fridge prevents any accidental shocks while you’re working with water and cleaning solutions. Plus, it allows the fridge to warm up slightly, making it easier to remove stuck-on food.
2. Empty the Fridge Completely: Take everything out – every jar, every container, every vegetable. This is the most important step. As you remove items, check expiration dates and toss anything that’s past its prime. Be honest with yourself – that questionable yogurt from two weeks ago? It’s gotta go! Place the remaining food in your cooler or empty containers. Group similar items together to make it easier to put everything back later.
3. Remove Shelves, Drawers, and Bins: Most refrigerator shelves and drawers are removable. Take them out and place them in your sink or bathtub. This will allow you to clean them thoroughly and give you better access to the interior of the fridge.
4. Prepare Your Cleaning Solutions: I like to use a combination of natural cleaners. Here are my go-to recipes:
* Baking Soda Paste: Mix baking soda with a small amount of water to form a paste. This is great for scrubbing away stubborn stains.
* Vinegar Solution: Mix equal parts white vinegar and warm water in a spray bottle. This is a fantastic all-purpose cleaner and disinfectant.
* Dish Soap Solution: Add a few drops of dish soap to a bowl of warm water. This is perfect for greasy spills.
5. Wash Shelves, Drawers, and Bins:
* Soak: If your shelves and drawers are particularly dirty, let them soak in warm, soapy water for a few minutes to loosen the grime.
* Scrub: Use a sponge or cleaning cloth to scrub the shelves, drawers, and bins. For tough stains, apply the baking soda paste and let it sit for a few minutes before scrubbing.
* Rinse: Rinse thoroughly with clean water to remove all traces of soap and cleaning solutions.
* Dry: Dry completely with a clean towel before putting them back in the fridge.
6. Clean the Interior of the Fridge:
* Spray: Spray the interior walls, ceiling, and floor of the fridge with the vinegar solution.
* Wipe: Wipe down all surfaces with a clean cloth or sponge. Pay special attention to any spills or stains.
* Scrub: For stubborn stains, use the baking soda paste and an old toothbrush to scrub them away.
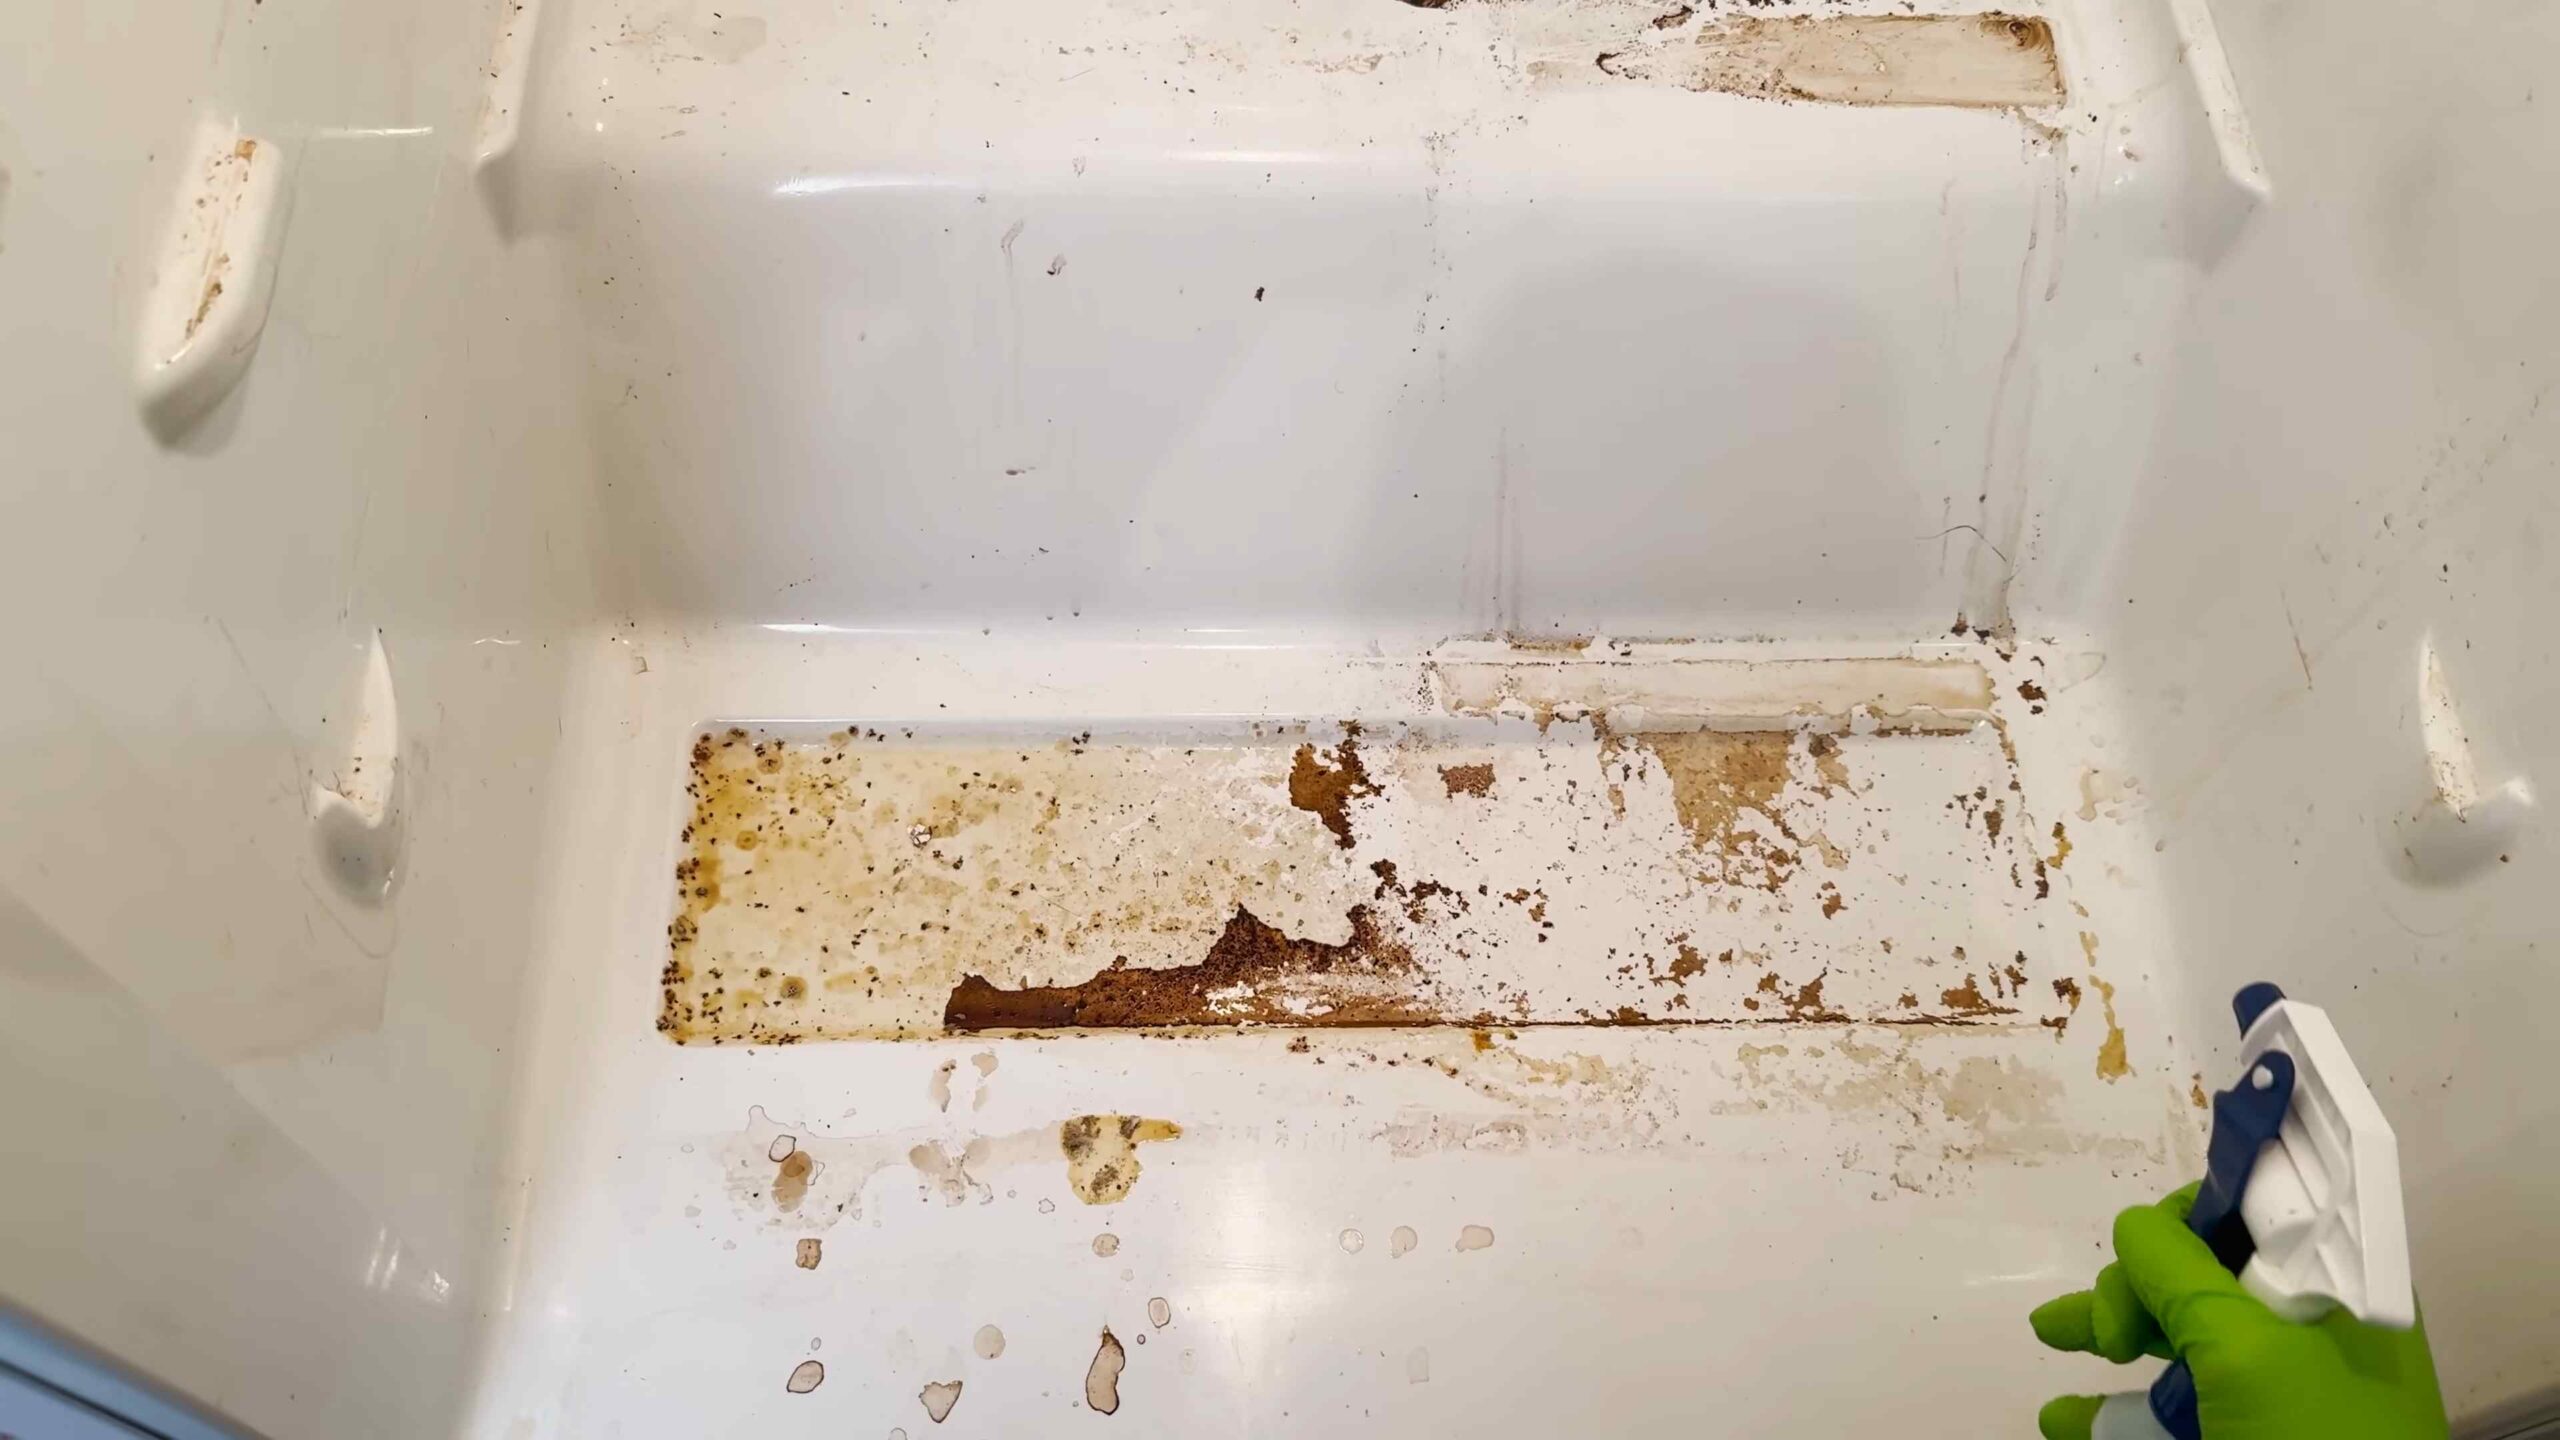
* Clean the Door: Don’t forget the refrigerator door! Wipe down the shelves, compartments, and seals with the vinegar solution. Use the toothbrush to clean the seals thoroughly, as they can often harbor mold and mildew.
* Rinse (If Necessary): If you used a lot of baking soda paste, you may need to rinse the interior of the fridge with a damp cloth.
* Dry: Dry all surfaces with a clean towel.
7. Clean the Exterior of the Fridge:
* Wipe Down: Wipe down the exterior of the fridge with a damp cloth and a mild cleaning solution.
* Polish: For stainless steel refrigerators, use a stainless steel cleaner to polish the surface and remove fingerprints.
8. Address the Drip Tray (If Applicable): Many refrigerators have a drip tray located at the bottom. Remove the drip tray and empty any water that has accumulated. Clean the tray with warm, soapy water and dry it thoroughly before replacing it.
9. Deodorize the Fridge:
* Baking Soda: Place an open box of baking soda in the fridge to absorb odors. Replace it every few months.
* Activated Charcoal: Activated charcoal is another excellent odor absorber. Place a small container of activated charcoal in the fridge.
* Coffee Grounds: Place a small bowl of dry, unused coffee grounds in the fridge to absorb odors.
* Essential Oils (Optional): Add a few drops of lemon or tea tree essential oil to a cotton ball and place it in the fridge for a fresh, clean scent. Be careful not to use too much, as the scent can be overpowering.
10. Reassemble the Fridge: Once everything is clean and dry, put the shelves, drawers, and bins back in their places.
11. Restock the Fridge: Now comes the fun part – putting everything back in! As you restock, consider these tips:
* Organize: Group similar items together. For example, keep all your condiments in one area, your dairy products in another, and your vegetables in the crisper drawers.
* FIFO (First In, First Out): Place older items in the front and newer items in the back. This will help you use up older food before it expires.
* Proper Storage: Store food in airtight containers to prevent spoilage and odors.
* Temperature Zones: Be aware of the different temperature zones in your fridge. The top shelves are generally warmer than the bottom shelves. Store items that need to be kept very cold (like raw meat and fish) on the bottom shelves.
12. Plug the Fridge Back In: Once everything is back in place, plug the fridge back in. Allow it to cool down completely before adding any more food.
Maintaining Your Clean Fridge: Prevention is Key
Okay, you’ve done the hard work of deep cleaning your fridge. Now, let’s talk about how to keep it clean and fresh for longer. Here are a few tips:
* Wipe Up Spills Immediately: Don’t let spills sit and harden. Wipe them up as soon as they happen to prevent stains and odors.
* Check Expiration Dates Regularly: Make it a habit to check expiration dates at least once a week. Toss out anything that’s past its prime.
* Clean Out Leftovers Regularly: Don’t let leftovers linger in the fridge for too long. If you haven’t eaten them within a few days, toss them out.
* Use Shelf Liners: Shelf liners can help protect your shelves from spills and make cleaning easier.
* Ventilate: Make sure your fridge isn’t overcrowded. Proper ventilation helps to keep food fresh and prevent odors.
* Regular Quick Cleans: Do a quick clean of your fridge every week or two. This involves wiping down shelves, removing any expired food, and cleaning up any spills. This will prevent the need for frequent deep cleans.
Troubleshooting Common Fridge Cleaning Issues
Even with the best intentions, you might encounter some challenges during your fridge cleaning adventure. Here are a few common issues and how to address them:
* Stubborn Stains: If you’re struggling to remove a stubborn stain, try making a paste of baking soda and water and letting it sit on the stain for a few minutes before scrubbing. You can also try using a commercial stain remover specifically designed for refrigerators.
* Lingering Odors: If your fridge still smells funky after cleaning, try placing a bowl of activated charcoal or coffee grounds inside. You can also
Conclusion
So, there you have it! Mastering the art of a deep clean fridge is not just about aesthetics; it’s about food safety, extending the life of your refrigerator, and ultimately, saving you money. By implementing these simple yet effective DIY tricks, you’re taking a proactive step towards a healthier and more organized kitchen.
Think about it: no more mystery smells lurking in the back, no more forgotten leftovers turning into science experiments, and no more struggling to find that jar of pickles you swore you had. A sparkling clean fridge is a happy fridge, and a happy fridge leads to a happy you!
This isn’t just a one-size-fits-all solution, either. Feel free to adapt these techniques to suit your specific needs and preferences. For instance, if you’re sensitive to strong smells, try using a diluted vinegar solution instead of lemon juice. Or, if you have particularly stubborn stains, create a paste of baking soda and water and let it sit on the affected area for a few minutes before scrubbing.
Variations to consider:
* Essential Oil Infusion: Add a few drops of your favorite essential oil (lemon, grapefruit, or tea tree are great choices) to your cleaning solution for an extra boost of freshness and antibacterial properties.
* Activated Charcoal Power: Place an open container of activated charcoal in your fridge to absorb odors. Replace it every month or two.
* Shelf Liner Customization: Cut out custom-fit shelf liners from washable materials like silicone or plastic to make future cleanups even easier.
* Produce Drawer Power-Up: Line your produce drawers with paper towels to absorb excess moisture and keep your fruits and vegetables fresher for longer.
We understand that tackling a deep clean can seem daunting, but trust us, the results are well worth the effort. The satisfaction of opening your fridge to a pristine and organized space is truly unparalleled. Plus, you’ll be amazed at how much easier it is to meal plan and reduce food waste when you can actually see what you have!
Don’t just take our word for it, though. We encourage you to try these DIY deep clean fridge tips for yourself and experience the difference firsthand. And most importantly, we want to hear about your experiences! Share your before-and-after photos, your favorite cleaning hacks, and any variations you’ve discovered in the comments below. Let’s create a community of fridge-cleaning enthusiasts and inspire each other to maintain healthy and organized kitchens.
So, grab your cleaning supplies, put on some music, and get ready to transform your fridge into a sparkling oasis. You’ll be amazed at the results! Happy cleaning!
Frequently Asked Questions (FAQs)
Q: How often should I deep clean my fridge?
A: Ideally, you should aim for a deep clean of your fridge every 3-6 months. However, this can vary depending on your usage and how often spills occur. If you notice persistent odors, excessive condensation, or frequent spills, it’s a good idea to clean it more often. Regular spot cleaning of spills and wiping down shelves can help extend the time between deep cleans.
Q: What’s the best way to remove stubborn stains from my fridge shelves?
A: For stubborn stains, a paste of baking soda and water is your best friend. Apply the paste to the stain, let it sit for 15-20 minutes, and then scrub gently with a non-abrasive sponge or cloth. For particularly tough stains, you can add a few drops of white vinegar to the paste. Avoid using harsh chemicals or abrasive cleaners, as they can damage the fridge’s interior.
Q: How can I prevent food from spoiling so quickly in my fridge?
A: Proper food storage is key to preventing spoilage. Make sure your fridge is set to the correct temperature (between 37°F and 40°F or 3°C and 4°C). Store perishable items like milk, meat, and eggs on the coldest shelves, typically the top shelves. Use airtight containers to store leftovers and cut produce. Keep fruits and vegetables in their designated crisper drawers, and don’t overcrowd your fridge, as this can restrict airflow and lead to uneven cooling.
Q: What’s the best way to get rid of bad odors in my fridge?
A: There are several ways to combat fridge odors. First, identify and remove any spoiled food. Then, thoroughly clean the interior of your fridge with a solution of baking soda and water. Place an open box of baking soda in the fridge to absorb odors. You can also use activated charcoal or coffee grounds for the same purpose. Another trick is to place a cotton ball soaked in vanilla extract in the fridge for a few hours.
Q: Can I use bleach to clean my fridge?
A: While bleach is a powerful disinfectant, it’s generally not recommended for cleaning your fridge. Bleach can be harsh and can potentially damage the fridge’s interior. It can also leave behind a strong odor that can be absorbed by food. If you must use bleach, dilute it heavily with water (no more than 1 tablespoon of bleach per gallon of water) and rinse thoroughly with clean water afterward. However, safer and more natural alternatives like vinegar and baking soda are usually sufficient for cleaning and disinfecting your fridge.
Q: How do I clean the rubber seals around my fridge door?
A: The rubber seals around your fridge door can accumulate dirt and grime, which can affect their ability to create a tight seal. To clean them, use a soft cloth or sponge dampened with warm, soapy water. Gently scrub the seals to remove any dirt or debris. Rinse with clean water and dry thoroughly. You can also use a toothbrush to reach tight corners and crevices. Regularly cleaning the seals will help maintain their integrity and prevent air leaks.
Q: What should I do with the food while I’m cleaning my fridge?
A: Before you start cleaning, remove all the food from your fridge. Place perishable items in a cooler with ice packs to keep them cold while you’re working. This will prevent them from spoiling and ensure they stay at a safe temperature. Once you’ve finished cleaning, return the food to the fridge as quickly as possible.
Q: How can I make my fridge cleaning last longer?
A: To extend the cleanliness of your fridge, make it a habit to wipe up spills immediately. Regularly check for expired food and discard it promptly. Store food properly in airtight containers and designated drawers. Consider using shelf liners to protect the shelves from spills and make cleanup easier. And, of course, schedule regular spot cleaning to maintain a tidy and organized fridge.
Leave a Comment