

Bathroom cleaning hacks – who doesn’t need a few of those up their sleeve? Let’s be honest, the bathroom is probably the last place we *want* to spend our time cleaning, but it’s a space that demands our attention. From toothpaste splatters to lingering odors, keeping it sparkling can feel like a never-ending battle. But what if I told you that you could reclaim your weekends and achieve a gleaming bathroom with minimal effort?
For centuries, people have sought out clever ways to maintain hygiene and cleanliness in their homes. Think about the ancient Romans and their elaborate bathhouses! While we might not have access to heated pools and dedicated cleaning staff, we *do* have access to a wealth of knowledge and some seriously effective DIY solutions.
That’s where these bathroom cleaning hacks come in. I’m going to share some of my favorite tips and tricks that will transform your cleaning routine from a chore into a breeze. We’ll tackle everything from stubborn soap scum to grimy grout, using simple ingredients you probably already have in your pantry. So, ditch the harsh chemicals and get ready to discover the secrets to a sparkling clean bathroom – the easy way!
DIY Bathroom Cleaning Hacks: Sparkling Clean with Minimal Effort!
Okay, let’s face it, cleaning the bathroom is nobody’s favorite chore. But a sparkling clean bathroom? That’s something we can all appreciate! I’m going to share some of my favorite DIY bathroom cleaning hacks that will make the process easier, cheaper, and maybe even a little bit…fun? (Okay, maybe not fun, but definitely less dreadful!).
Hack #1: The Power of Vinegar and Baking Soda (Your All-Purpose Cleaning Duo!)
Vinegar and baking soda are like the dynamic duo of DIY cleaning. They’re cheap, effective, and readily available. This hack tackles everything from soap scum to hard water stains.
What you’ll need:
* White vinegar
* Baking soda
* Spray bottle
* Scrub brush or sponge
* Microfiber cloths
* Optional: Essential oils (for a pleasant scent)
Step-by-step instructions:
1. Prepare the Vinegar Solution: Pour white vinegar into a spray bottle. You can dilute it with water if you prefer a milder solution, but for tough stains, I recommend using it undiluted. If you want to add a little fragrance, add a few drops of your favorite essential oil (lemon, tea tree, or lavender work great!).
2. Tackle the Shower/Tub: Spray the vinegar solution liberally onto the shower walls, tub, and shower door. Let it sit for at least 30 minutes. For really stubborn soap scum, you can let it sit for an hour or even overnight. The longer it sits, the easier it will be to scrub away.
3. Baking Soda Power: While the vinegar is working its magic, sprinkle baking soda onto a damp sponge or scrub brush.
4. Scrub-a-dub-dub: After the vinegar has had time to soak, use the baking soda-covered sponge or brush to scrub the surfaces. The baking soda acts as a gentle abrasive, helping to lift away the loosened soap scum and grime. You’ll see a paste form as the baking soda reacts with the vinegar – that’s a good sign!
5. Rinse Thoroughly: Rinse everything thoroughly with clean water. Make sure to get rid of all the baking soda residue.
6. Dry and Shine: Use a clean microfiber cloth to dry the surfaces. This will prevent water spots and leave your shower and tub sparkling.
Hack #2: Cleaning Showerheads with Vinegar (Goodbye Mineral Buildup!)
Hard water can wreak havoc on showerheads, causing mineral buildup that reduces water pressure and makes your shower less enjoyable. This hack is super easy and effective.
What you’ll need:
* White vinegar
* Plastic bag (gallon-sized works best)
* Rubber band or twist tie
Step-by-step instructions:
1. Fill the Bag: Pour enough white vinegar into the plastic bag to completely submerge the showerhead.
2. Secure the Bag: Carefully position the bag over the showerhead, ensuring that the showerhead is fully immersed in the vinegar. Use a rubber band or twist tie to secure the bag tightly around the showerhead neck.
3. Soak Overnight: Let the showerhead soak in the vinegar overnight. This will give the vinegar plenty of time to dissolve the mineral deposits.
4. Remove and Rinse: In the morning, remove the bag and discard the vinegar. Rinse the showerhead thoroughly with clean water.
5. Wipe Clean: Use a clean cloth to wipe away any remaining residue.
6. Run the Shower: Run the shower for a few minutes to flush out any remaining vinegar and debris. You should notice a significant improvement in water pressure!
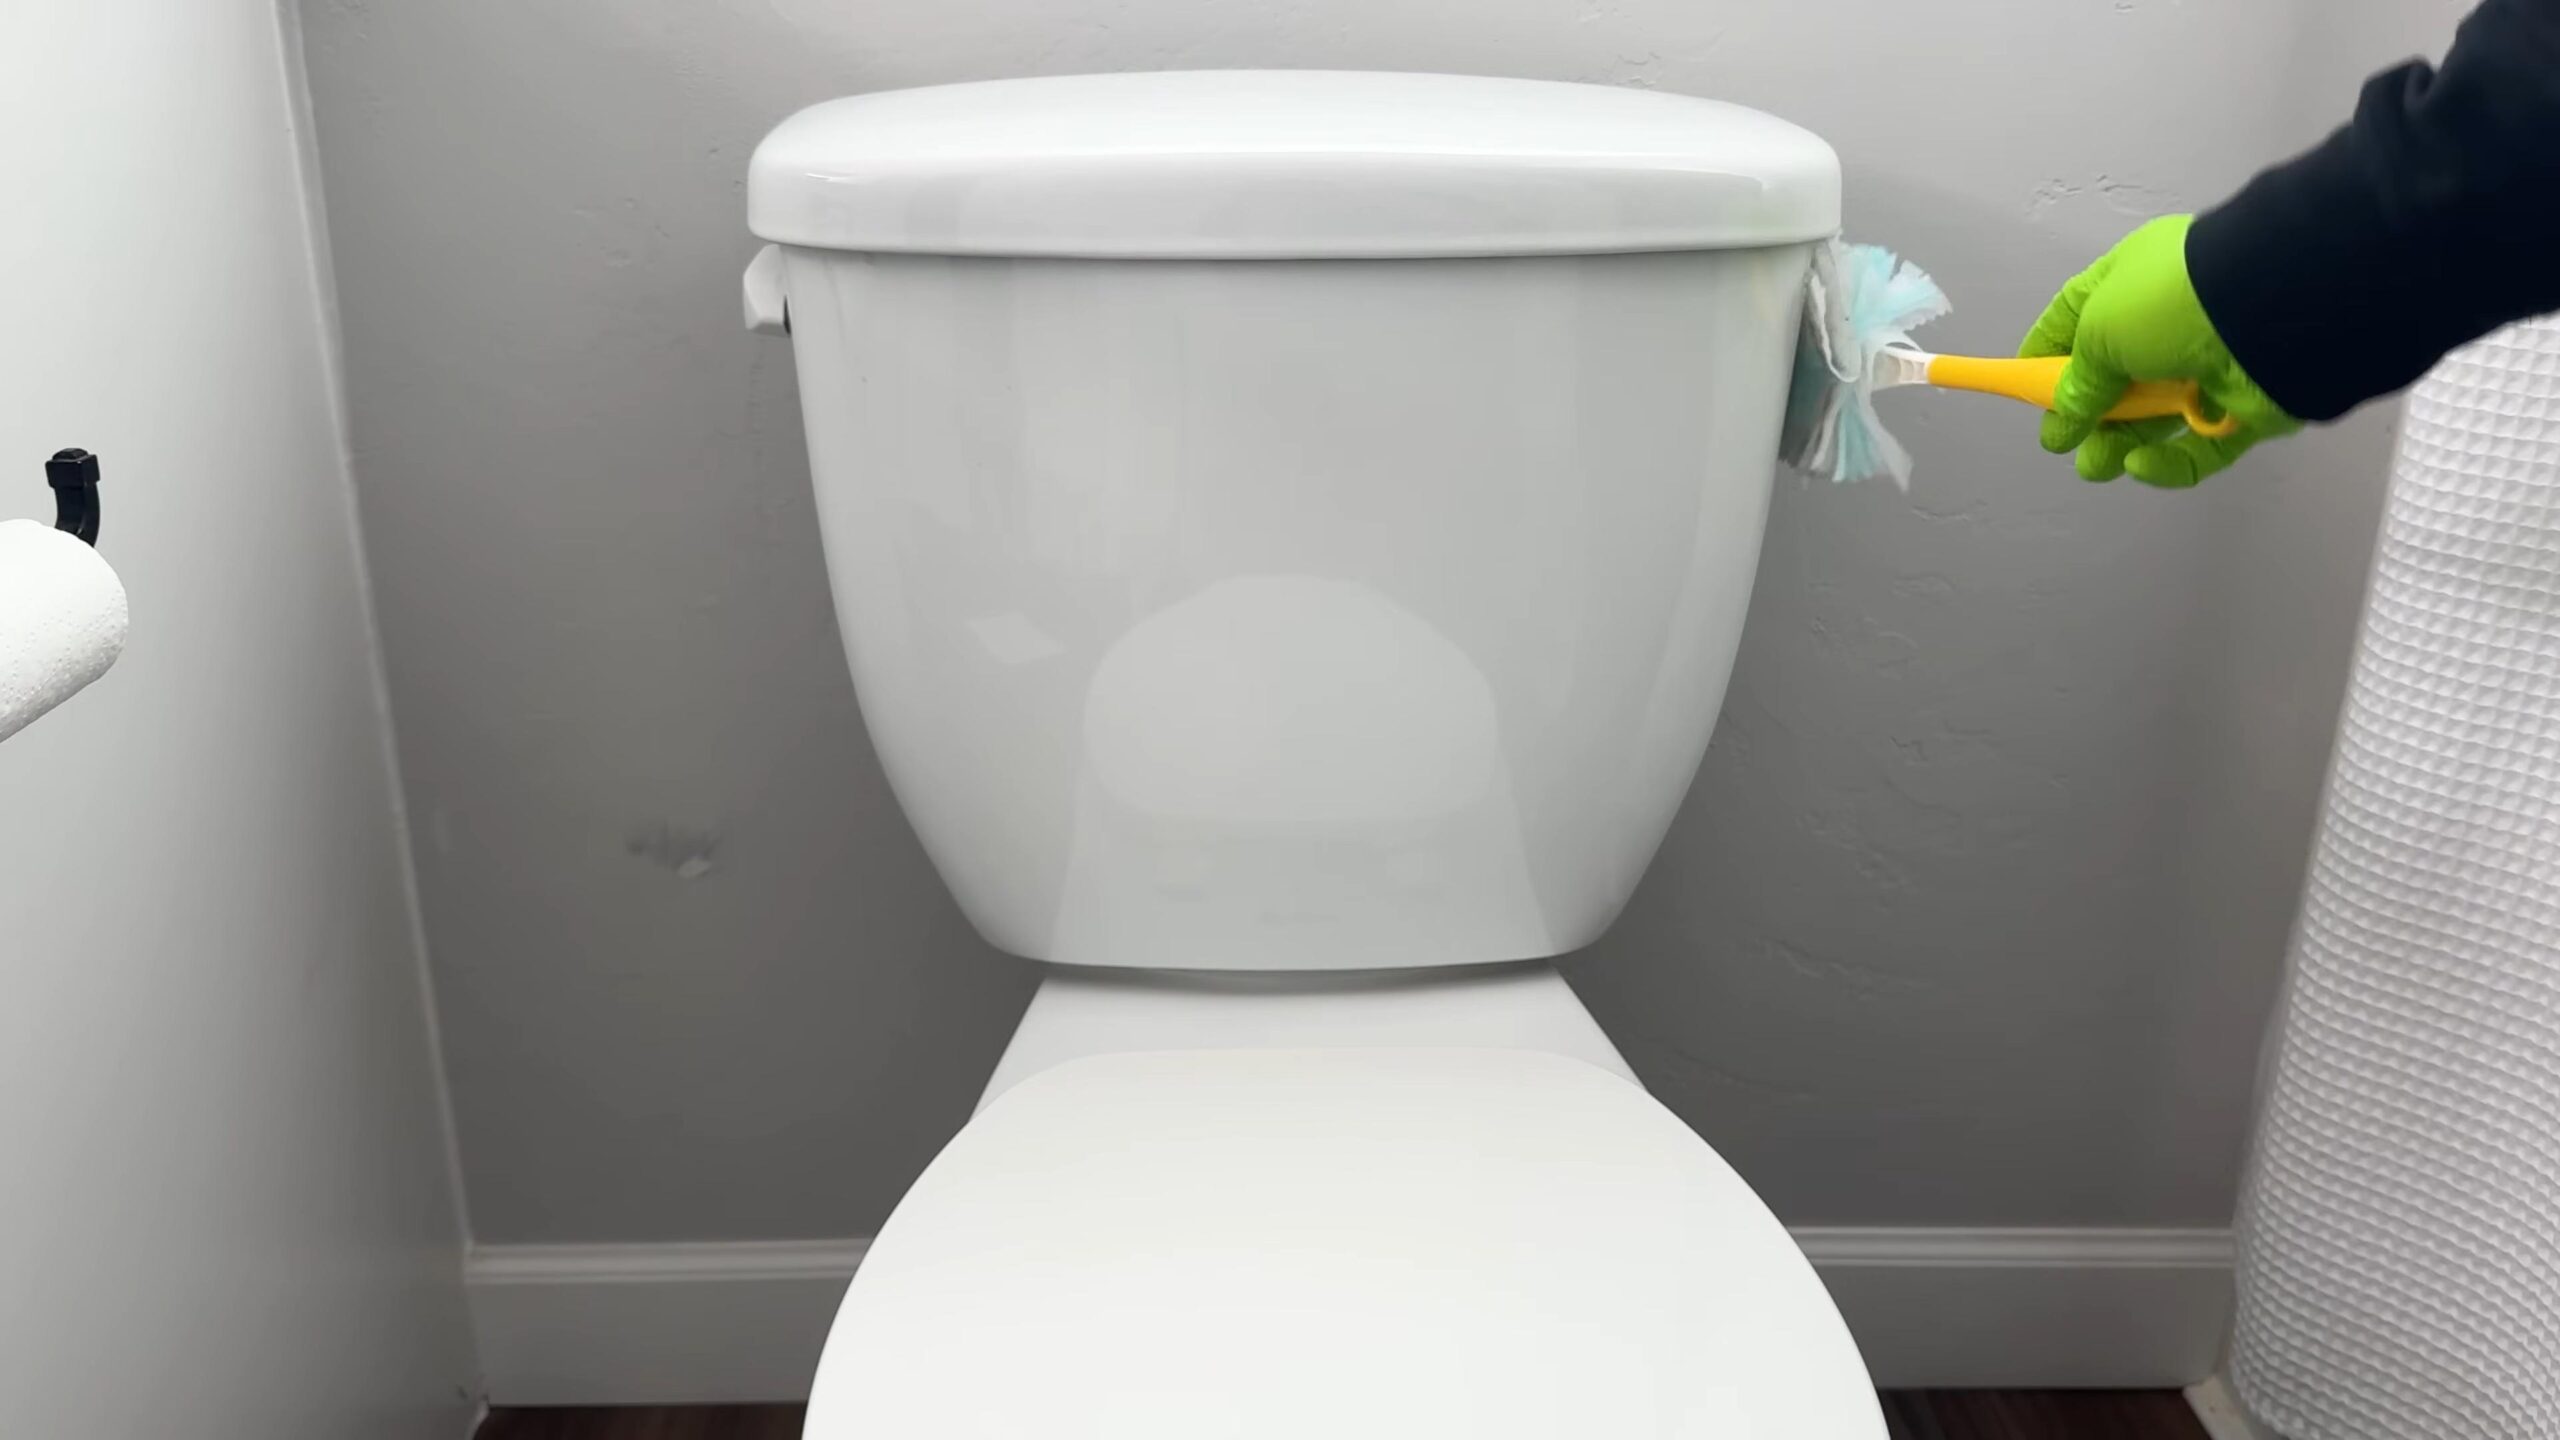
Hack #3: Toilet Bowl Cleaning with Fizzing Power (No Harsh Chemicals!)
Commercial toilet bowl cleaners can be harsh and full of chemicals. This DIY alternative is just as effective and much gentler on the environment.
What you’ll need:
* Baking soda
* White vinegar
* Toilet brush
Step-by-step instructions:
1. Sprinkle Baking Soda: Sprinkle about a cup of baking soda into the toilet bowl, making sure to coat the sides as well as the bottom.
2. Pour in Vinegar: Slowly pour about a cup of white vinegar into the toilet bowl. You’ll see it fizz and bubble as it reacts with the baking soda.
3. Let it Fizz: Let the mixture fizz for about 30 minutes. This will help to loosen any stains and grime.
4. Scrub-a-dub-dub (Again!): Use a toilet brush to scrub the inside of the toilet bowl thoroughly, paying attention to any stains or rings.
5. Flush: Flush the toilet to rinse away the baking soda and vinegar. Your toilet bowl should be sparkling clean!
Hack #4: Cleaning Grout with Baking Soda Paste (Banishing Grime!)
Grout can be a breeding ground for mold and mildew, and it can quickly become stained and discolored. This baking soda paste is a simple and effective way to clean grout.
What you’ll need:
* Baking soda
* Water
* Old toothbrush or grout brush
* Spray bottle (optional)
Step-by-step instructions:
1. Make the Paste: Mix baking soda with enough water to form a thick paste. The consistency should be similar to toothpaste.
2. Apply the Paste: Apply the baking soda paste to the grout lines, using an old toothbrush or grout brush to work it into the crevices.
3. Let it Sit: Let the paste sit for at least 15-20 minutes. For stubborn stains, you can let it sit for longer, even up to an hour.
4. Scrub-a-dub-dub (One More Time!): Use the toothbrush or grout brush to scrub the grout lines thoroughly. You’ll see the grime and stains start to lift away.
5. Rinse Thoroughly: Rinse the grout lines thoroughly with clean water. You can use a spray bottle to make rinsing easier.
6. Dry and Admire: Use a clean cloth to dry the grout lines. Your grout should look significantly cleaner and brighter!
Hack #5: Cleaning Mirrors and Glass with Vinegar (Streak-Free Shine!)
Forget expensive glass cleaners! Vinegar is all you need for streak-free mirrors and glass surfaces.
What you’ll need:
* White vinegar
* Water
* Spray bottle
* Microfiber cloth
Step-by-step instructions:
1. Prepare the Solution: Mix equal parts white vinegar and water in a spray bottle.
2. Spray the Surface: Spray the vinegar solution onto the mirror or glass surface.
3. Wipe Clean: Use a clean microfiber cloth to wipe the surface dry. Microfiber cloths are essential for streak-free results.
4. Admire Your Reflection: Enjoy your sparkling clean, streak-free mirror or glass!
Hack #6: Unclogging Drains with Baking Soda and Vinegar (A Natural Solution!)
Clogged drains are a common bathroom problem. This baking soda and vinegar solution is a natural and effective way to unclog drains without using harsh chemicals.
What you’ll need:
* Baking soda
* White vinegar
* Hot water
Step-by-step instructions:
1. Pour in Baking Soda: Pour about 1/2 cup of baking soda down the drain.
2. Add Vinegar: Pour about 1 cup of white vinegar down the drain after the baking soda.
3. Let it Fizz: Let the mixture fizz for about 30 minutes. Cover the drain with a plug or cloth to contain the fizzing action.
4. Flush with Hot Water: After 30 minutes, pour a pot of boiling water down the drain. This will help to flush away any remaining debris.
5. Repeat if Necessary: If the drain is still clogged, repeat the process. For really stubborn clogs, you may need to use a plunger after the baking soda and vinegar treatment.
Hack #7: Freshening Up Your Bathroom with Essential Oils (Aromatic Bliss!)
Once you’ve cleaned your bathroom, you can freshen it up with essential oils. There are several ways to do this.
What you’ll need:
* Essential oils (lavender, eucalyptus, tea tree, lemon, etc.)
* Diffuser (optional)
* Cotton balls (optional)
* Spray bottle (optional)
Step-by-step instructions:
1. Use a Diffuser: The easiest way to freshen up your bathroom is to use an essential oil diffuser. Simply add a few drops of your favorite essential oil to the diffuser and let it run for a few hours.
2. Create a DIY Air Freshener: You can also
Conclusion
So, there you have it! These simple yet incredibly effective DIY bathroom cleaning hacks are a game-changer for anyone looking to maintain a sparkling clean bathroom without resorting to harsh chemicals or spending a fortune on commercial cleaners. We’ve explored how everyday ingredients like vinegar, baking soda, and lemon can tackle everything from stubborn soap scum to grimy grout, leaving your bathroom fresh and inviting.
But why is this DIY approach a must-try? Firstly, it’s eco-friendly. By using natural ingredients, you’re reducing your environmental footprint and avoiding the release of harmful chemicals into your home and the water system. Secondly, it’s cost-effective. These ingredients are often already in your pantry or are significantly cheaper than specialized cleaning products. Thirdly, it’s customizable. You can adjust the recipes to suit your specific needs and preferences, adding essential oils for a pleasant scent or tweaking the ratios for tougher stains.
Don’t underestimate the power of these simple solutions. For instance, the vinegar and baking soda combination is a powerhouse for unclogging drains and dissolving mineral deposits. The lemon trick not only disinfects but also leaves a refreshing citrus aroma. And the homemade grout cleaner can restore your tiles to their original glory, making your entire bathroom look brand new.
Variations and Suggestions
Feel free to experiment with these hacks to find what works best for you. Here are a few suggestions:
* Essential Oil Boost: Add a few drops of your favorite essential oil, such as tea tree (for its antibacterial properties), lavender (for a calming scent), or eucalyptus (for a refreshing aroma), to your cleaning solutions.
* Vinegar Infusion: Infuse your vinegar with citrus peels (lemon, orange, grapefruit) for a more pleasant scent and added cleaning power. Simply soak the peels in vinegar for a few weeks before using.
* Baking Soda Paste: For particularly stubborn stains, create a thick paste of baking soda and water. Apply it to the affected area, let it sit for a while, and then scrub gently.
* DIY Toilet Bowl Cleaner: Drop a fizzing tablet made of baking soda and citric acid into your toilet bowl for a natural and effective cleaner.
We strongly encourage you to give these DIY bathroom cleaning hacks a try. You’ll be amazed at how effective they are and how much money and effort you can save. Plus, you’ll have the satisfaction of knowing that you’re cleaning your bathroom in a safe and environmentally responsible way.
Once you’ve tried these hacks, we’d love to hear about your experience! Share your results, tips, and variations in the comments below. Let’s build a community of DIY cleaning enthusiasts and help each other create sparkling clean and healthy homes. Your insights could be invaluable to others who are just starting their DIY cleaning journey. So, go ahead, transform your bathroom cleaning routine, and let us know how it goes! Remember, a clean bathroom is a happy bathroom, and with these hacks, achieving that is easier than ever.
Frequently Asked Questions (FAQ)
Q: Are these DIY bathroom cleaning hacks safe for all bathroom surfaces?
A: Generally, yes, these hacks are safe for most common bathroom surfaces like tile, porcelain, glass, and stainless steel. However, it’s always a good idea to test any cleaning solution in an inconspicuous area first, especially on more delicate surfaces like natural stone (marble, granite) or painted surfaces. Vinegar, in particular, can be acidic and may etch or dull certain materials if left on for too long. For natural stone, consider using gentler alternatives like baking soda paste or a mild soap solution. Always dilute vinegar with water, especially when cleaning sensitive surfaces.
Q: How often should I use these DIY cleaning methods?
A: The frequency depends on how often your bathroom is used and how quickly it gets dirty. For general cleaning, once a week is usually sufficient. For high-traffic bathrooms or areas prone to soap scum and mildew, you may need to clean more frequently, perhaps two or three times a week. For specific issues like drain clogs, address them as needed. Regular maintenance with these DIY methods can prevent buildup and make cleaning easier in the long run.
Q: Can I use these hacks to remove mold and mildew?
A: Yes, some of these hacks can be effective in removing mold and mildew, especially in the early stages. Vinegar is a natural disinfectant and can kill mold spores. Spray vinegar directly onto the affected area, let it sit for an hour, and then scrub with a brush. Baking soda can also be used to absorb moisture and prevent mold growth. For more severe mold infestations, you may need to use a stronger solution like hydrogen peroxide or bleach (use with caution and proper ventilation). Always address the underlying cause of the mold, such as poor ventilation or leaks, to prevent it from returning.
Q: What if I don’t have vinegar or baking soda? Are there other alternatives?
A: Yes, there are several alternatives you can use. Lemon juice is a great substitute for vinegar, as it also has acidic properties and a pleasant scent. Borax is another natural cleaning agent that can be used for disinfecting and removing stains. Washing soda (sodium carbonate) is stronger than baking soda and can be used for tougher cleaning tasks. For soap scum, you can try using a paste of cream of tartar and water. Remember to always test any new cleaning solution in an inconspicuous area first.
Q: How do I prevent soap scum buildup in the first place?
A: Preventing soap scum buildup is easier than removing it. Here are a few tips:
* Switch to liquid soap: Liquid soaps tend to create less soap scum than bar soaps.
* Wipe down surfaces after showering: Use a squeegee or a microfiber cloth to wipe down the shower walls and door after each use. This will remove excess water and soap residue before it has a chance to dry and harden.
* Improve ventilation: Ensure your bathroom is well-ventilated by opening a window or using the exhaust fan during and after showering. This will help reduce humidity and prevent mold and mildew growth.
* Use a water softener: Hard water contributes to soap scum buildup. Consider installing a water softener to reduce the mineral content of your water.
Q: Are these DIY bathroom cleaning hacks safe for septic systems?
A: Yes, these DIY hacks are generally safe for septic systems. Vinegar, baking soda, and lemon juice are all natural and biodegradable, so they won’t harm the beneficial bacteria in your septic tank. However, avoid using excessive amounts of any cleaning solution, as this could disrupt the balance of your septic system. If you have any concerns, consult with a septic system professional.
Q: How do I clean a showerhead with these DIY methods?
A: To clean a showerhead with vinegar, fill a plastic bag with white vinegar and secure it around the showerhead so that the showerhead is submerged in the vinegar. Let it soak for at least an hour, or preferably overnight. Remove the bag and run the shower to flush out any remaining vinegar and loosened mineral deposits. For stubborn clogs, you can use a toothbrush to scrub the showerhead nozzles. This method is effective for removing mineral buildup and restoring water flow.
Q: Can I use these hacks to clean a toilet?
A: Absolutely! Baking soda and vinegar are excellent for cleaning toilets. Pour a cup of baking soda into the toilet bowl, followed by two cups of vinegar. Let it fizz for about 30 minutes, then scrub with a toilet brush and flush. For a deeper clean, you can leave the mixture in the bowl overnight. This method helps to remove stains, deodorize, and unclog minor blockages. You can also use a lemon half to scrub the toilet bowl for a natural and refreshing clean.
Leave a Comment