

Growing Kale in Plastic Bottles: Sounds a little crazy, right? But trust me, it’s a game-changer for anyone who wants fresh, homegrown kale without a ton of space or a huge garden commitment! I’m so excited to share this super simple and effective DIY trick with you.
For centuries, humans have cultivated kale, tracing its origins back to wild cabbage varieties. From ancient Greece to medieval Europe, kale has been a staple, prized for its hardiness and nutritional value. Now, we’re taking this ancient veggie into the modern age with a clever, space-saving twist!
Let’s face it, not everyone has a sprawling backyard perfect for a traditional garden. Apartment dwellers, balcony gardeners, and even those with limited mobility can struggle to enjoy the joys of growing their own food. That’s where this DIY hack comes in! Growing kale in plastic bottles is not only incredibly easy and affordable, but it’s also a fantastic way to recycle and reduce waste. Imagine stepping onto your balcony and snipping fresh kale leaves for your morning smoothie or a delicious salad – all thanks to a repurposed plastic bottle! This method is perfect for beginners, and I’m here to guide you through every step of the process. Let’s get started and unlock the secrets to a thriving kale harvest, no matter where you live!
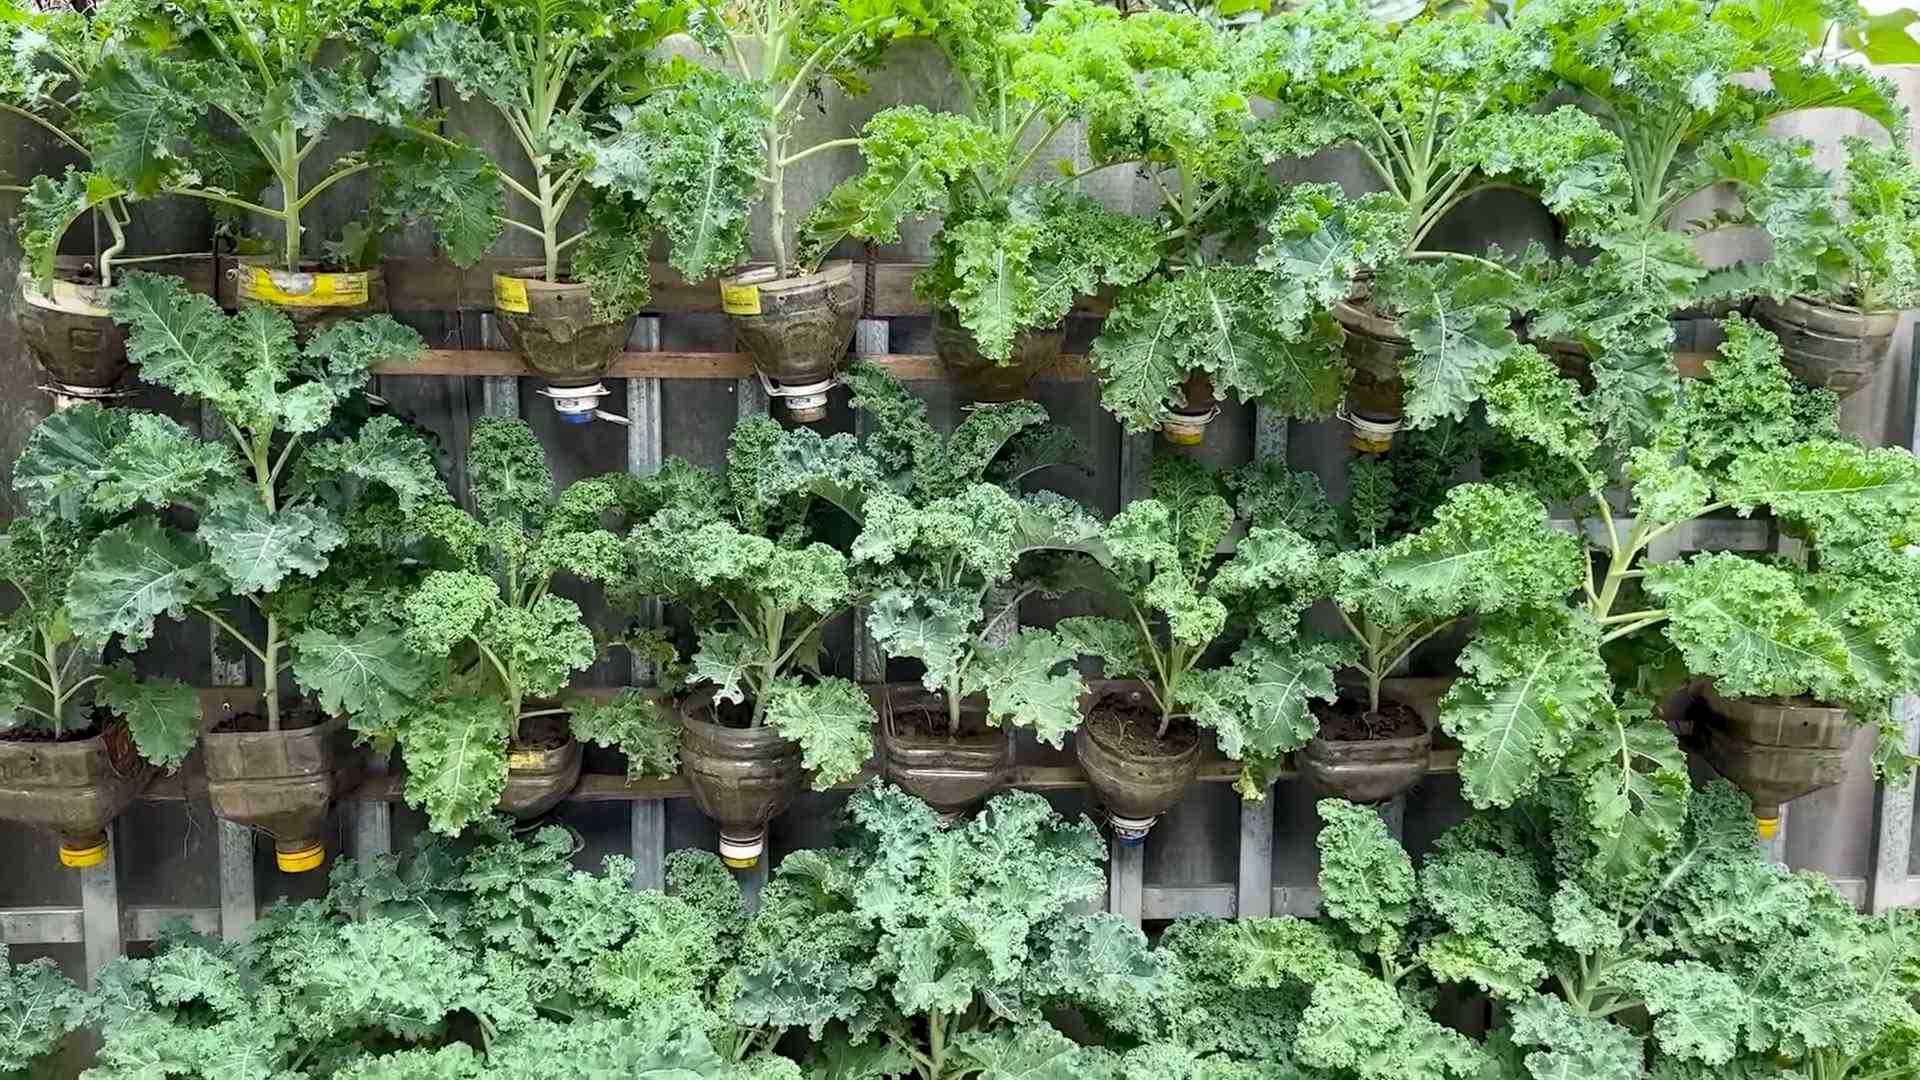
DIY Vertical Kale Garden: From Plastic Bottle to Bountiful Harvest
Hey there, fellow gardening enthusiasts! I’m super excited to share one of my favorite DIY projects with you: creating a vertical kale garden using recycled plastic bottles. Not only is this project incredibly budget-friendly and eco-conscious, but it’s also a fantastic way to grow fresh, nutritious kale even if you’re short on space. Trust me, there’s nothing quite like snipping off a few leaves of homegrown kale for your morning smoothie or a quick stir-fry. Let’s dive in!
What You’ll Need
Before we get started, let’s gather all the necessary materials. This will make the whole process smoother and more enjoyable.
* Plastic Bottles: You’ll need several plastic bottles (2-liter soda bottles or similar work great). The number depends on how tall you want your vertical garden to be. Make sure they’re clean and dry.
* Potting Soil: A good quality potting mix is essential for healthy kale growth.
* Kale Seeds or Seedlings: You can start from seeds or purchase small kale seedlings from your local nursery. I personally prefer seedlings for a quicker harvest.
* Scissors or Utility Knife: For cutting the plastic bottles. Be careful!
* Drill or Awl: To create drainage holes and hanging points.
* Rope, Twine, or Zip Ties: To hang the bottles.
* Measuring Tape or Ruler: To ensure consistent cuts and spacing.
* Permanent Marker: To mark cutting lines.
* Watering Can or Hose: For watering your kale.
* Gloves (Optional): To keep your hands clean.
* Safety Glasses (Optional): To protect your eyes when cutting.
Preparing the Plastic Bottles
This is where the magic begins! We’ll transform those ordinary plastic bottles into mini kale planters.
1. Clean the Bottles: Thoroughly wash each bottle with soap and water to remove any residue. Rinse well and let them dry completely. This is crucial for preventing mold and ensuring a healthy growing environment.
2. Mark the Cutting Lines: Using your measuring tape and permanent marker, draw a horizontal line around each bottle. This line will determine the size of the opening for planting. I usually cut about one-third of the way down from the top of the bottle. For the top bottle, you’ll only need to make small holes for hanging.
3. Cut the Bottles: Carefully cut along the marked lines using your scissors or utility knife. Be extra cautious when using a utility knife – always cut away from yourself. You should now have a series of bottle halves, each with a large opening.
4. Create Drainage Holes: Use your drill or awl to create several small drainage holes in the bottom of each bottle half. This is absolutely essential to prevent waterlogging, which can lead to root rot and unhappy kale plants. Aim for at least 4-5 holes per bottle.
5. Prepare the Top Bottle: For the top bottle, instead of cutting a large opening, drill or poke two holes on opposite sides near the top. These holes will be used to hang the entire vertical garden.
Planting Your Kale
Now comes the fun part – planting your kale!
1. Fill the Bottles with Potting Soil: Fill each bottle half with high-quality potting soil, leaving about an inch of space at the top. Gently pat down the soil to remove any air pockets.
2. Plant Your Kale Seeds or Seedlings:
* From Seeds: Sprinkle a few kale seeds evenly over the surface of the soil in each bottle. Cover them with a thin layer of soil and gently water.
* From Seedlings: Carefully remove the kale seedlings from their containers. Gently loosen the roots and plant one seedling in the center of each bottle. Fill in around the seedling with soil and gently water.
3. Water Thoroughly: After planting, water each bottle thoroughly until water drains out of the drainage holes. This will help settle the soil and ensure the roots have access to moisture.
Assembling the Vertical Garden
Time to put it all together and create your stunning vertical kale garden!
1. Stack the Bottles: Carefully stack the bottle halves on top of each other, nesting them securely. The bottom of the top bottle should rest inside the opening of the bottle below it.
2. Secure the Bottles (Optional): While the bottles will naturally nest together, you can add extra security by using zip ties or strong tape to connect them. This is especially helpful if you live in a windy area.
3. Hanging the Garden: Thread your rope, twine, or zip ties through the holes you created in the top bottle. Make sure the rope is strong enough to support the weight of the entire garden when filled with soil and water.
4. Find a Sunny Spot: Choose a location that receives at least 6 hours of sunlight per day. Kale thrives in sunny conditions.
5. Hang Your Garden: Hang your vertical kale garden from a sturdy hook, railing, or other support structure. Make sure it’s securely fastened and won’t be easily knocked over.
Caring for Your Kale
Now that your vertical kale garden is up and running, it’s important to provide proper care to ensure a bountiful harvest.
1. Watering: Water your kale regularly, especially during hot, dry weather. Check the soil moisture by sticking your finger into the soil. If it feels dry to the touch, it’s time to water. Avoid overwatering, as this can lead to root rot.
2. Fertilizing: Feed your kale with a balanced liquid fertilizer every 2-3 weeks. This will provide the necessary nutrients for healthy growth and abundant leaf production. Follow the instructions on the fertilizer label.
3. Sunlight: Ensure your kale receives at least 6 hours of sunlight per day. If you live in a particularly hot climate, you may need to provide some afternoon shade to prevent the leaves from scorching.
4. Pest Control: Keep an eye out for common kale pests, such as aphids, cabbage worms, and flea beetles. You can control these pests with organic methods, such as insecticidal soap, neem oil, or handpicking.
5. Harvesting: You can start harvesting kale leaves once they are large enough to eat, usually about 4-6 inches long. Simply snip off the outer leaves, leaving the inner leaves to continue growing. This will encourage continuous production throughout the growing season.
Troubleshooting
Even with the best care, you might encounter a few challenges along the way. Here are some common issues and how to address them:
* Yellowing Leaves: This could be a sign of overwatering, underwatering, or nutrient deficiency. Adjust your watering schedule and fertilize your kale regularly.
* Leggy Growth: This indicates insufficient sunlight. Move your garden to a sunnier location.
* Pest Infestation: Treat the infestation with organic pest control methods.
* Slow Growth: This could be due to poor soil quality or insufficient nutrients. Amend your soil with compost or use a balanced fertilizer.
Extra Tips and Tricks
* Choose the Right Kale Variety: There are many different varieties of kale to choose from, each with its own unique flavor and texture. Experiment with different varieties to find your favorites.
* Succession Planting: To ensure a continuous harvest, plant new kale seeds or seedlings every few weeks.
* Companion Planting: Plant kale alongside other beneficial plants, such as marigolds, which can help repel pests.
* Winter Growing: In mild climates, you can grow kale throughout the winter. Protect your plants from frost with a row cover or by moving them indoors.
* Get Creative with Bottle Design: Feel free to paint or decorate your plastic bottles to add a personal touch to your vertical garden.
Enjoy Your Homegrown Kale!
And there you have it! A thriving vertical kale garden, all thanks to a few recycled plastic bottles and a little bit of effort. I hope you enjoy the satisfaction of growing your own fresh, healthy kale. Happy gardening!

Conclusion
So, there you have it! Growing kale in plastic bottles isn’t just a quirky gardening experiment; it’s a genuinely effective and rewarding way to cultivate fresh, nutritious greens, even with limited space or resources. We’ve walked you through the simple steps, highlighting the benefits of this upcycling method and offering tips for success. From reducing waste to enjoying a constant supply of homegrown kale, the advantages are undeniable.
This DIY trick is a must-try for several compelling reasons. First and foremost, it’s incredibly accessible. You likely already have the primary ingredient – plastic bottles – readily available. This makes it a budget-friendly option, eliminating the need for expensive pots or raised beds. Secondly, it’s space-saving. Vertical gardening with plastic bottles is perfect for balconies, patios, or even sunny windowsills. You can maximize your growing area without sacrificing valuable square footage. Thirdly, it’s environmentally conscious. By repurposing plastic bottles, you’re actively contributing to waste reduction and promoting sustainable gardening practices. Finally, and perhaps most importantly, it’s incredibly satisfying to nurture your own food from seed to harvest.
But don’t stop there! Feel free to experiment with different varieties of kale. Curly kale, dinosaur kale (lacinato), and red Russian kale all thrive in container gardens. You can also try companion planting. Consider adding herbs like rosemary or thyme to your plastic bottle garden; they can help deter pests and enhance the flavor of your kale. Another variation is to create a tiered system by stacking multiple bottle planters on top of each other, creating a visually appealing and highly productive vertical garden. You can also paint the bottles to add a splash of color to your garden and protect the roots from excessive sunlight. Remember to adjust your watering schedule based on the weather and the specific needs of your kale variety.
We wholeheartedly encourage you to give this DIY trick a try. It’s a fun, educational, and rewarding experience that will connect you with nature and provide you with a constant supply of fresh, healthy kale. Whether you’re a seasoned gardener or a complete beginner, this project is easily adaptable to your skill level.
Once you’ve embarked on your plastic bottle kale-growing adventure, we’d love to hear about your experience! Share your photos, tips, and challenges in the comments section below. Let’s create a community of resourceful gardeners who are passionate about growing their own food sustainably. Your insights could inspire others to embrace this innovative method and reap the many benefits of homegrown kale. So, grab your plastic bottles, some soil, and kale seeds, and get ready to transform your space into a thriving vertical garden! Happy growing!
Frequently Asked Questions (FAQs)
What type of plastic bottles are best for growing kale?
Ideally, you should use food-grade plastic bottles, such as those used for water, juice, or soda. Avoid bottles that have contained harsh chemicals or cleaning products, as these could contaminate your soil and affect the growth of your kale. PET (polyethylene terephthalate) bottles are a common and generally safe choice. Make sure to thoroughly clean the bottles with soap and water before using them. Darker colored bottles may retain more heat, so consider painting them a lighter color or using clear bottles in shadier locations.
How often should I water my kale plants in plastic bottles?
The watering frequency will depend on several factors, including the weather, the size of the bottle, and the type of soil you’re using. Generally, you should water your kale plants when the top inch of soil feels dry to the touch. During hot, sunny weather, you may need to water them daily, while during cooler, cloudy weather, you may only need to water them every few days. Be careful not to overwater, as this can lead to root rot. Ensure that your bottles have adequate drainage holes to prevent water from accumulating at the bottom.
What kind of soil should I use for growing kale in plastic bottles?
A well-draining potting mix is essential for growing healthy kale in plastic bottles. Avoid using garden soil, as it can be too heavy and compact, hindering root growth. A good potting mix will retain moisture while allowing excess water to drain away. You can also amend your potting mix with compost or other organic matter to provide additional nutrients for your kale plants. Consider adding perlite or vermiculite to improve drainage and aeration.
How much sunlight does kale need when grown in plastic bottles?
Kale thrives in full sun, which means it needs at least 6 hours of direct sunlight per day. However, it can also tolerate partial shade, especially during the hottest part of the day. If you’re growing your kale indoors, place it near a sunny window or use grow lights to supplement the natural light. Rotate the bottles regularly to ensure that all sides of the plant receive adequate sunlight.
How do I fertilize my kale plants in plastic bottles?
Kale is a heavy feeder, so it’s important to fertilize it regularly to ensure healthy growth. You can use a balanced liquid fertilizer, such as a 10-10-10 or 20-20-20, diluted to half strength. Apply the fertilizer every 2-3 weeks, following the instructions on the label. You can also use organic fertilizers, such as compost tea or fish emulsion. Avoid over-fertilizing, as this can burn the roots and damage the plants.
How do I protect my kale plants from pests and diseases?
Regularly inspect your kale plants for signs of pests or diseases. Common pests that affect kale include aphids, cabbage worms, and flea beetles. You can control these pests by handpicking them off the plants, spraying them with insecticidal soap, or using organic pesticides like neem oil. Diseases that can affect kale include powdery mildew and black rot. To prevent these diseases, ensure good air circulation around the plants, avoid overwatering, and remove any infected leaves promptly.
When is the best time to harvest my kale?
You can start harvesting kale leaves when they are about 4-6 inches long. Harvest the outer leaves first, leaving the inner leaves to continue growing. This will encourage the plant to produce more leaves. You can harvest kale throughout the growing season, even after a light frost. In fact, some people believe that frost improves the flavor of kale.
Can I grow other vegetables in plastic bottles besides kale?
Yes, absolutely! Many other vegetables and herbs can be successfully grown in plastic bottles. Some popular choices include lettuce, spinach, herbs like basil and mint, strawberries, and even small varieties of tomatoes and peppers. The key is to choose plants that are well-suited to container gardening and to provide them with adequate space, sunlight, and nutrients.
How long will my kale plants last in plastic bottles?
With proper care, your kale plants can last for several months in plastic bottles. Kale is a relatively hardy plant that can tolerate a wide range of conditions. However, eventually, the plants may become root-bound or exhausted, and you may need to replant them. You can also propagate new kale plants from cuttings or seeds.
What do I do with the plastic bottles after I’m done growing kale?
Once you’re finished with your plastic bottle garden, you can recycle the bottles if your local recycling program accepts them. Alternatively, you can reuse them for other gardening projects or for other purposes around the house. You can also donate them to schools or community gardens. The possibilities are endless!

Leave a Comment