

Grow Yellow Watermelon and impress your friends and family with this unique and delicious fruit! Have you ever seen a vibrant yellow watermelon at the grocery store and wondered, “How do they do that?” Well, wonder no more! This DIY guide will unlock the secrets to cultivating your very own sunshine-colored watermelons right in your backyard.
Watermelons, with their juicy sweetness, have been enjoyed for centuries, with evidence of their cultivation dating back to ancient Egypt. They were even buried with pharaohs to nourish them in the afterlife! While the familiar red variety is a summertime staple, yellow watermelons offer a delightful twist on a classic. They’re often sweeter and have a slightly honeyed flavor, making them a refreshing treat.
But why should you bother learning how to grow yellow watermelon yourself? Simple! Store-bought yellow watermelons can be pricey and hard to find. Plus, there’s nothing quite as satisfying as harvesting a fruit you’ve nurtured from seed to maturity. Imagine the bragging rights you’ll have when you serve slices of your homegrown yellow watermelon at your next barbecue! This guide will provide you with easy-to-follow steps, tips, and tricks to ensure a successful harvest, even if you’re a beginner gardener. Let’s get started and turn your garden into a yellow watermelon paradise!
How to Grow Your Own Yellow Watermelon: A Step-by-Step Guide
Hey there, fellow gardening enthusiasts! Ever dreamt of biting into a sweet, juicy watermelon with a vibrant yellow flesh? Well, dream no more! Growing your own yellow watermelon is totally achievable, and I’m here to guide you through the entire process. It might seem a little daunting at first, but trust me, with a little patience and the right know-how, you’ll be harvesting your own sunshine-colored watermelons in no time.
Choosing the Right Variety
First things first, you need to select the right variety of yellow watermelon. Not all watermelons are created equal, and some are specifically bred for that beautiful yellow interior. Here are a few popular and reliable choices:
* Yellow Doll: This is a classic choice, known for its small size (perfect for smaller gardens!) and incredibly sweet flavor. It matures relatively quickly, too.
* Buttercup Yellow: Another excellent option, Buttercup Yellow watermelons are slightly larger than Yellow Doll and boast a crisp, refreshing taste.
* Honey Cream: If you’re looking for something truly unique, Honey Cream is the way to go. It has a creamy texture and a honey-like sweetness that’s simply divine.
* Desert King: This variety is known for its drought tolerance, making it a great choice if you live in a drier climate. Plus, it has a lovely yellow flesh and a good shelf life.
Once you’ve picked your variety, it’s time to get started!
Getting Started: Planting Your Watermelon Seeds
Watermelons are warm-weather lovers, so timing is crucial. You’ll want to start your seeds indoors about 4-6 weeks before the last expected frost in your area. This gives them a head start and ensures they’re strong enough to handle the outdoor conditions.
Here’s how to get those seeds germinating:
1. Gather Your Supplies: You’ll need:
* Watermelon seeds (of course!)
* Seed starting trays or small pots (biodegradable ones are great!)
* Seed starting mix (this is lighter and better draining than regular potting soil)
* A spray bottle filled with water
* A warm, sunny spot or a grow light
2. Prepare Your Seed Starting Trays: Fill each cell or pot with the seed starting mix, leaving about half an inch of space at the top. Gently tap the trays to settle the soil.
3. Plant Your Seeds: Make a small indentation (about half an inch deep) in the center of each cell. Place 2-3 watermelon seeds in each indentation. This increases your chances of at least one seed germinating. Cover the seeds with a thin layer of seed starting mix.
4. Water Gently: Use the spray bottle to thoroughly moisten the soil. Avoid overwatering, as this can lead to rot. The soil should be damp, not soggy.
5. Provide Warmth and Light: Watermelon seeds need warmth to germinate. Place the trays in a warm, sunny spot (like a south-facing window) or under a grow light. If using a grow light, keep it on for about 14-16 hours per day. A heat mat can also be helpful, especially if your house is on the cooler side.
6. Keep the Soil Moist: Check the soil daily and mist with water as needed to keep it consistently moist. Don’t let it dry out completely.
7. Wait Patiently: Germination usually takes about 7-10 days. Once the seedlings emerge, remove the weaker ones, leaving only the strongest seedling in each cell.
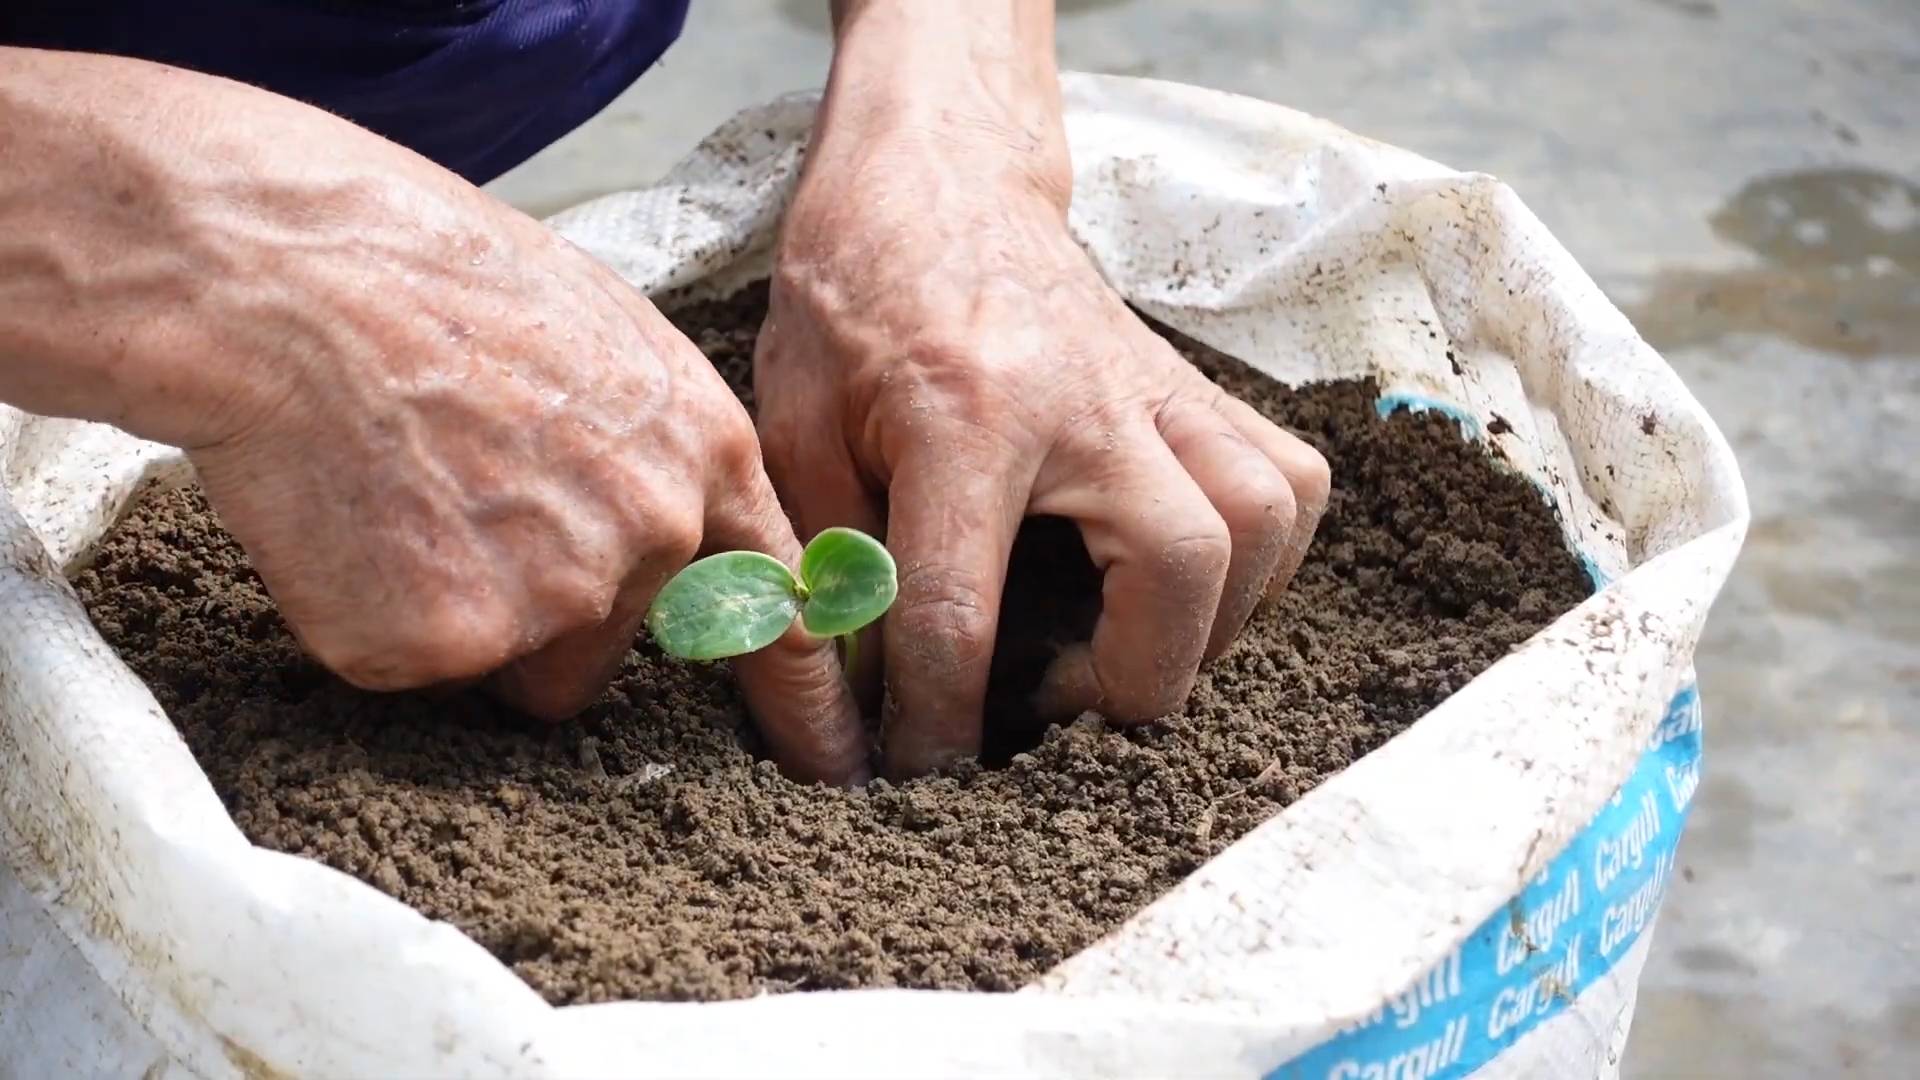
Transplanting Your Seedlings Outdoors
Once the danger of frost has passed and the soil has warmed up (ideally to at least 60°F or 15°C), it’s time to transplant your watermelon seedlings outdoors. This is a crucial step, so take your time and be gentle.
1. Harden Off Your Seedlings: Before transplanting, you need to “harden off” your seedlings. This means gradually exposing them to outdoor conditions over a period of about a week. Start by placing them outside in a sheltered spot for a few hours each day, gradually increasing the amount of time they spend outdoors. This helps them acclimate to the sun, wind, and temperature changes.
2. Choose a Sunny Location: Watermelons need at least 6-8 hours of direct sunlight per day. Choose a location in your garden that gets plenty of sun.
3. Prepare the Soil: Watermelons thrive in well-drained, fertile soil. Amend the soil with compost or well-rotted manure to improve its fertility and drainage. Watermelons are heavy feeders, so this is important!
4. Space Your Plants Properly: Watermelons need plenty of space to spread out. Space your plants at least 3-4 feet apart in rows that are 6-8 feet apart. This allows for good air circulation and prevents overcrowding.
5. Dig Your Holes: Dig holes that are slightly larger than the root balls of your seedlings.
6. Transplant Carefully: Gently remove the seedlings from their trays or pots. If you used biodegradable pots, you can plant the entire pot directly into the ground. Otherwise, carefully loosen the roots and place the seedling in the hole.
7. Backfill and Water: Backfill the hole with soil, gently firming it around the base of the plant. Water thoroughly to help settle the soil.
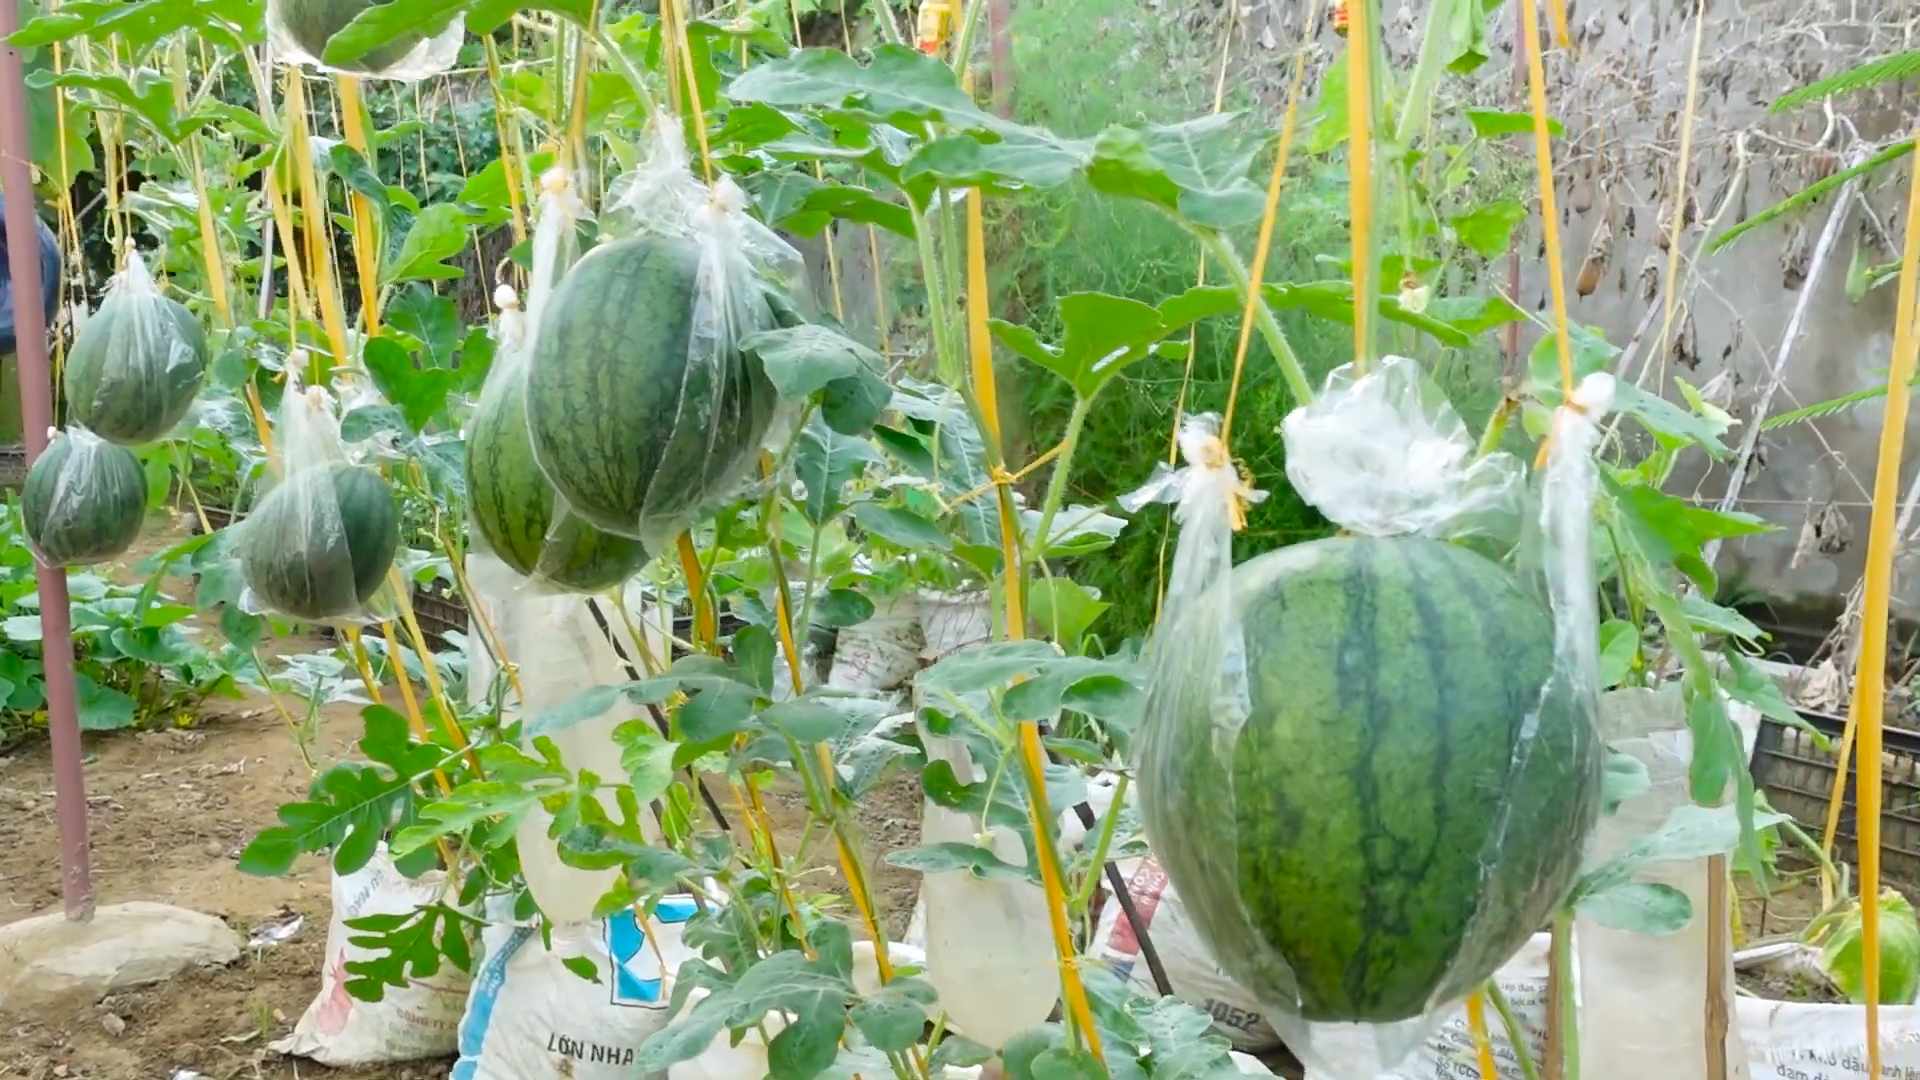
8. Mulch Around the Plants: Apply a layer of mulch around the plants to help retain moisture, suppress weeds, and regulate soil temperature. Straw, wood chips, or black plastic mulch are all good options.
Caring for Your Watermelon Plants
Now that your watermelon plants are in the ground, it’s time to provide them with the care they need to thrive.
1. Water Regularly: Watermelons need consistent moisture, especially during hot, dry weather. Water deeply and regularly, aiming for about 1-2 inches of water per week. Avoid overhead watering, as this can promote fungal diseases. Drip irrigation is an excellent option for watermelons.
2. Fertilize Regularly: As I mentioned before, watermelons are heavy feeders. Fertilize them every 2-3 weeks with a balanced fertilizer. You can also use a fertilizer specifically formulated for melons.
3. Control Weeds: Keep the area around your watermelon plants free of weeds. Weeds compete with the watermelons for nutrients and water. Hand-pull weeds or use a hoe to remove them. Be careful not to damage the watermelon roots.
4. Watch Out for Pests and Diseases: Watermelons can be susceptible to various pests and diseases, such as aphids, squash bugs, vine borers, and powdery mildew. Inspect your plants regularly for signs of infestation or disease. Treat any problems promptly with appropriate organic or chemical controls.
5. Provide Support (Optional): If you’re growing your watermelons on a trellis, you’ll need to provide support for the developing fruits. Use slings made of netting or fabric to support the watermelons as they grow. This prevents them from breaking off the vine.
Pollination: Helping Your Watermelons Set Fruit
Watermelons are pollinated by bees and other insects. If you’re not seeing many bees in your garden, you may need to hand-pollinate your watermelons.
1. Identify Male and Female Flowers: Watermelons have separate male and female flowers. Male flowers have a long, thin stem, while female flowers have a small, immature watermelon at the base of the flower.
2. Hand-Pollinate: In the morning, when the flowers are open, use a small paintbrush to collect pollen from the male flower. Then, gently brush the pollen onto the stigma of the female flower.
3. Repeat as Needed: Repeat this process every day for several days to ensure that the female flowers are properly pollinated.
Harvesting Your Yellow Watermelons
The moment you’ve been waiting for! Knowing when to harvest your watermelons is key to enjoying their sweet, juicy flavor.
1. Check the Tendril: The tendril closest to the watermelon stem should be brown and dry.
2. Thump the Watermelon: A ripe watermelon will sound hollow when you thump it.
3. Check the Ground Spot: The spot where the watermelon rests on the ground should be yellow or cream-colored.
4. Consider the Days to Maturity: Check the seed packet for the days to maturity for your specific variety. This will give you a general idea of when to expect your watermelons to be ripe.
5. Harvest Carefully: Use a sharp knife to cut the watermelon from the vine, leaving a few inches of stem attached.
Enjoying Your Homegrown Yellow Watermelon
Congratulations! You’ve successfully grown your own yellow watermelon. Now it’s time to enjoy the fruits (or rather, the vegetables!) of your labor.
Conclusion
So, there you have it! Growing your own yellow watermelon isn’t just a fun gardening project; it’s a gateway to experiencing a unique and incredibly delicious fruit that you simply won’t find in most grocery stores. The vibrant color and subtly sweet flavor of a homegrown yellow watermelon are truly something special, offering a refreshing twist on a summer classic.
This DIY trick, focusing on selecting the right seeds and providing optimal growing conditions, is a must-try for any gardener looking to expand their horticultural horizons. Imagine the look on your friends’ and family’s faces when you present them with a slice of this unexpected delight! It’s a conversation starter, a taste bud tantalizer, and a testament to your gardening prowess.
But the beauty of gardening lies in experimentation. Don’t be afraid to tweak the process to suit your specific climate and soil conditions. Consider these variations:
* Vertical Gardening: If you’re short on space, try growing your yellow watermelon vertically on a trellis. This not only saves space but also improves air circulation around the plant, reducing the risk of fungal diseases.
* Companion Planting: Plant basil or marigolds near your watermelon to deter pests and attract beneficial insects. These companion plants can help create a healthier and more productive growing environment.
* Grafting: For advanced gardeners, grafting your yellow watermelon onto a more vigorous rootstock can improve disease resistance and overall plant health.
* Different Varieties: While we’ve focused on growing yellow watermelons, there are several varieties to choose from, each with its own unique characteristics. Experiment with different types to find your favorite! Some popular choices include ‘Yellow Doll’, ‘Buttercup Yellow’, and ‘Honeyheart’.
Ultimately, the key to success is observation and adaptation. Pay close attention to your plants, monitor their growth, and adjust your care accordingly. Remember, gardening is a learning process, and every season brings new opportunities to improve your skills.
We wholeheartedly encourage you to embark on this exciting journey of growing your own yellow watermelon. It’s a rewarding experience that will connect you with nature, challenge your gardening abilities, and, most importantly, provide you with a delicious and unique fruit to enjoy.
Don’t just take our word for it – try it yourself! We’re confident that you’ll be amazed by the results. And once you’ve harvested your first yellow watermelon, we’d love to hear about your experience. Share your photos, tips, and stories in the comments below. Let’s create a community of yellow watermelon enthusiasts and inspire others to discover the joy of growing their own food. Happy gardening!
Frequently Asked Questions (FAQ)
What exactly *is* a yellow watermelon, and how does it differ from a red watermelon?
A yellow watermelon is simply a variety of watermelon that produces yellow flesh instead of the traditional red. The difference in color is due to the presence of different pigments. Red watermelons get their color from lycopene, while yellow watermelons contain beta-carotene, the same pigment that gives carrots their orange hue. In terms of taste, yellow watermelons are often described as being sweeter and having a slightly honey-like flavor compared to red watermelons. They also tend to have fewer seeds, making them a more convenient option for some.
Are yellow watermelon seeds different from red watermelon seeds? Where can I find them?
Yes, yellow watermelon seeds are genetically distinct from red watermelon seeds. You can’t simply plant seeds from a red watermelon and expect to get a yellow one. To grow yellow watermelons, you need to purchase seeds specifically labeled as “yellow watermelon” varieties. These seeds are readily available from a variety of sources, including:
* Online Seed Retailers: Many reputable online seed companies offer a wide selection of yellow watermelon seeds. Look for retailers that specialize in heirloom or unusual varieties.
* Local Nurseries and Garden Centers: Check with your local nurseries and garden centers, especially those that carry a diverse range of vegetable seeds.
* Seed Exchanges: Consider participating in seed exchanges with other gardeners. This is a great way to discover unique varieties and share your own seeds.
When purchasing seeds, be sure to choose a reputable supplier and read reviews to ensure you’re getting high-quality seeds that are likely to germinate successfully.
How long does it take to grow a yellow watermelon from seed?
The time it takes to grow a yellow watermelon from seed to harvest can vary depending on several factors, including the specific variety, climate, and growing conditions. However, as a general guideline, you can expect it to take anywhere from 70 to 90 days.
To speed up the process, you can start your seeds indoors 4-6 weeks before the last expected frost. This will give your seedlings a head start and allow them to establish a strong root system before being transplanted outdoors.
What are the best growing conditions for yellow watermelons?
Yellow watermelons thrive in warm, sunny conditions with well-drained soil. Here are some key factors to consider:
* Sunlight: Watermelons need at least 6-8 hours of direct sunlight per day. Choose a planting location that receives plenty of sun throughout the day.
* Soil: Watermelons prefer sandy loam soil that is rich in organic matter and well-draining. Amend your soil with compost or other organic materials to improve its fertility and drainage.
* Watering: Watermelons need consistent watering, especially during hot, dry periods. Water deeply and regularly, but avoid overwatering, which can lead to root rot.
* Temperature: Watermelons are sensitive to frost and cold temperatures. Plant them after the last expected frost when the soil has warmed up to at least 70°F (21°C).
* Fertilizing: Watermelons benefit from regular fertilization. Use a balanced fertilizer at planting time and then side-dress with a nitrogen-rich fertilizer a few weeks later.
How do I know when my yellow watermelon is ripe?
Determining when a watermelon is ripe can be tricky, but here are a few indicators to look for:
* The Tendril: The tendril closest to the watermelon stem should be brown and dry.
* The Ground Spot: The spot where the watermelon rests on the ground (the “ground spot”) should be yellow or cream-colored.
* The Sound: When you thump the watermelon, it should sound hollow and deep.
* The Feel: The watermelon should feel heavy for its size.
It may take some practice to master the art of watermelon ripeness detection, but with a little experience, you’ll be able to tell when your yellow watermelon is perfectly ripe and ready to enjoy.
Are there any common pests or diseases that affect yellow watermelons? How can I prevent them?
Yes, like all plants, yellow watermelons are susceptible to certain pests and diseases. Some common problems include:
* Aphids: These small insects can suck the sap from watermelon leaves, causing them to curl and distort. Control aphids with insecticidal soap or neem oil.
* Squash Bugs: These pests can damage watermelon vines and fruits. Handpick squash bugs or use row covers to protect your plants.
* Cucumber Beetles: These beetles can spread diseases and damage watermelon leaves and fruits. Use yellow sticky traps or insecticides to control cucumber beetles.
* Powdery Mildew: This fungal disease can cause a white, powdery coating on watermelon leaves. Improve air circulation and use a fungicide to control powdery mildew.
* Fusarium Wilt: This soilborne disease can cause watermelon plants to wilt and die. Choose disease-resistant varieties and practice crop rotation to prevent Fusarium wilt.
To prevent pests and diseases, practice good gardening hygiene, such as removing weeds and debris, providing adequate air circulation, and watering properly. You can also use organic pest control methods, such as insecticidal soap, neem oil, and Bacillus thuringiensis (Bt).
Can I save seeds from my yellow watermelon to plant next year?
Yes, you can save seeds from your yellow watermelon to plant next year, but there are a few things to keep in mind. If your watermelon was pollinated by another variety of watermelon, the seeds may not produce true-to-type plants. This means that the resulting watermelons may not be yellow or may have different characteristics than the parent plant.
To ensure that you get true-to-type seeds, you need to isolate your yellow watermelon plants from other watermelon varieties. This can be done by growing them in a greenhouse or by hand-pollinating the flowers.
To save the seeds, scoop them out of the watermelon and rinse them thoroughly. Spread the seeds out on a paper towel to dry completely. Once the seeds are dry, store them in an airtight container in a cool, dark place.
Leave a Comment