

Grow Pink Radishes, and add a vibrant splash of color and a peppery kick to your salads, snacks, and even cooked dishes! Have you ever dreamt of pulling a perfectly formed, bright pink radish straight from your own garden? It’s easier than you think, and this DIY guide will show you how to make that dream a reality. Forget those bland, store-bought radishes – imagine the satisfaction of harvesting your own, bursting with flavor and freshness.
Radishes have a surprisingly rich history, dating back to ancient times. They were cultivated in Egypt before the pyramids were even built! Throughout history, they’ve been valued not only for their taste but also for their medicinal properties. Now, you can continue this tradition by growing your own!
But why should you bother with this DIY project? Well, for starters, growing your own produce is incredibly rewarding. Plus, you’ll know exactly where your food comes from and what’s gone into it. More importantly, growing pink radishes is a fantastic way to introduce kids to gardening and healthy eating. It’s a quick and easy project that yields visible results in just a few weeks, making it perfect for beginners. I’m excited to share these simple tricks and hacks that will help you grow pink radishes successfully, even if you have limited space or gardening experience. Let’s get started!

DIY: Unleash Your Inner Gardener and Grow Vibrant Pink Radishes!
Okay, fellow gardening enthusiasts! Are you ready to add a pop of color and a peppery kick to your salads? Today, I’m going to walk you through the surprisingly simple process of growing your own gorgeous pink radishes. Forget those bland, store-bought veggies – we’re talking about homegrown goodness bursting with flavor and vibrant color. Trust me, it’s easier than you think, and the satisfaction of harvesting your own radishes is truly rewarding.
What You’ll Need: The Radish Grower’s Toolkit
Before we dive in, let’s gather our supplies. This is a pretty low-key project, so you probably have most of this stuff already.
* Radish Seeds: Obviously! Look for varieties specifically labeled as “pink” or “French Breakfast” for that beautiful rosy hue. I personally love the ‘Pink Beauty’ variety – they’re reliable and super cute.
* Well-Draining Soil: Radishes aren’t picky, but they do need soil that drains well. Soggy soil is a radish’s worst enemy. You can use a good quality potting mix if you’re growing in containers, or amend your garden soil with compost or sand to improve drainage.
* A Sunny Spot: Radishes need at least 6 hours of sunlight per day. A south-facing garden bed or a sunny windowsill will work perfectly.
* Watering Can or Hose: Consistent moisture is key for happy radishes.
* Small Trowel or Garden Fork: For preparing the soil and planting the seeds.
* Optional: Compost or other organic fertilizer to enrich the soil.
* Optional: Row covers to protect your radishes from pests.
Getting Started: Preparing the Soil
Radishes are fast growers, so they don’t need a super-rich soil, but a little preparation goes a long way.
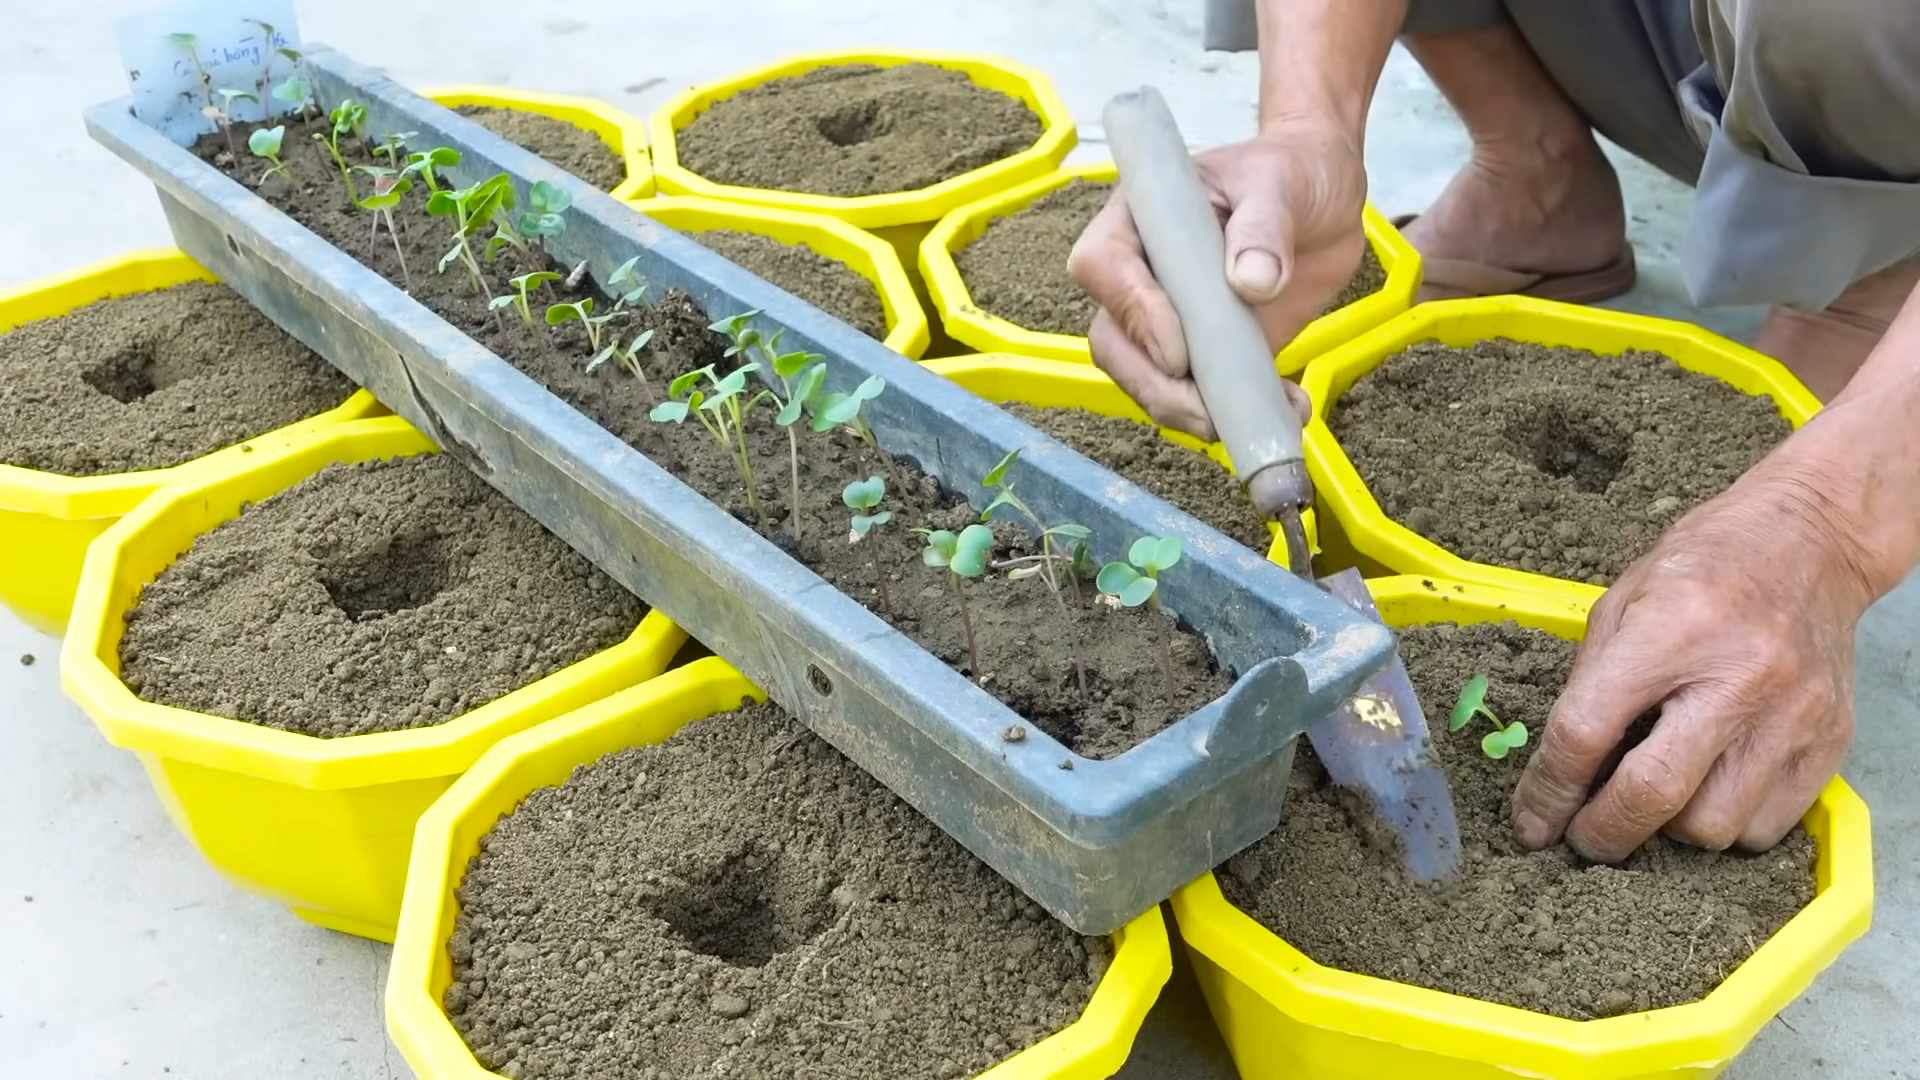
1. Choose Your Location: As I mentioned, pick a spot that gets at least 6 hours of sunlight. If you’re growing in containers, make sure they have drainage holes.
2. Loosen the Soil: Use your trowel or garden fork to loosen the soil to a depth of about 6 inches. This will make it easier for the radish roots to grow.
3. Remove Rocks and Debris: Get rid of any rocks, sticks, or other debris that could impede root growth.
4. Amend the Soil (Optional): If your soil is heavy clay or very sandy, amend it with compost or other organic matter to improve drainage and fertility. I usually add a thin layer of compost and mix it in well.
5. Level the Surface: Rake the soil to create a smooth, level surface. This will help ensure even watering and germination.
Planting the Seeds: The Heart of the Operation
Now for the fun part! Planting the seeds is quick and easy.
1. Create Rows or Furrows: Use your finger or the edge of your trowel to create shallow rows or furrows in the soil, about ½ inch deep and 1 inch apart.
2. Sow the Seeds: Sprinkle the radish seeds evenly along the rows, spacing them about ½ inch apart. Don’t overcrowd them!
3. Cover the Seeds: Gently cover the seeds with a thin layer of soil.
4. Water Gently: Use a watering can or hose with a gentle spray to water the soil thoroughly. Be careful not to wash away the seeds.
5. Label Your Rows: It’s always a good idea to label your rows so you know what you’ve planted.
Caring for Your Radishes: Keeping Them Happy
Radishes are relatively low-maintenance, but they do need a little TLC to thrive.
1. Water Regularly: Keep the soil consistently moist, but not soggy. Water deeply whenever the top inch of soil feels dry to the touch. Radishes need consistent moisture to develop properly. Inconsistent watering can lead to cracked or woody radishes.
2. Thin Seedlings (Important!): Once the seedlings emerge (usually in 4-7 days), thin them to about 1 inch apart. This will give them enough space to grow. Use small scissors to snip off the unwanted seedlings at the soil line, rather than pulling them out, which could disturb the roots of the remaining plants.
3. Weed Regularly: Keep the area around your radishes free of weeds. Weeds compete with radishes for nutrients and water. Hand-pull weeds carefully to avoid disturbing the radish roots.
4. Fertilize (Optional): If your soil is poor, you can fertilize your radishes with a balanced organic fertilizer. Follow the instructions on the fertilizer package. I rarely fertilize mine, as they grow so quickly.
5. Protect from Pests (Optional): Flea beetles can sometimes be a problem for radishes. They chew small holes in the leaves. You can protect your radishes from flea beetles by covering them with row covers. You can also try spraying them with insecticidal soap.
Harvesting Your Radishes: The Grand Finale!
This is the best part! Radishes are usually ready to harvest in about 3-4 weeks.
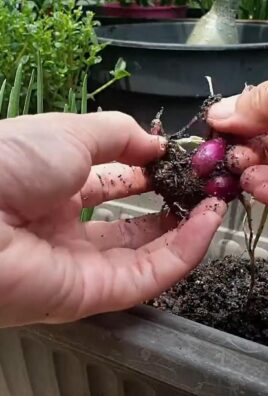
1. Check for Maturity: Radishes are ready to harvest when the roots are about 1 inch in diameter. You can gently brush away the soil around the base of the plant to check the size of the root.
2. Harvest Carefully: Gently pull the radishes from the soil. If the soil is dry, you may need to loosen it with a trowel first.
3. Wash and Enjoy: Wash the radishes thoroughly and enjoy them fresh in salads, sandwiches, or as a crunchy snack. You can also roast them or pickle them.
4. Succession Planting: To enjoy a continuous harvest of radishes, plant a new batch of seeds every 1-2 weeks.
Troubleshooting: Common Radish Problems and Solutions
Even with the best care, you might encounter a few problems along the way. Here are some common issues and how to fix them:
* Radishes are small and stunted: This is usually caused by overcrowding or lack of water. Make sure you thin your seedlings properly and water regularly.
* Radishes are cracked or woody: This is usually caused by inconsistent watering. Keep the soil consistently moist.
* Radishes are bitter: This can be caused by hot weather or letting the radishes grow too large. Harvest them when they are still relatively small.
* Flea beetles are eating the leaves: Cover your radishes with row covers or spray them with insecticidal soap.
* Root maggots are attacking the roots: Rotate your crops to avoid root maggots. You can also try using diatomaceous earth around the base of the plants.
Extra Tips for Radish-Growing Success
* Choose the right variety: Some radish varieties are better suited for certain climates and growing conditions. Do some research to find the best varieties for your area.
* Plant in cool weather: Radishes prefer cool weather and grow best in the spring and fall. Avoid planting them in the heat of summer.
* Don’t let them get too big: Radishes are best when they are harvested young and tender. If you let them grow too large, they can become woody and bitter.
* Eat the greens! Radish greens are edible and nutritious. You can add them to salads, soups, or stir-fries.
* Experiment with different varieties: There are many different types of radishes to choose from, so experiment with different varieties to find your favorites.
Growing Radishes in Containers: A Great Option for Small Spaces
Don’t have a garden? No problem! You can easily grow radishes in containers.
1. Choose a Container: Select a container that is at least 6 inches deep and has drainage holes.
2. Use a Good Quality Potting Mix: Fill the container with a well-draining potting mix.
3. Plant the Seeds: Sow the radish seeds according to the instructions above.
4. Water Regularly: Keep the soil consistently moist.
5. Place in a Sunny Location: Place the container in a sunny location that gets at least 6 hours of sunlight per day.
6. Harvest When Ready: Harvest the radishes when they are about 1 inch in diameter.
Enjoying Your Homegrown Radishes: Recipe Ideas
Now that you’ve harvested your beautiful pink radishes, it’s time to enjoy them! Here are a few ideas:
* Radish and Butter Sandwiches: A classic! Thinly slice radishes and spread them on buttered bread. Sprinkle with sea salt.
* Radish Salad: Combine sliced radishes with other salad greens, such as lettuce, spinach, and arugula. Dress with a vinaigrette.
* Roasted Radishes: Toss radishes with olive oil, salt, and pepper
Conclusion
So, there you have it! Growing pink radishes at home is not only surprisingly simple, but it’s also incredibly rewarding. Forget those bland, store-bought radishes that lack that vibrant color and peppery punch. With this easy DIY trick, you can cultivate a garden bursting with beautiful, crisp, and flavorful pink radishes that will elevate your salads, snacks, and side dishes to a whole new level.
Why is this a must-try? Because you’re taking control of your food source, ensuring freshness and quality that you simply can’t replicate with commercially grown produce. Plus, the satisfaction of harvesting your own vegetables is an experience that connects you to nature and adds a touch of magic to your everyday life. Imagine the delight of your family and friends when you present them with a colorful radish salad featuring radishes you grew yourself!
But the fun doesn’t stop there! Feel free to experiment with different radish varieties. While we focused on achieving that beautiful pink hue, you can explore other colorful options like purple, white, or even black radishes. You can also adjust the growing conditions to influence the flavor profile. For a milder taste, try growing your radishes in partial shade. For a spicier kick, give them plenty of sunshine.
Consider companion planting to further enhance your radish garden. Carrots, lettuce, and peas are excellent companions that can help deter pests and improve soil health. You can also intercrop radishes with slower-growing vegetables to maximize your garden space.
Don’t be afraid to get creative with your radish recipes too! Beyond salads, try pickling your pink radishes for a tangy treat, roasting them for a caramelized sweetness, or even using them as a garnish for cocktails. The possibilities are endless!
We are confident that you will find this DIY trick for growing pink radishes to be a game-changer. It’s a simple, cost-effective, and incredibly satisfying way to add a touch of color and flavor to your life.
So, what are you waiting for? Grab your seeds, prepare your soil, and get ready to embark on a radish-growing adventure! We encourage you to try this DIY trick and share your experiences with us. Post photos of your beautiful pink radishes on social media using #HomeGrownRadishes and let us know what creative recipes you come up with. We can’t wait to see your radish-growing success stories! Happy gardening!
Frequently Asked Questions (FAQ)
What kind of soil is best for growing pink radishes?
Radishes thrive in loose, well-drained soil that is rich in organic matter. Amend your soil with compost or well-rotted manure before planting to improve its fertility and drainage. Avoid heavy clay soils, as they can hinder root development and result in misshapen radishes. A slightly acidic to neutral soil pH (around 6.0 to 7.0) is ideal. If your soil is compacted, consider adding sand or perlite to improve drainage. Remember, healthy soil is the foundation for healthy radishes!
How much sunlight do pink radishes need?
Radishes prefer full sun, which means at least six hours of direct sunlight per day. However, they can also tolerate partial shade, especially in hotter climates. If you live in a region with intense summer heat, providing some afternoon shade can help prevent the radishes from bolting (going to seed prematurely). Insufficient sunlight can result in leggy growth and smaller radishes. Monitor your plants closely and adjust their location if needed to ensure they are receiving adequate sunlight.
How often should I water my pink radishes?
Consistent moisture is crucial for growing plump, juicy radishes. Water deeply and regularly, especially during dry periods. Aim to keep the soil consistently moist but not waterlogged. Overwatering can lead to root rot, while underwatering can cause the radishes to become tough and bitter. A good rule of thumb is to water when the top inch of soil feels dry to the touch. Mulching around the plants can help retain moisture and suppress weeds.
How long does it take for pink radishes to mature?
One of the great things about radishes is their quick growth rate. Most varieties mature in just 20 to 30 days. This makes them an excellent choice for impatient gardeners or those looking for a quick harvest. The exact time to maturity will depend on the specific variety and growing conditions. Check the seed packet for specific information. To ensure a continuous harvest, consider succession planting, sowing a new batch of seeds every week or two.
What are some common pests and diseases that affect pink radishes?
Radishes are generally relatively pest-resistant, but they can be susceptible to certain issues. Common pests include flea beetles, root maggots, and aphids. Flea beetles can create small holes in the leaves, while root maggots can damage the roots. Aphids can suck the sap from the plants, weakening them. To control these pests, consider using row covers, insecticidal soap, or diatomaceous earth. Diseases such as damping-off and white rust can also affect radishes. To prevent these diseases, ensure good air circulation, avoid overwatering, and practice crop rotation.
Can I grow pink radishes in containers?
Yes, radishes are well-suited for container gardening. Choose a container that is at least 6 inches deep and has good drainage holes. Use a high-quality potting mix and follow the same planting and care instructions as you would for growing radishes in the ground. Container-grown radishes may require more frequent watering, as the soil in containers tends to dry out faster. Place the container in a sunny location and enjoy your homegrown radishes!
How do I know when my pink radishes are ready to harvest?
The best way to determine if your radishes are ready to harvest is to check their size. Most varieties are ready when they are about 1 inch in diameter. You can also gently brush away the soil around the top of the radish to get a better look. If the radish looks plump and well-formed, it’s likely ready to harvest. Don’t let them get too large, as they can become tough and bitter. Harvest your radishes promptly for the best flavor and texture.
What can I do if my radishes are too spicy?
The spiciness of radishes is influenced by several factors, including the variety, growing conditions, and time of year. Radishes grown in hot weather or allowed to mature for too long tend to be spicier. To reduce the spiciness, try growing your radishes in partial shade or harvesting them earlier. You can also soak the radishes in cold water for a few hours before eating them. Some people also find that peeling the radishes helps to reduce the spiciness.
How do I store pink radishes after harvesting?
To keep your radishes fresh and crisp after harvesting, remove the greens and store them separately. Place the radishes in a plastic bag or container in the refrigerator. They should last for up to two weeks. The greens can also be stored in the refrigerator, but they will wilt more quickly. Use them within a few days for the best flavor and texture.
Can I eat the radish greens?
Yes, radish greens are edible and nutritious! They have a peppery flavor similar to the radishes themselves. You can use them in salads, soups, stir-fries, or as a garnish. Be sure to wash them thoroughly before using them. Choose young, tender greens for the best flavor and texture. Avoid eating greens that are yellowed or wilted.
Leave a Comment