

Bathroom cleaning hacks – who doesn’t need them? Let’s be honest, tackling the bathroom is nobody’s favorite chore. It’s the one space we all dread, conjuring images of stubborn stains, lingering odors, and endless scrubbing. But what if I told you that conquering your bathroom chaos could be easier, faster, and even…dare I say…enjoyable?
For centuries, keeping our living spaces clean has been a sign of health and well-being. While the tools have evolved from simple cloths and natural remedies to the powerful cleaners we have today, the goal remains the same: a fresh, hygienic environment. Think about it – our ancestors used everything from vinegar to lemon juice to keep their homes sparkling! We’re just building on that legacy with a modern twist.
That’s where these DIY bathroom cleaning hacks come in. I’m going to share some simple, yet incredibly effective, tricks that will transform your cleaning routine. We’ll ditch the harsh chemicals (in some cases!) and embrace clever solutions using items you probably already have in your pantry. From banishing soap scum to sparkling showerheads, get ready to discover how to reclaim your bathroom and your precious free time. Because let’s face it, we all deserve a little less scrubbing and a little more relaxation!
DIY Bathroom Cleaning Hacks: Sparkling Clean Without Breaking a Sweat!
Okay, let’s face it, cleaning the bathroom is nobody’s favorite chore. But, with a few clever hacks, you can transform your bathroom from a grimy disaster zone into a sparkling sanctuary. I’m going to share some of my go-to DIY cleaning tricks that are not only effective but also save you money and time. Get ready to ditch those harsh chemicals and embrace a cleaner, fresher bathroom!
Tackling Soap Scum and Grime
Soap scum is the bane of every bathroom cleaner’s existence. It’s stubborn, unsightly, and seems to multiply overnight. But fear not! I’ve got some amazing solutions for you.
* The Power of Vinegar: Vinegar is my secret weapon against soap scum. Its acidity breaks down the mineral deposits and grime, making it easy to wipe away.
* Baking Soda Scrub: For tougher stains, baking soda acts as a gentle abrasive, scrubbing away grime without scratching surfaces.
* Lemon Freshness: Lemons not only smell amazing but also contain citric acid, which is a natural cleaning agent.
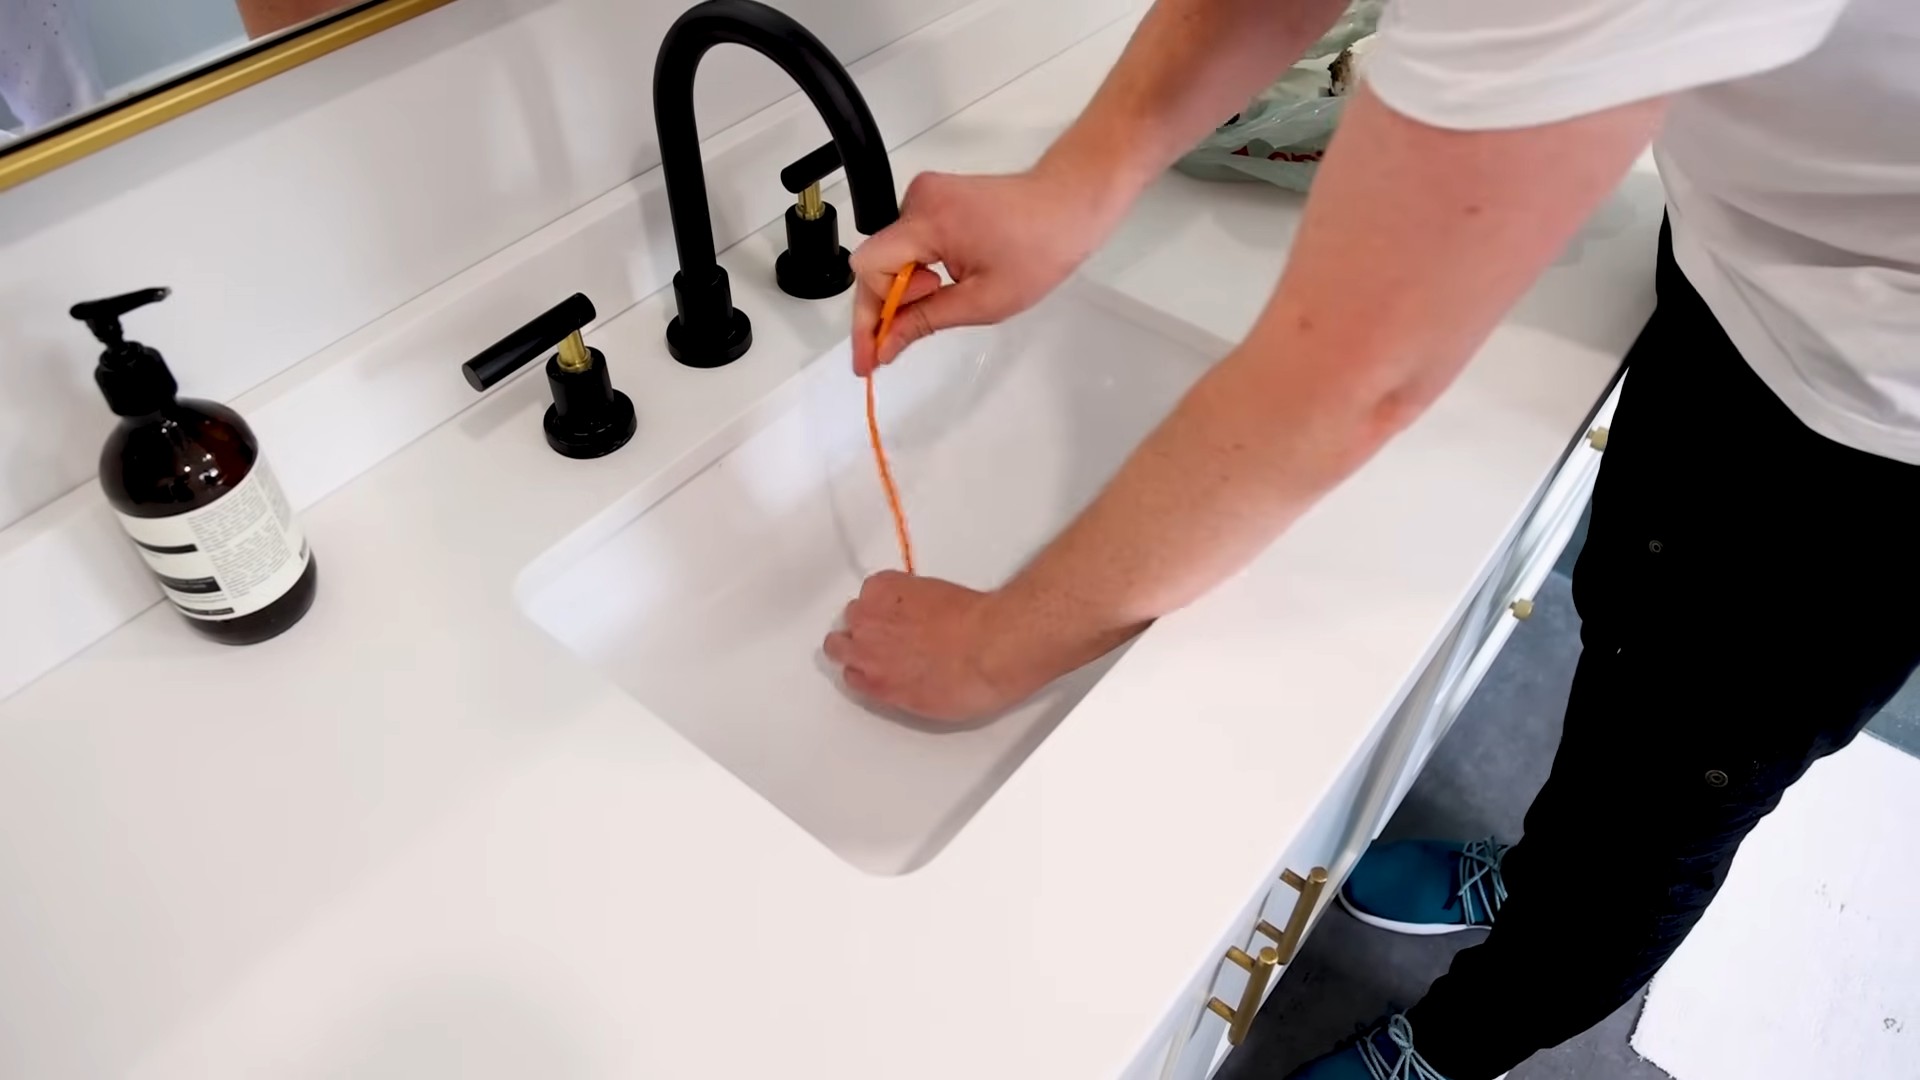
Step-by-Step: Vinegar Shower Head Cleaning
Hard water deposits can clog your shower head, reducing water pressure and making your shower less enjoyable. Here’s how to restore it to its former glory:
1. Gather Your Supplies: You’ll need a plastic bag (a Ziploc bag works great), white vinegar, a rubber band or twist tie, and an old toothbrush.
2. Fill the Bag with Vinegar: Pour enough white vinegar into the plastic bag to fully submerge the shower head.
3. Secure the Bag: Carefully attach the bag to the shower head using the rubber band or twist tie. Make sure the shower head is completely immersed in the vinegar.
4. Soak Overnight: Let the shower head soak in the vinegar overnight (or for at least a few hours). This allows the vinegar to dissolve the mineral deposits.
5. Remove and Rinse: Remove the bag and discard the vinegar. Turn on the shower and let the water run for a few minutes to flush out any remaining vinegar and loosened debris.
6. Scrub Away Residue: Use the old toothbrush to scrub away any stubborn residue around the shower head nozzles.
7. Enjoy Your Improved Shower: Your shower head should now be free of mineral deposits and providing a much better shower experience!
Step-by-Step: Baking Soda Paste for Tile Grout
Grout can be a breeding ground for mold and mildew, and it can quickly become discolored. This baking soda paste is a simple and effective way to brighten your grout lines.
1. Gather Your Supplies: You’ll need baking soda, water, a small bowl, an old toothbrush or grout brush, and a damp cloth.
2. Make the Paste: In the small bowl, mix baking soda and water to form a thick paste. The consistency should be similar to toothpaste.
3. Apply the Paste: Apply the baking soda paste to the grout lines using your fingers or a small spatula.
4. Scrub the Grout: Use the old toothbrush or grout brush to scrub the grout lines thoroughly. Focus on areas with heavy staining or mildew.
5. Let it Sit: Allow the paste to sit on the grout for about 10-15 minutes. This gives the baking soda time to work its magic.
6. Rinse and Wipe: Rinse the grout lines with water and wipe away any remaining paste with a damp cloth.
7. Repeat if Necessary: For stubborn stains, you may need to repeat the process.
Step-by-Step: Lemon Power for Faucets and Fixtures
Lemons are a natural and refreshing way to clean and shine your faucets and fixtures.
1. Gather Your Supplies: You’ll need a lemon (cut in half), salt (optional), and a clean cloth.
2. Prepare the Lemon: Cut a lemon in half. If your faucets have stubborn water spots, sprinkle a little salt on the cut side of the lemon. The salt acts as a gentle abrasive.
3. Rub the Lemon: Rub the cut side of the lemon over your faucets and fixtures, paying attention to areas with water spots or grime.
4. Let it Sit: Allow the lemon juice to sit on the surfaces for a few minutes.
5. Rinse and Wipe: Rinse the surfaces with water and wipe them dry with a clean cloth.
6. Enjoy the Shine: Your faucets and fixtures should now be sparkling clean and smelling fresh!
Cleaning the Toilet Like a Pro
The toilet is arguably the least pleasant part of the bathroom to clean, but it’s essential for hygiene. Here are some DIY tricks to make the job easier and more effective.
* Baking Soda and Vinegar Bomb: This combination creates a fizzing action that helps to loosen stains and deodorize the toilet bowl.
* Toilet Bowl Cleaner Tablets: Make your own toilet bowl cleaner tablets using simple ingredients like baking soda, citric acid, and essential oils.
* Essential Oil Freshener: Add a few drops of your favorite essential oil to the toilet bowl after cleaning to keep it smelling fresh.
Step-by-Step: Baking Soda and Vinegar Toilet Bowl Cleaner
This is a simple and effective way to clean and deodorize your toilet bowl without harsh chemicals.
1. Gather Your Supplies: You’ll need baking soda, white vinegar, and a toilet brush.
2. Add Baking Soda: Pour one cup of baking soda into the toilet bowl.
3. Add Vinegar: Slowly pour two cups of white vinegar into the toilet bowl. The mixture will fizz.
4. Let it Fizz: Allow the mixture to fizz for about 30 minutes. This gives the baking soda and vinegar time to loosen stains and deodorize the bowl.
5. Scrub the Bowl: Use the toilet brush to scrub the entire bowl, paying attention to areas with stains or buildup.
6. Flush: Flush the toilet to rinse away the baking soda and vinegar.
7. Enjoy a Clean Toilet: Your toilet bowl should now be cleaner and fresher!
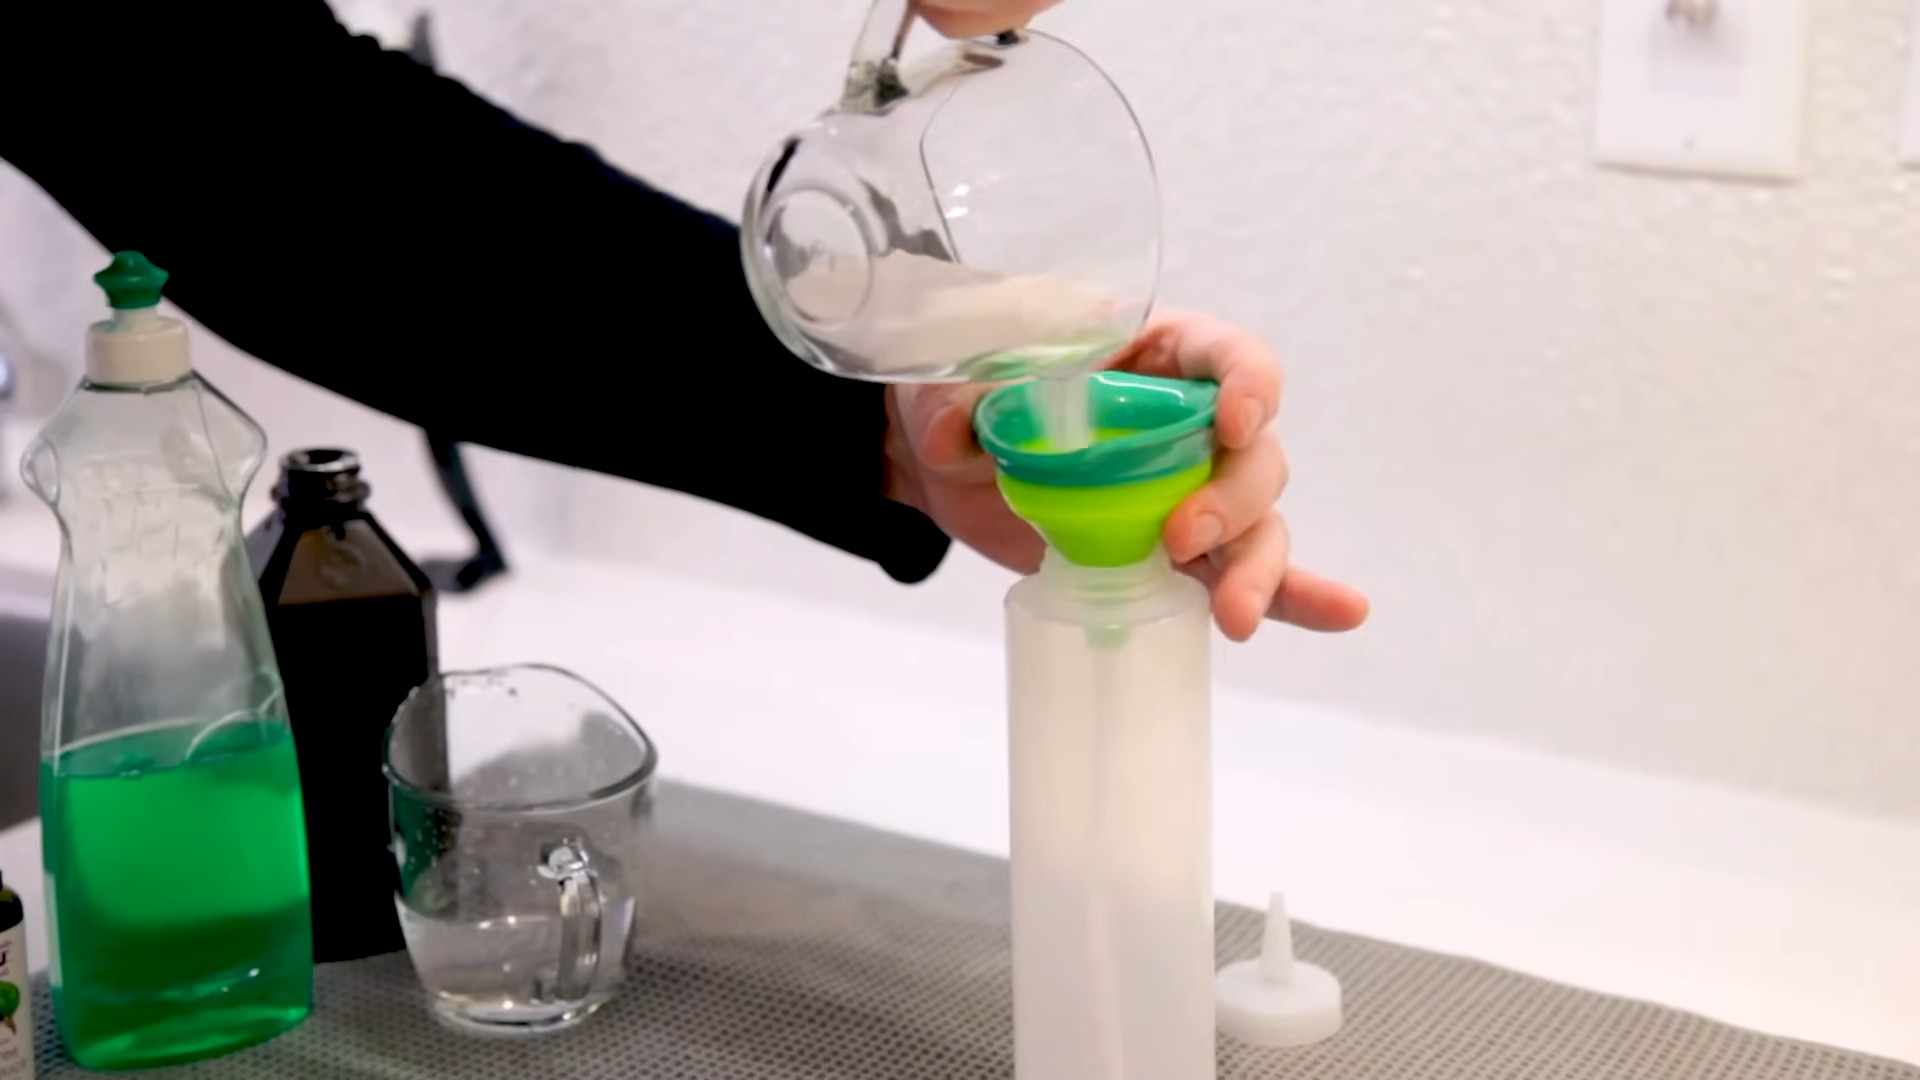
Step-by-Step: DIY Toilet Bowl Cleaner Tablets
These tablets are a convenient way to keep your toilet bowl clean and fresh between deep cleanings.
1. Gather Your Supplies: You’ll need 1 ½ cups baking soda, ½ cup citric acid, ½ cup cornstarch, ¼ cup water, 15-20 drops of your favorite essential oil (like tea tree, lavender, or lemon), a spray bottle filled with water, a silicone mold (ice cube trays work well), and gloves.
2. Combine Dry Ingredients: In a large bowl, combine the baking soda, citric acid, and cornstarch. Mix well.
3. Add Water and Essential Oil: Slowly add the water to the dry ingredients, mixing constantly. Be careful not to add too much water at once, as this will cause the mixture to fizz prematurely. Add the essential oil and mix well.
4. Test the Consistency: The mixture should be slightly damp and hold its shape when pressed together. If it’s too dry, add a little more water, a teaspoon at a time. If it’s too wet, add a little more baking soda.
5. Pack the Molds: Pack the mixture tightly into the silicone molds.
6. Let them Dry: Allow the tablets to dry completely for at least 24 hours, or until they are hard to the touch.
7. Remove and Store: Once the tablets are dry, remove them from the molds and store them in an airtight container.
8. Use a Tablet: To use, simply drop one tablet into the toilet bowl and let it fizz. After a few minutes, flush the toilet.
Mirror, Mirror on the Wall: Streak-Free Shine
A streaky mirror can make your entire bathroom look dirty. Here’s how to achieve a sparkling, streak-free shine.
* Vinegar and Water Solution: A simple mixture of vinegar and water is an effective and eco-friendly mirror cleaner.
* Microfiber Cloth: Using a microfiber cloth is essential for achieving a streak-free finish.
* Newspaper Trick: Crumpled newspaper can also be used to polish mirrors and leave them sparkling.
Step-by-Step: Vinegar and Water Mirror Cleaning
This is a quick and easy way to clean your mirrors and leave them streak-free.
1. Gather Your Supplies: You’ll need white vinegar, water, a spray bottle, and a microfiber cloth.
2. Mix the Solution: In the spray bottle, mix equal parts white vinegar and water.
3. Spray the Mirror: Lightly spray the mirror with the vinegar and water solution.
4. Wipe with Microfiber Cloth: Immediately wipe the mirror with a clean, dry microfiber cloth. Use a circular motion to
Conclusion
So, there you have it! These simple yet incredibly effective DIY bathroom cleaning hacks are a game-changer for anyone looking to maintain a sparkling clean bathroom without resorting to harsh chemicals or spending a fortune on commercial cleaners. We’ve explored how everyday ingredients like vinegar, baking soda, and lemon can tackle everything from stubborn soap scum to grimy grout, leaving your bathroom smelling fresh and looking its absolute best.
But why is this DIY approach a must-try? Beyond the cost savings and eco-friendliness, these hacks offer a level of control and customization that you simply can’t achieve with store-bought products. You know exactly what’s going into your cleaning solutions, avoiding potentially harmful chemicals and allergens. Plus, the satisfaction of creating your own effective cleaners is surprisingly rewarding!
This isn’t just about cleaning; it’s about creating a healthier and more pleasant environment for yourself and your family.
Don’t be afraid to experiment with these bathroom cleaning hacks and find what works best for your specific needs and bathroom surfaces. For instance, if you have particularly tough water stains, try letting the vinegar soak for a longer period. Or, if you prefer a different scent, add a few drops of your favorite essential oil to the baking soda paste. Lavender, tea tree, and eucalyptus are all excellent choices for their antibacterial and refreshing properties. You could even infuse your vinegar with citrus peels for a naturally fragrant and potent cleaner.
Another variation to consider is using a microfiber cloth instead of paper towels. Microfiber cloths are more absorbent, reusable, and less likely to leave streaks behind. They’re a fantastic eco-friendly alternative that will save you money in the long run. For cleaning showerheads, consider using a plastic bag filled with vinegar secured with a rubber band, allowing it to soak overnight for maximum descaling power.
We’ve covered a lot of ground, from tackling toilet bowl stains with baking soda and vinegar to restoring shine to your shower doors with lemon. Remember, consistency is key. Incorporating these DIY bathroom cleaning hacks into your regular cleaning routine will prevent grime and buildup from becoming overwhelming, making your cleaning tasks much easier and more manageable.
Now, it’s your turn! We wholeheartedly encourage you to give these DIY bathroom cleaning hacks a try. We’re confident that you’ll be amazed by the results. And most importantly, we want to hear about your experience! Share your before-and-after photos, your favorite variations, and any tips or tricks you discover along the way in the comments section below. Let’s create a community of DIY cleaning enthusiasts and help each other maintain sparkling clean bathrooms, naturally and affordably. Your insights could be invaluable to others who are just starting their DIY cleaning journey. So, grab your vinegar, baking soda, and lemon, and get ready to transform your bathroom into a pristine oasis!
FAQ
What are the benefits of using DIY bathroom cleaning hacks compared to commercial cleaners?
DIY bathroom cleaning hacks offer a multitude of benefits. Firstly, they are significantly more cost-effective. Ingredients like vinegar, baking soda, and lemon are readily available and much cheaper than specialized cleaning products. Secondly, they are environmentally friendly. By using natural ingredients, you reduce your exposure to harsh chemicals and minimize your contribution to environmental pollution. Thirdly, DIY cleaners are often safer for your health, especially if you have allergies or sensitivities to certain chemicals found in commercial cleaners. Finally, you have complete control over the ingredients, allowing you to customize your cleaning solutions to suit your specific needs and preferences.
Are these DIY bathroom cleaning hacks safe for all bathroom surfaces?
While most of these DIY bathroom cleaning hacks are safe for a wide range of bathroom surfaces, it’s always a good idea to test them in an inconspicuous area first, especially on delicate surfaces like natural stone (marble, granite) or certain types of tile. Vinegar, in particular, can be acidic and may etch or damage some surfaces if left on for too long. Avoid using abrasive cleaners like baking soda on easily scratched surfaces. Always dilute vinegar with water, especially when cleaning sensitive materials. When in doubt, consult the manufacturer’s recommendations for cleaning specific bathroom fixtures and surfaces.
How often should I use these DIY bathroom cleaning hacks?
The frequency of cleaning depends on your personal preferences and the level of usage your bathroom receives. For general maintenance, aim to clean your bathroom at least once a week using these DIY hacks. High-traffic areas like the shower and toilet may require more frequent cleaning. Spot cleaning can be done as needed to address spills or stains. Regularly wiping down surfaces after each use can also help prevent buildup and make your cleaning tasks easier in the long run.
Can I mix different DIY cleaning ingredients together?
While some DIY cleaning ingredients work well together, it’s crucial to avoid mixing certain combinations, as they can create harmful or even dangerous reactions. The most important rule to remember is never to mix bleach with vinegar or ammonia. This combination produces toxic chlorine gas, which can be extremely harmful to your respiratory system. Baking soda and vinegar can be mixed, but the reaction creates carbon dioxide and water, which is more suitable for unclogging drains than general cleaning. Always research the potential reactions before mixing any cleaning ingredients.
What are some alternative ingredients I can use if I don’t have vinegar, baking soda, or lemon?
If you don’t have vinegar, baking soda, or lemon on hand, there are several alternative ingredients you can use for DIY bathroom cleaning. Hydrogen peroxide is a great disinfectant and can be used to clean toilets and showers. Borax is a natural mineral that can be used as a cleaning agent and deodorizer. Castile soap is a gentle and versatile cleaner that can be used on a variety of surfaces. Essential oils, such as tea tree, lavender, and eucalyptus, have antibacterial and antifungal properties and can be added to your cleaning solutions for extra cleaning power and a pleasant scent.
How can I prevent mold and mildew from growing in my bathroom?
Preventing mold and mildew is crucial for maintaining a healthy and clean bathroom. The key is to control moisture levels. Always ensure proper ventilation by opening windows or using an exhaust fan during and after showering. Wipe down wet surfaces, such as shower walls and doors, after each use. Regularly clean grout lines with a solution of baking soda and water or vinegar and water. Fix any leaks promptly to prevent water damage. Consider using a dehumidifier in your bathroom to reduce humidity levels.
What’s the best way to clean a showerhead with DIY solutions?
Cleaning a showerhead with DIY solutions is a simple and effective way to remove mineral buildup and improve water flow. The most common method involves using vinegar. Fill a plastic bag with white vinegar and secure it around the showerhead with a rubber band, ensuring that the showerhead is fully submerged in the vinegar. Let it soak for at least 30 minutes, or preferably overnight, to dissolve the mineral deposits. Remove the bag and run hot water through the showerhead to flush out any remaining debris. For stubborn buildup, you can use an old toothbrush to scrub the showerhead before rinsing.
How do I get rid of hard water stains in my bathroom?
Hard water stains are a common problem in many bathrooms, but they can be effectively removed with DIY solutions. Vinegar is your best friend when it comes to tackling hard water stains. Spray the affected areas with white vinegar and let it sit for 15-30 minutes to allow the vinegar to dissolve the mineral deposits. Scrub the area with a non-abrasive sponge or cloth and rinse thoroughly with water. For tougher stains, you can create a paste of baking soda and water and apply it to the stains before scrubbing. Lemon juice is another effective option for removing hard water stains, thanks to its citric acid content.


Leave a Comment