

Clean Baseboards Easily? Yes, please! I know, I know, cleaning baseboards is probably right up there with cleaning the oven on the list of everyone’s least favorite chores. It’s back-breaking, tedious, and honestly, feels like it takes forever. But what if I told you there were some super simple, DIY tricks that could make this task not only easier but also faster?
Baseboards, those often-overlooked strips of trim, have been around for centuries, evolving from purely functional elements protecting walls from furniture and foot traffic to decorative features that add character to our homes. Think about the grand, ornate baseboards in historical homes – they tell a story! But whether your baseboards are simple and modern or intricately detailed, one thing remains the same: they get dirty! Dust, grime, pet hair, and scuff marks accumulate, making your whole room look less polished.
That’s where these DIY hacks come in. We all want a clean and inviting home, but who has the time to spend hours scrubbing baseboards? These tricks are designed to save you time, energy, and maybe even your back! I’m going to share some of my favorite and most effective methods to clean baseboards easily, using common household items you probably already have on hand. Get ready to say goodbye to grimy baseboards and hello to a sparkling clean home with minimal effort!
DIY: Sparkling Clean Baseboards Without Breaking Your Back!
Okay, let’s be honest, cleaning baseboards is the chore that everyone loves to hate. Bending, scrubbing, and contorting yourself into weird positions? No thanks! But dusty, grimy baseboards can really drag down the look of a room. So, I’m going to share my super-easy, back-saving method for getting those baseboards sparkling clean. Trust me, you’ll wonder why you didn’t try this sooner!
What You’ll Need: The Arsenal of Clean
Before we dive in, let’s gather our supplies. This is a pretty low-cost project, and you probably have most of these items already:
* A bucket (or two – one for clean water, one for dirty)
* Warm water
* Dish soap (a gentle, all-purpose cleaner works too)
* Microfiber cloths (lots of them! You’ll want to switch them out frequently)
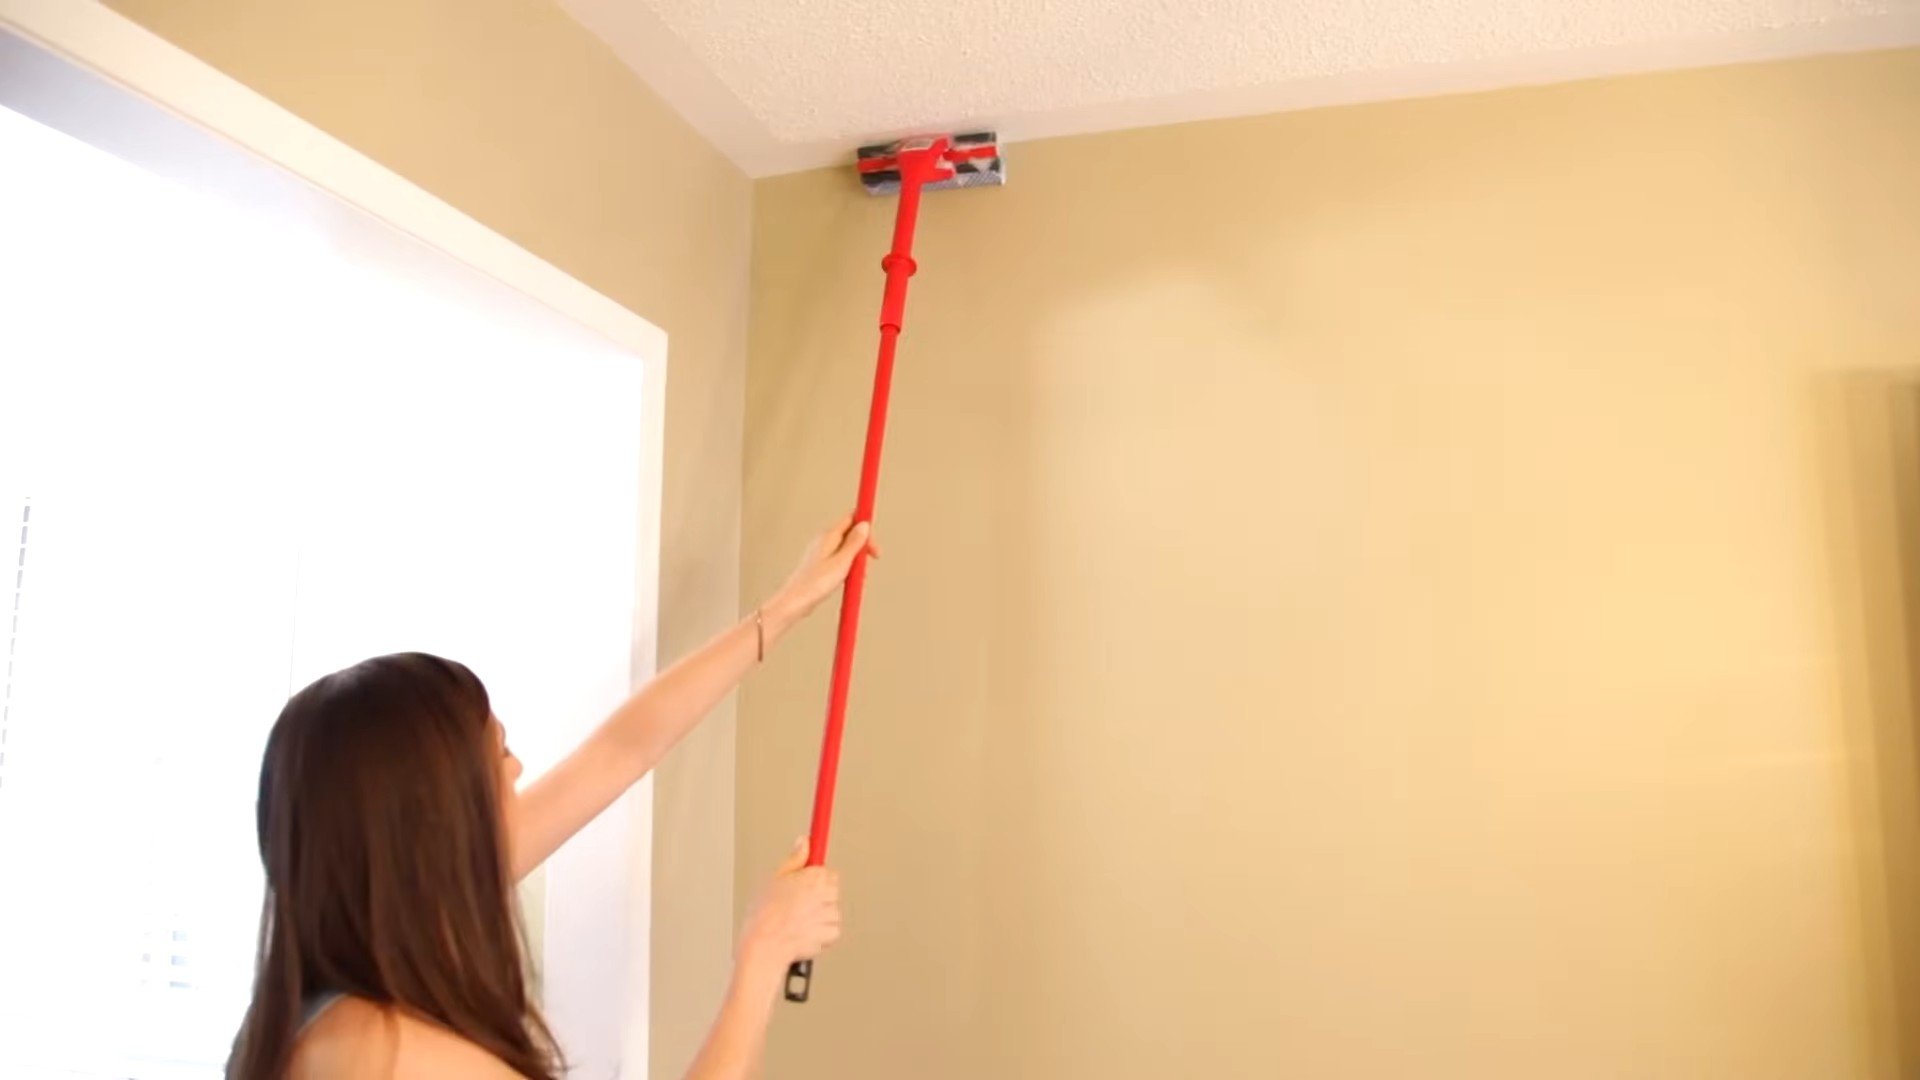
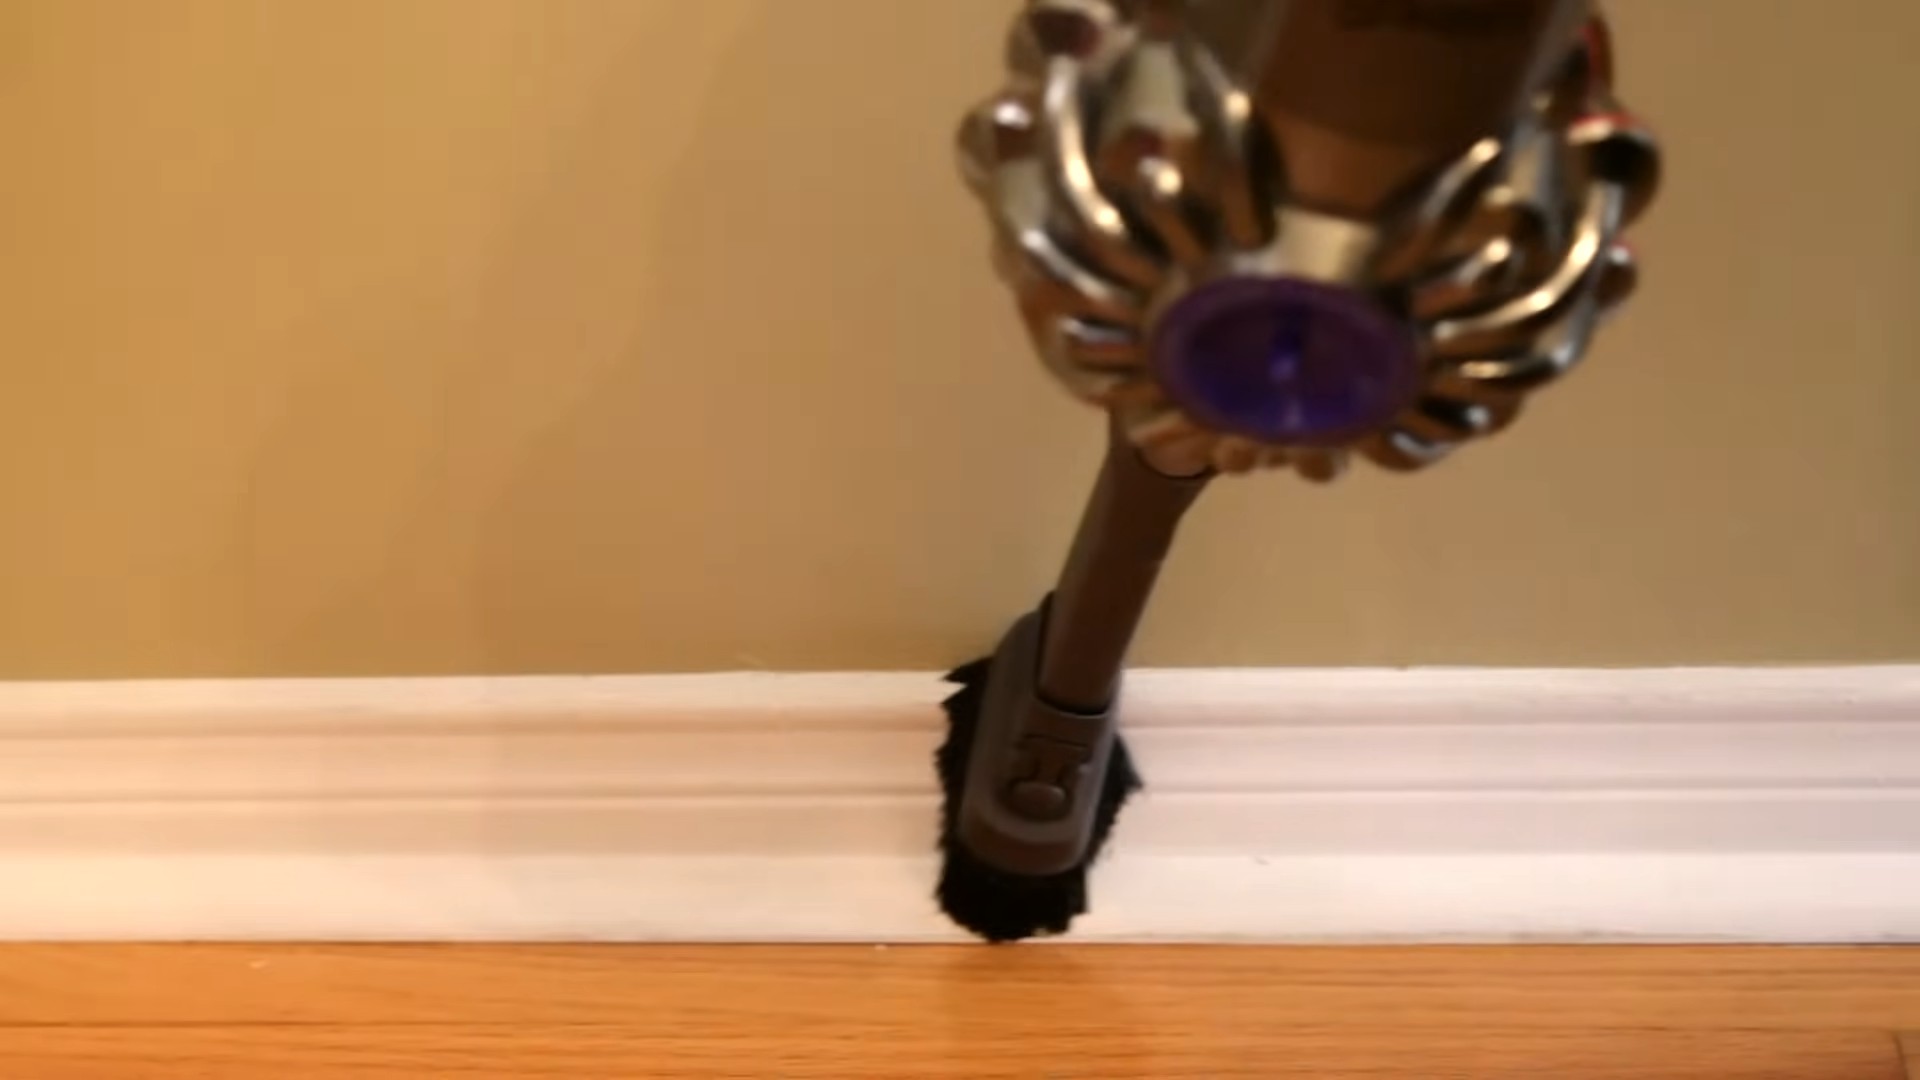
* A long-handled duster or vacuum with a brush attachment
* A paint edger tool (this is the secret weapon!)
* Optional: Magic Eraser (for stubborn scuff marks)
* Optional: Old toothbrush (for tight corners and crevices)
* Optional: Spray bottle (for targeted cleaning)
* Optional: Gloves (to protect your hands)
Prepping for Baseboard Battle: Dust is the Enemy
Before we even think about getting wet, we need to tackle the dust and loose debris. This step is crucial because trying to wash dusty baseboards just creates a muddy mess.
1. Dust First: Use your long-handled duster or vacuum with a brush attachment to thoroughly dust the baseboards. Pay special attention to the top edge where dust loves to accumulate. I like to go over them twice, just to be sure I’ve gotten everything.
2. Vacuum the Floor: While you’re at it, vacuum the floor right next to the baseboards. This will prevent any loose dirt from splashing back onto your freshly cleaned baseboards.
The Main Event: Cleaning with the Paint Edger
This is where the magic happens! The paint edger tool is a game-changer. It allows you to clean the baseboards without bending over and provides even pressure for effective cleaning.
1. Prepare Your Cleaning Solution: Fill your bucket with warm water and add a squirt or two of dish soap. You don’t need a ton of soap; too much can leave a residue. Mix well.
2. Attach the Microfiber Cloth: Wrap a clean microfiber cloth around the paint edger tool. Make sure it’s snug and secure. You might need to experiment with folding the cloth to get the right fit.
3. Dip and Wring: Dip the covered paint edger into the soapy water, then wring it out thoroughly. You want the cloth to be damp, not dripping wet. Excess water can damage your floors and leave streaks.
4. Glide and Clean: Now, gently glide the paint edger along the baseboard, applying even pressure. Work in sections, overlapping each pass slightly. You’ll be amazed at how easily the dirt comes off!
5. Rinse and Repeat: As the microfiber cloth gets dirty, rinse it out in the bucket of clean water (if you have one) or replace it with a fresh one. I recommend having a stack of clean cloths ready to go.
6. Tackle Stubborn Spots: For stubborn scuff marks or grime, try using a Magic Eraser. Be gentle, as Magic Erasers can be abrasive. You can also spray the area with a targeted cleaner and let it sit for a minute before wiping.
7. Reach Those Corners: Use an old toothbrush to get into tight corners and crevices. Dip the toothbrush in the soapy water and scrub gently.
8. Dry the Baseboards: After cleaning, use a clean, dry microfiber cloth to dry the baseboards. This will prevent water spots and streaks.
Dealing with Different Types of Baseboards
Not all baseboards are created equal! Here’s how to adjust your cleaning method for different materials:
* Painted Baseboards: These are the most common and easiest to clean. The method described above works perfectly.
* Wood Baseboards (Stained or Varnished): Be careful not to use too much water, as it can damage the finish. Use a slightly damp cloth and a gentle wood cleaner. Always test in an inconspicuous area first.
* Tile Baseboards: These are very durable and can withstand more water. You can use a stronger cleaning solution if needed.
* Vinyl Baseboards: These are also quite durable and easy to clean. The method described above works well.
Extra Tips and Tricks for Baseboard Bliss
* Frequency is Key: Cleaning your baseboards regularly (every few months) will prevent dirt and grime from building up and make the job much easier.
* Protect Your Floors: If you’re worried about water damage, place a towel or plastic sheet along the floor next to the baseboards.
* Ventilation is Important: Open windows or turn on a fan to help the baseboards dry quickly.
* Spot Clean as Needed: If you notice a spill or scuff mark, clean it up right away to prevent it from setting in.
* Consider a Baseboard Buddy: There are specialized baseboard cleaning tools available that are similar to the paint edger but designed specifically for baseboards.
* Don’t Forget the Details: Pay attention to the areas around door frames and corners, as these tend to accumulate more dirt.
* Listen to Your Body: If you start to feel back pain, take a break! It’s better to clean a little bit at a time than to overdo it and hurt yourself.
* Homemade Cleaning Solution: If you prefer a more natural cleaning solution, you can mix equal parts white vinegar and water. Vinegar is a great disinfectant and degreaser.
* Test in an Inconspicuous Area: Before using any cleaning solution, test it in an inconspicuous area to make sure it doesn’t damage the finish.
* Use a Soft Brush: If you’re using a brush to scrub the baseboards, make sure it has soft bristles to avoid scratching the surface.
* Avoid Abrasive Cleaners: Avoid using abrasive cleaners, as they can damage the finish on your baseboards.
* Be Patient: Cleaning baseboards can be time-consuming, but the results are worth it!
* Get the Kids Involved: If you have kids, get them involved in the cleaning process! It’s a great way to teach them about responsibility and teamwork. (Okay, maybe that’s wishful thinking, but it’s worth a try!)
* Reward Yourself: After you’ve finished cleaning your baseboards, reward yourself with a treat! You deserve it!
* Preventative Measures: Place mats at doorways to trap dirt and debris before it gets tracked onto your floors and baseboards.
* Regular Dusting: Regularly dust your home to prevent dust from accumulating on your baseboards.
* Consider Baseboard Heaters: If you have baseboard heaters, make sure to clean them regularly as well. Dust and debris can accumulate inside the heater and reduce its efficiency.
* Inspect Regularly: Regularly inspect your baseboards for damage, such as cracks or chips. Repair any damage promptly to prevent further deterioration.
* Caulk Gaps: Caulk any gaps between the baseboards and the wall to prevent dirt and moisture from getting trapped.
* Touch-Up Paint: If your baseboards are painted, touch up any chips or scratches with paint to keep them looking their best.
* Consider a Professional: If you’re not comfortable cleaning your baseboards yourself, consider hiring a professional cleaning service.
Maintaining Your Sparkling Baseboards
Once you’ve got your baseboards clean, you’ll want to keep them that way! Regular dusting and spot cleaning will go a long way. And remember, a little bit of effort on a regular basis is much easier than tackling a huge buildup of grime.
So, there you have it! My foolproof method for cleaning baseboards without breaking your back. Give it a try, and I promise you’ll be amazed at the difference it makes in your home. Happy cleaning!
Conclusion
So, there you have it! Cleaning baseboards is often a neglected chore, but with this simple DIY trick, it doesn’t have to be a back-breaking, time-consuming ordeal. We’ve shown you how to transform this often-dreaded task into a manageable and even, dare we say, enjoyable experience. The beauty of this method lies in its simplicity and effectiveness. You’re likely already equipped with most, if not all, of the necessary supplies, meaning you can ditch the expensive, chemical-laden cleaners and embrace a more budget-friendly and eco-conscious approach.
Why is this DIY baseboard cleaning trick a must-try? Because it saves you time, money, and effort while delivering sparkling clean results. No more crawling around on your hands and knees, struggling to reach those awkward corners. This method allows you to clean your baseboards standing up, protecting your back and knees. Plus, you’re using gentle ingredients that won’t damage your baseboards or expose your family to harsh chemicals.
But the best part? The customization! Feel free to experiment with different cleaning solutions to find what works best for your specific baseboard material and level of grime. For painted baseboards, a mild dish soap solution often works wonders. For wood baseboards, consider adding a touch of vinegar for extra cleaning power, but always test in an inconspicuous area first to ensure it doesn’t damage the finish. You can also add a few drops of your favorite essential oil to the cleaning solution for a fresh, clean scent. Lavender, lemon, and tea tree oil are all excellent choices.
Variations to consider:
* For heavily soiled baseboards: Pre-treat stubborn stains with a paste of baking soda and water before using the cleaning solution. Let the paste sit for a few minutes before wiping it away.
* For textured baseboards: Use a soft-bristled brush to gently scrub away dirt and grime from the crevices.
* For high baseboards: Extend the handle of your cleaning tool or use a step stool to safely reach those hard-to-reach areas.
* Dusting First: Always dust your baseboards before wet cleaning. This prevents you from simply pushing the dust around and creating a muddy mess. A vacuum with a brush attachment works great for this.
We are confident that this DIY baseboard cleaning trick will revolutionize your cleaning routine. It’s efficient, effective, and easy to adapt to your specific needs. So, ditch the harsh chemicals and back pain, and give this method a try. You’ll be amazed at how quickly and easily you can achieve sparkling clean baseboards.
Don’t just take our word for it! We encourage you to try this DIY trick and share your experience with us. Let us know what variations you tried, what worked best for you, and any tips you have to share. Your feedback will help us refine this method and make it even better for everyone. Share your before-and-after photos on social media using #CleanBaseboardsEasily and inspire others to embrace this simple and effective cleaning solution. We can’t wait to see your sparkling clean baseboards! Remember, a clean home starts with the details, and clean baseboards can make a world of difference.
Frequently Asked Questions (FAQ)
What kind of cleaning solution should I use?
The best cleaning solution depends on the material of your baseboards and the level of grime. For painted baseboards, a mild dish soap solution (a few drops of dish soap in warm water) is usually sufficient. For wood baseboards, you can add a touch of vinegar to the solution for extra cleaning power, but always test in an inconspicuous area first to ensure it doesn’t damage the finish. Avoid using harsh chemicals or abrasive cleaners, as they can damage the baseboards. For stubborn stains, a paste of baking soda and water can be applied before cleaning.
How often should I clean my baseboards?
The frequency of cleaning depends on several factors, including the amount of foot traffic in your home, whether you have pets, and how dusty your environment is. As a general rule, cleaning your baseboards every 1-3 months is a good starting point. However, if you notice that your baseboards are getting dirty more quickly, you may need to clean them more often. Regular dusting can also help to prevent dirt and grime from building up.
Can I use this method on all types of baseboards?
This method is generally safe for most types of baseboards, including painted, wood, and vinyl. However, it’s always a good idea to test the cleaning solution in an inconspicuous area first to ensure it doesn’t damage the finish. For delicate or antique baseboards, consult with a professional cleaner before attempting any DIY cleaning methods.
What if I have textured baseboards?
Textured baseboards can be more challenging to clean because dirt and grime can get trapped in the crevices. To clean textured baseboards, use a soft-bristled brush to gently scrub away dirt and grime from the crevices. You may also need to use a slightly stronger cleaning solution. Be sure to rinse the baseboards thoroughly after cleaning to remove any residue.
What if I have pets?
If you have pets, you may need to clean your baseboards more often, as they can track dirt, hair, and other debris onto the baseboards. You may also want to use a pet-friendly cleaning solution to avoid exposing your pets to harsh chemicals. Consider using a vacuum with a brush attachment to remove pet hair from the baseboards before cleaning.
How can I prevent my baseboards from getting dirty so quickly?
There are several things you can do to prevent your baseboards from getting dirty so quickly. First, regularly dust your baseboards to remove loose dirt and debris. You can also use a doormat to prevent dirt from being tracked into your home. If you have pets, groom them regularly to reduce shedding. Finally, consider sealing your baseboards with a protective coating to make them easier to clean.
What if I don’t have a microfiber cloth?
While microfiber cloths are ideal for cleaning baseboards because they are soft, absorbent, and non-abrasive, you can use other types of cloths as well. A soft cotton cloth or an old t-shirt will also work. Just be sure to use a clean cloth to avoid spreading dirt and grime. Avoid using abrasive cloths or scrub brushes, as they can damage the baseboards.
Is vinegar safe to use on all types of baseboards?
While vinegar is a natural and effective cleaning agent, it is acidic and can damage certain types of baseboards, particularly those with a delicate finish. Always test vinegar in an inconspicuous area before using it on your baseboards. If you are unsure whether vinegar is safe to use, consult with a professional cleaner.
Can I use a steam cleaner on my baseboards?
Steam cleaners can be effective for cleaning baseboards, but it’s important to use them carefully. Avoid using too much steam, as it can damage the baseboards. Also, be sure to use a steam cleaner with a soft brush attachment to avoid scratching the baseboards. Always test the steam cleaner in an inconspicuous area first to ensure it doesn’t damage the finish.
What are the benefits of using this DIY method over commercial cleaners?
This DIY method offers several benefits over commercial cleaners. It’s more budget-friendly, as you likely already have most of the necessary supplies on hand. It’s also more eco-conscious, as you’re using gentle ingredients that won’t harm the environment. Additionally, this method allows you to customize the cleaning solution to your specific needs and preferences. Finally, you’re avoiding harsh chemicals that can be harmful to your health.


Leave a Comment