

Clean Oven with Baking Soda: Are you tired of battling baked-on grime and lingering odors every time you open your oven? I know I was! For years, I dreaded oven cleaning day, resorting to harsh chemicals and endless scrubbing. But what if I told you there’s a simple, natural, and incredibly effective way to get your oven sparkling clean using something you probably already have in your pantry?
Oven cleaning has been a chore for generations, evolving from wood-fired ovens requiring meticulous ash removal to modern self-cleaning models that still often fall short. Baking soda, however, has been a trusted cleaning agent for centuries, valued for its gentle abrasiveness and deodorizing properties. Think of it as a return to simpler, more sustainable cleaning methods – a nod to our grandmothers’ wisdom with a modern twist.
Let’s face it, a clean oven isn’t just about aesthetics. Burnt food residue can affect the taste of your dishes and even release unpleasant smells into your kitchen. Plus, a clean oven operates more efficiently, saving you energy and money. That’s why mastering this simple clean oven with baking soda trick is a game-changer. I’m going to show you a step-by-step guide to effortlessly banish oven grime, leaving you with a sparkling clean oven and more time to enjoy your delicious creations. Get ready to say goodbye to harsh chemicals and hello to a naturally clean oven!
DIY Oven Cleaning with Baking Soda: A Sparkling Clean Oven Without Harsh Chemicals!
Okay, let’s face it, cleaning the oven is probably on everyone’s list of least favorite chores. But a clean oven not only looks better, it also helps your food cook more evenly and can even improve its taste! The good news is, you don’t need harsh chemicals to get the job done. This DIY method using baking soda and vinegar is surprisingly effective, budget-friendly, and much gentler on your lungs and the environment. I’ve been using this method for years, and I’m always amazed at the results. So, grab your supplies, and let’s get started!
What You’ll Need:
* Baking soda (the star of the show!)
* White vinegar (the supporting actor)
* Water
* Spray bottle
* Rubber gloves (protect those hands!)
* Sponge or scrubbing brush (I prefer a non-scratch scrubbing brush)
* Plastic scraper or spatula (for stubborn baked-on messes)
* Old rags or paper towels (for wiping)
* Small bowl (for mixing the baking soda paste)
Prepping Your Oven:
Before we dive into the cleaning process, let’s get the oven ready. This will make the whole process smoother and more effective.
1. Remove the Oven Racks: Take out all the oven racks, pizza stones, or anything else that’s inside. We’ll clean these separately later.
2. Protect the Floor: Lay down some old newspapers or a drop cloth around the base of your oven. This will catch any drips and spills, saving you from extra cleanup later.
3. Give it a Quick Wipe Down: Use a damp cloth to wipe up any loose crumbs or debris from the bottom of the oven. This will help the baking soda paste adhere better.
Making and Applying the Baking Soda Paste:
This is where the magic happens! The baking soda paste will work its way into the baked-on grime and loosen it up for easy removal.
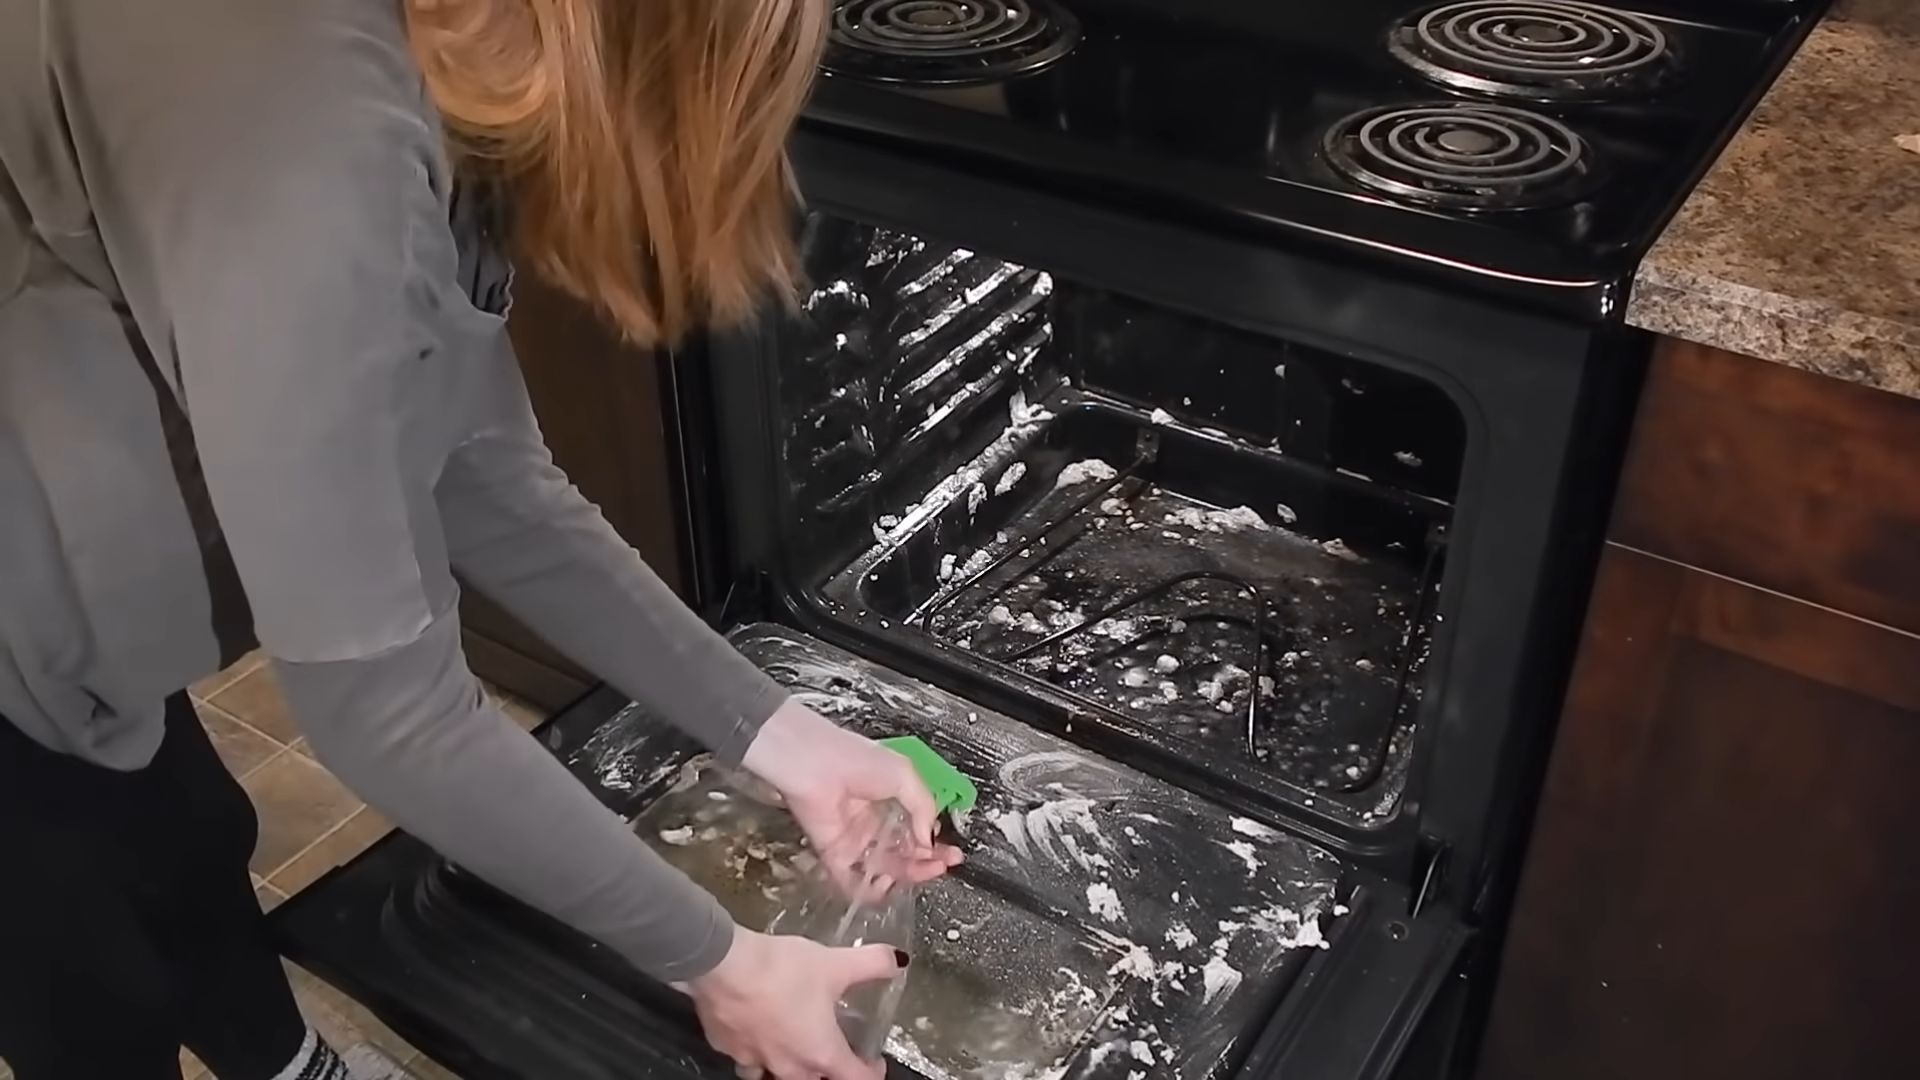
1. Mix the Paste: In your small bowl, combine about 1/2 cup of baking soda with enough water to form a thick, spreadable paste. You want it to be similar to the consistency of frosting. Add water gradually, mixing as you go, until you reach the desired consistency.
2. Coat the Oven: Using your rubber gloves (remember, protection!), generously spread the baking soda paste all over the interior surfaces of your oven. This includes the back, sides, top, bottom, and even the inside of the oven door. Avoid the heating elements!
3. Focus on Problem Areas: Pay special attention to areas with heavy baked-on grease or food splatters. Apply a thicker layer of paste to these spots.
4. Let it Sit (and Work its Magic!): This is the most important part! Let the baking soda paste sit in your oven for at least 12 hours, or even overnight. The longer it sits, the more effective it will be at loosening the grime. I usually apply it before I go to bed and let it work its magic while I sleep.
Cleaning the Oven Racks:
While the baking soda paste is working its magic inside the oven, let’s tackle those grimy oven racks.
1. Choose Your Method: There are a couple of ways to clean your oven racks. You can either soak them in a bathtub or use a large trash bag. I prefer the trash bag method because it’s less messy.
2. Trash Bag Method: Place the oven racks inside a large trash bag. Add about 1/2 cup of dish soap and 1/4 cup of baking soda to the bag. Pour in enough hot water to cover the racks. Seal the bag tightly and let it sit for at least 2 hours, or even overnight.
3. Bathtub Method: Line your bathtub with old towels to protect the surface. Place the oven racks in the tub and fill it with hot water. Add about 1/2 cup of dish soap and 1/4 cup of baking soda to the water. Let the racks soak for at least 2 hours, or even overnight.
4. Scrub and Rinse: After soaking, remove the racks from the bag or tub. Use a sponge or scrubbing brush to scrub away any remaining grime. Rinse the racks thoroughly with clean water and let them dry completely.
Removing the Baking Soda Paste and Final Touches:
Okay, the waiting is over! Now it’s time to remove the baking soda paste and reveal your sparkling clean oven.
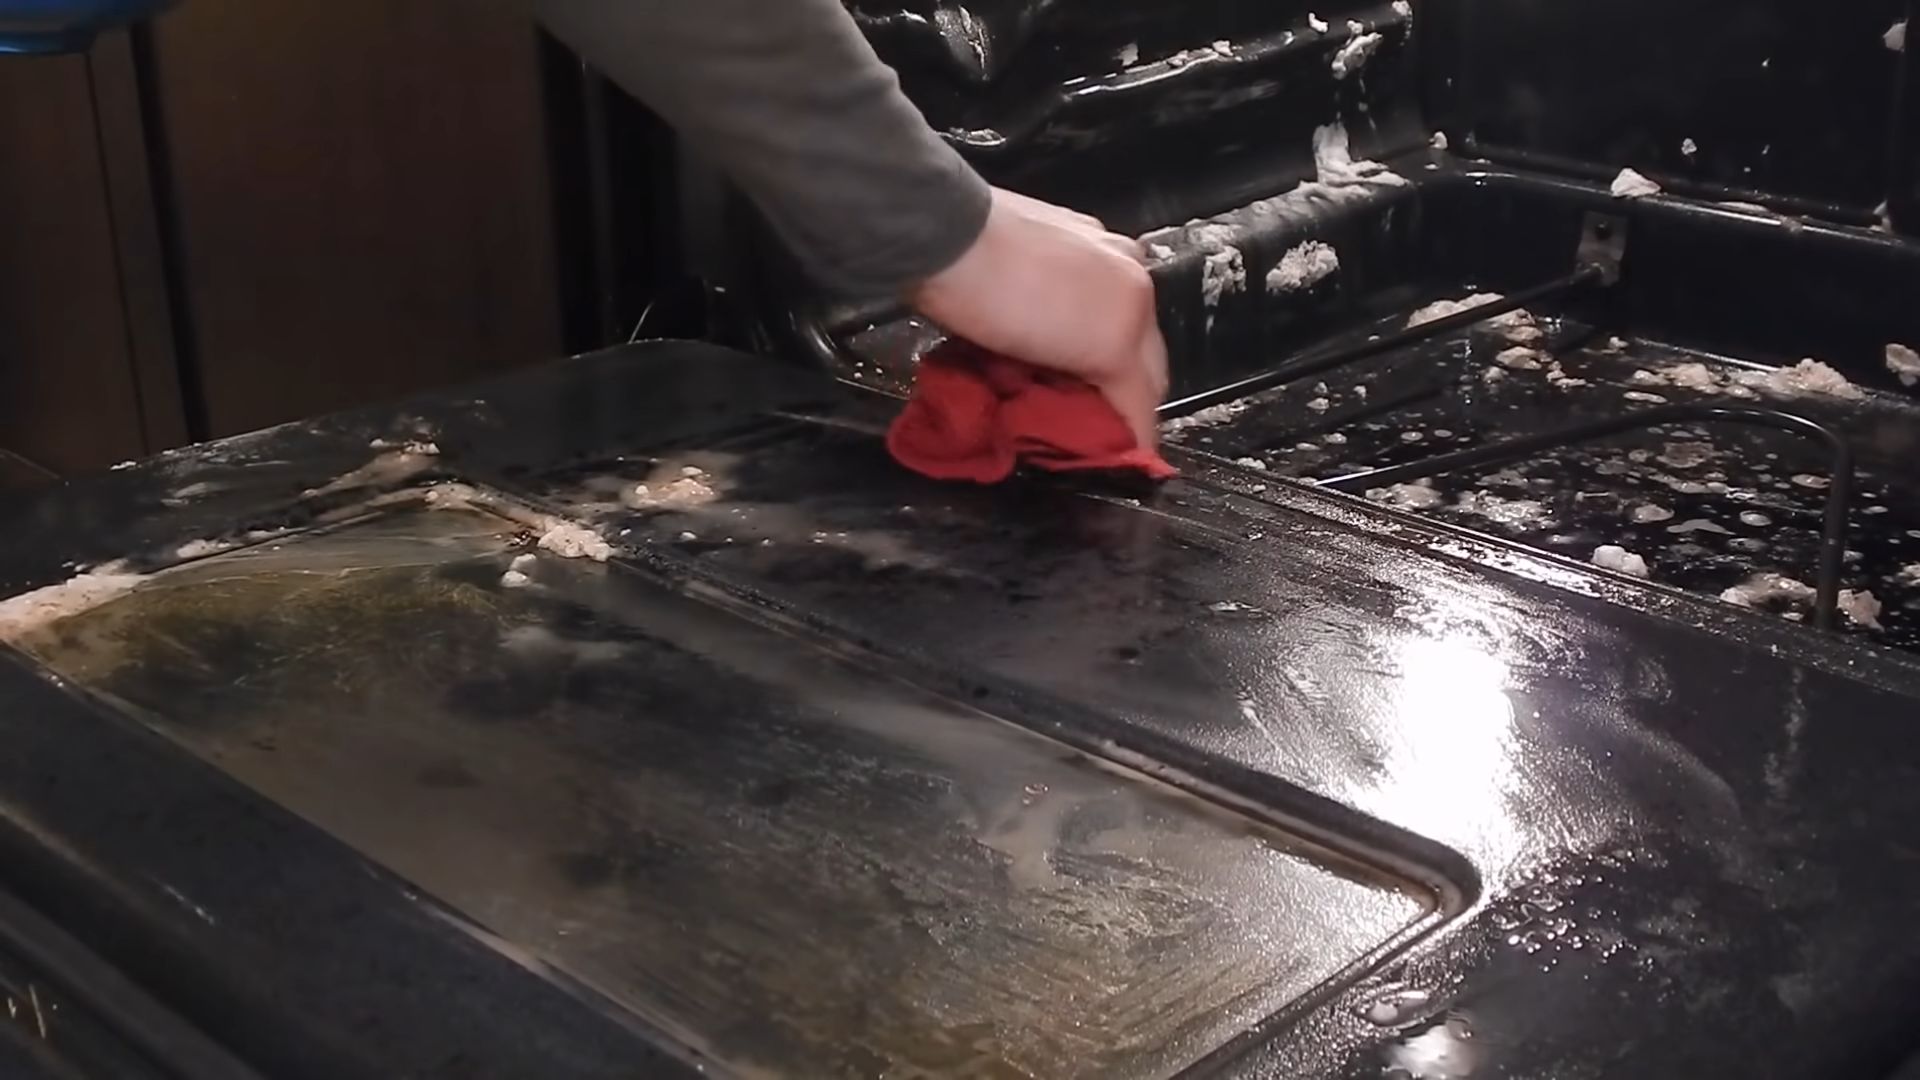
1. Wipe Away the Paste: Using a damp sponge or rag, start wiping away the baking soda paste from the interior of the oven. You may need to use a bit of elbow grease, especially in areas with heavy buildup.
2. Use the Scraper: For stubborn baked-on messes, use your plastic scraper or spatula to gently scrape away the grime. Be careful not to scratch the oven surface.
3. Vinegar Power: Once you’ve removed most of the baking soda paste, fill your spray bottle with white vinegar. Spray the interior of the oven with vinegar. The vinegar will react with any remaining baking soda, creating a fizzing action that helps to loosen any remaining grime.
4. Final Wipe Down: Wipe down the interior of the oven one last time with a clean, damp cloth. Make sure to remove all traces of baking soda and vinegar.
5. Dry It Out: Use a clean, dry rag or paper towels to dry the interior of the oven completely.
6. Reassemble: Place the clean oven racks back inside the oven.
The Final Step:
1. Turn on the Oven: Turn on your oven to a low temperature (around 200 degrees Fahrenheit) for about 15-20 minutes. This will help to dry out any remaining moisture and eliminate any lingering odors. Keep an eye on it and make sure nothing is smoking.
Tips and Tricks for a Super Clean Oven:
* Regular Cleaning: The key to keeping your oven clean is to clean it regularly. Try to wipe up spills as soon as they happen to prevent them from baking on.
* Self-Cleaning Cycle (Use with Caution): While your oven might have a self-cleaning cycle, I generally avoid using it. It can produce harsh fumes and can be hard on your oven. If you do use it, make sure to follow the manufacturer’s instructions carefully and ventilate your kitchen well.
* Baking Soda and Lemon: For an extra boost of cleaning power, add a few drops of lemon juice to your baking soda paste. The lemon juice will help to cut through grease and leave your oven smelling fresh.
* Don’t Forget the Door: Pay attention to the oven door, both inside and out. Use a glass cleaner to clean the outside of the door and the baking soda paste method to clean the inside.
* Ventilation is Key: Even though this method is much gentler than using harsh chemicals, it’s still important to ventilate your kitchen well while you’re cleaning. Open a window or turn on your exhaust fan.
Troubleshooting:
* Stubborn Stains: If you have some really stubborn stains that just won’t budge, try making a thicker baking soda paste and letting it sit for a longer period of time. You can also try using a bit of steel wool (gently!) to scrub the stains.
* Baking Soda Residue: If you’re having trouble removing all the baking soda residue, try using a vinegar-soaked cloth to wipe down the oven. The vinegar will help to dissolve the baking soda.
* Odor: If your oven has a lingering odor after cleaning, try placing a bowl of vinegar or baking soda inside the oven overnight. This will help to absorb the odor.
Safety First!
* Always wear rubber gloves when cleaning your oven to protect your hands from the baking soda and vinegar.
* Avoid getting baking soda or vinegar in your eyes. If you do, rinse them thoroughly with water.
* Never mix baking soda and vinegar in a closed container, as this can create pressure and cause the container to explode.
* Unplug your oven or turn off the breaker before cleaning to avoid electric shock.
I hope this guide helps you get your oven sparkling clean! It might take a little bit of time and effort, but the results are well worth it. Plus, you’ll have the satisfaction of knowing that you cleaned your oven without using any harsh chemicals. Happy cleaning!
Conclusion
So, there you have it! A simple, effective, and surprisingly satisfying way to achieve a sparkling clean oven using the power of baking soda. Forget harsh chemicals and expensive oven cleaners; this DIY method is not only budget-friendly but also environmentally conscious, leaving you with a fresh-smelling kitchen and peace of mind.
The beauty of this method lies in its simplicity. You’re likely to already have baking soda in your pantry, making it an accessible solution for anyone looking to tackle oven grime. But beyond the convenience, consider the health benefits. Eliminating harsh chemicals from your cleaning routine reduces the risk of exposure to harmful fumes and residues, creating a safer environment for you and your family.
This isn’t just about cleaning; it’s about reclaiming your kitchen and enjoying the process. There’s a certain satisfaction in seeing years of baked-on grease and grime dissolve away with a little elbow grease and the magic of baking soda.
Why is this DIY trick a must-try? Because it’s effective, affordable, eco-friendly, and healthier than traditional oven cleaning methods. It’s a win-win-win-win!
Looking for variations or suggestions?
* For particularly stubborn stains, consider adding a few drops of essential oils like lemon or tea tree to the baking soda paste. These oils have natural degreasing and antibacterial properties that can boost the cleaning power.
* If you have a self-cleaning oven, you can still use this method as a gentler alternative. Simply skip the self-cleaning cycle and opt for the baking soda paste instead.
* To prevent future build-up, wipe down your oven after each use, even if it’s just a quick swipe with a damp cloth. This will prevent grease and food particles from hardening and becoming difficult to remove.
* Consider using a pumice stone (wet) for extremely stubborn baked-on spots after the baking soda treatment. Be gentle and test in an inconspicuous area first to avoid scratching.
* For a truly deep clean, remove the oven racks and soak them in a solution of hot water and dish soap while the baking soda paste is working its magic inside the oven.
We’re confident that this DIY oven cleaning trick will become a staple in your cleaning routine. It’s a simple, effective, and satisfying way to maintain a clean and healthy kitchen.
Now it’s your turn! Give this baking soda oven cleaning method a try and share your experience with us. We’d love to hear your tips, tricks, and any variations you discover along the way. Let’s create a community of clean oven enthusiasts! Share your before-and-after photos and let us know how this method worked for you. Happy cleaning!
FAQ
Q: Is baking soda safe to use for cleaning my oven?
A: Absolutely! Baking soda is a natural and non-toxic cleaning agent, making it a safe alternative to harsh chemical oven cleaners. It’s gentle on your oven’s surfaces and won’t leave behind any harmful fumes or residues. However, avoid getting baking soda in the heating element.
Q: How long should I leave the baking soda paste on the oven?
A: For best results, leave the baking soda paste on the oven for at least 12 hours, or even overnight. This allows the baking soda to penetrate and loosen the baked-on grease and grime. For lighter cleaning, you might get away with 2-3 hours.
Q: What if the baking soda paste dries out while it’s in the oven?
A: If the baking soda paste dries out, simply spritz it with a little water to rehydrate it. This will help to keep it working effectively. You can also cover the paste with plastic wrap to prevent it from drying out in the first place.
Q: How do I remove the baking soda paste after it’s been sitting in the oven?
A: Use a damp sponge or cloth to wipe away the baking soda paste. You may need to rinse the sponge or cloth frequently to remove all of the residue. For stubborn areas, use a plastic scraper to gently loosen the grime before wiping it away.
Q: My oven is really dirty. Will this baking soda method still work?
A: Yes, this method can work on even the dirtiest ovens, but it may require a little more effort and patience. You may need to apply a thicker layer of baking soda paste and let it sit for a longer period of time. You may also need to repeat the cleaning process a few times to achieve the desired results.
Q: Can I use this method on a self-cleaning oven?
A: Yes, you can use this method on a self-cleaning oven as a gentler alternative to the self-cleaning cycle. The self-cleaning cycle can produce strong odors and high temperatures, which can be harmful to your health and your oven. Using baking soda is a safer and more environmentally friendly option.
Q: What if I don’t have baking soda? Can I use something else?
A: While baking soda is the key ingredient in this method, you can try using a mixture of vinegar and dish soap as an alternative. However, baking soda is generally more effective at removing baked-on grease and grime.
Q: Will this method damage my oven?
A: No, this method is unlikely to damage your oven as long as you use baking soda and water. Avoid using abrasive cleaners or scouring pads, as these can scratch the oven’s surfaces. Also, be careful not to get baking soda in the heating element.
Q: How often should I clean my oven with baking soda?
A: The frequency of cleaning depends on how often you use your oven. If you use your oven frequently, you may want to clean it every month or two. If you only use your oven occasionally, you can clean it less frequently. A good rule of thumb is to clean your oven whenever you notice a significant build-up of grease and grime.
Q: What are the benefits of using baking soda to clean my oven compared to commercial oven cleaners?
A: The benefits are numerous! Baking soda is non-toxic, odorless, and readily available. Commercial oven cleaners often contain harsh chemicals that can be harmful to your health and the environment. Baking soda is also much more affordable than commercial oven cleaners. Plus, you avoid the harsh fumes associated with chemical cleaners.
Q: Can I add vinegar to the baking soda paste to make it more effective?
A: While some people suggest adding vinegar, it’s generally not recommended for this specific oven cleaning method. The initial fizzing reaction between baking soda and vinegar is short-lived and doesn’t necessarily enhance the cleaning power in this context. It’s better to use baking soda and water for the paste, and then use vinegar separately to wipe down the oven after removing the paste.
Q: How can I prevent my oven from getting so dirty in the first place?
A: Prevention is key! Wipe up spills immediately to prevent them from baking onto the oven surfaces. Use oven liners or baking sheets to catch drips and spills. Consider covering dishes with foil or lids while baking to minimize splattering. Regular, quick wipe-downs after each use can also make a big difference.


Leave a Comment