

Clean Stainless Steel Pans – are you tired of battling stubborn stains and burnt-on food that just won’t budge? I know I was! For years, I struggled to keep my stainless steel cookware looking its best. It felt like a never-ending cycle of scrubbing, soaking, and still ending up with less-than-sparkling results. But guess what? I’ve discovered some amazing DIY tricks that have completely transformed my cleaning routine, and I’m so excited to share them with you!
Stainless steel cookware has been a kitchen staple for generations, prized for its durability, even heating, and resistance to rust. Its popularity soared in the early 20th century, becoming a symbol of modern kitchens. However, its tendency to show every little mark and stain can be frustrating. That’s where these simple, effective DIY hacks come in.
Let’s face it, nobody enjoys spending hours scrubbing pots and pans. Life’s too short! These DIY tricks are designed to save you time, money, and elbow grease. Imagine effortlessly removing those unsightly stains and restoring your stainless steel pans to their original shine. Not only will your cookware look fantastic, but you’ll also feel a sense of accomplishment knowing you’ve conquered those kitchen challenges with simple, natural solutions. So, get ready to say goodbye to stubborn stains and hello to sparkling clean stainless steel pans!
DIY: Restore Your Stainless Steel Pans to Their Former Glory
Okay, let’s face it: we all love the sleek look of stainless steel cookware, but keeping it sparkling clean can feel like a never-ending battle. Burnt food, stubborn stains, and that annoying rainbow discoloration – they’re the bane of every home cook’s existence! But don’t despair! I’m here to share my tried-and-true method for restoring your stainless steel pans to their former glory, using simple ingredients you probably already have in your pantry. Get ready to say goodbye to those unsightly marks and hello to gleaming, like-new pans!
What You’ll Need: Your Arsenal of Cleaning Supplies
Before we dive in, let’s gather our supplies. This is a pretty straightforward process, and you likely have most of these items already.
* **Baking Soda:** This is our star player! Baking soda is a mild abrasive that’s perfect for lifting stains without scratching the surface.
* **White Vinegar:** The acid in vinegar helps to dissolve mineral deposits and cut through grease.
* **Dish Soap:** Good old dish soap is essential for removing surface grime and grease.
* **Water:** For mixing and rinsing, of course!
* **Soft Sponges or Cloths:** Avoid using steel wool or abrasive scrubbers, as they can scratch the stainless steel. I prefer using a non-scratch sponge or a microfiber cloth.
* **Paper Towels:** For drying and wiping.
* **Optional: Bar Keeper’s Friend:** This is a fantastic product specifically designed for cleaning stainless steel. If you have some on hand, it can give your pans an extra boost of shine.
* **Optional: Lemon:** Lemon juice is a natural degreaser and can help remove stubborn stains.
* **Optional: Olive Oil:** For polishing and protecting your pans after cleaning.
The Cleaning Process: Step-by-Step Instructions
Alright, let’s get down to business! I’ve broken down the cleaning process into several steps to make it as easy as possible.
1. Initial Soak and Wash
This first step is crucial for loosening any stuck-on food particles.
1. **Fill the Pan with Hot, Soapy Water:** Fill your dirty stainless steel pan with hot water and add a generous squirt of dish soap.
2. **Let it Soak:** Allow the pan to soak for at least 30 minutes, or even longer if the stains are particularly stubborn. I sometimes let mine soak overnight.
3. **Wash with a Soft Sponge:** After soaking, use a soft sponge or cloth to wash the pan thoroughly. Try to remove as much of the loose debris as possible.
4. **Rinse Well:** Rinse the pan thoroughly with hot water to remove all traces of soap.
2. Baking Soda Paste Power
Now, let’s bring in the baking soda for some serious stain-fighting action.
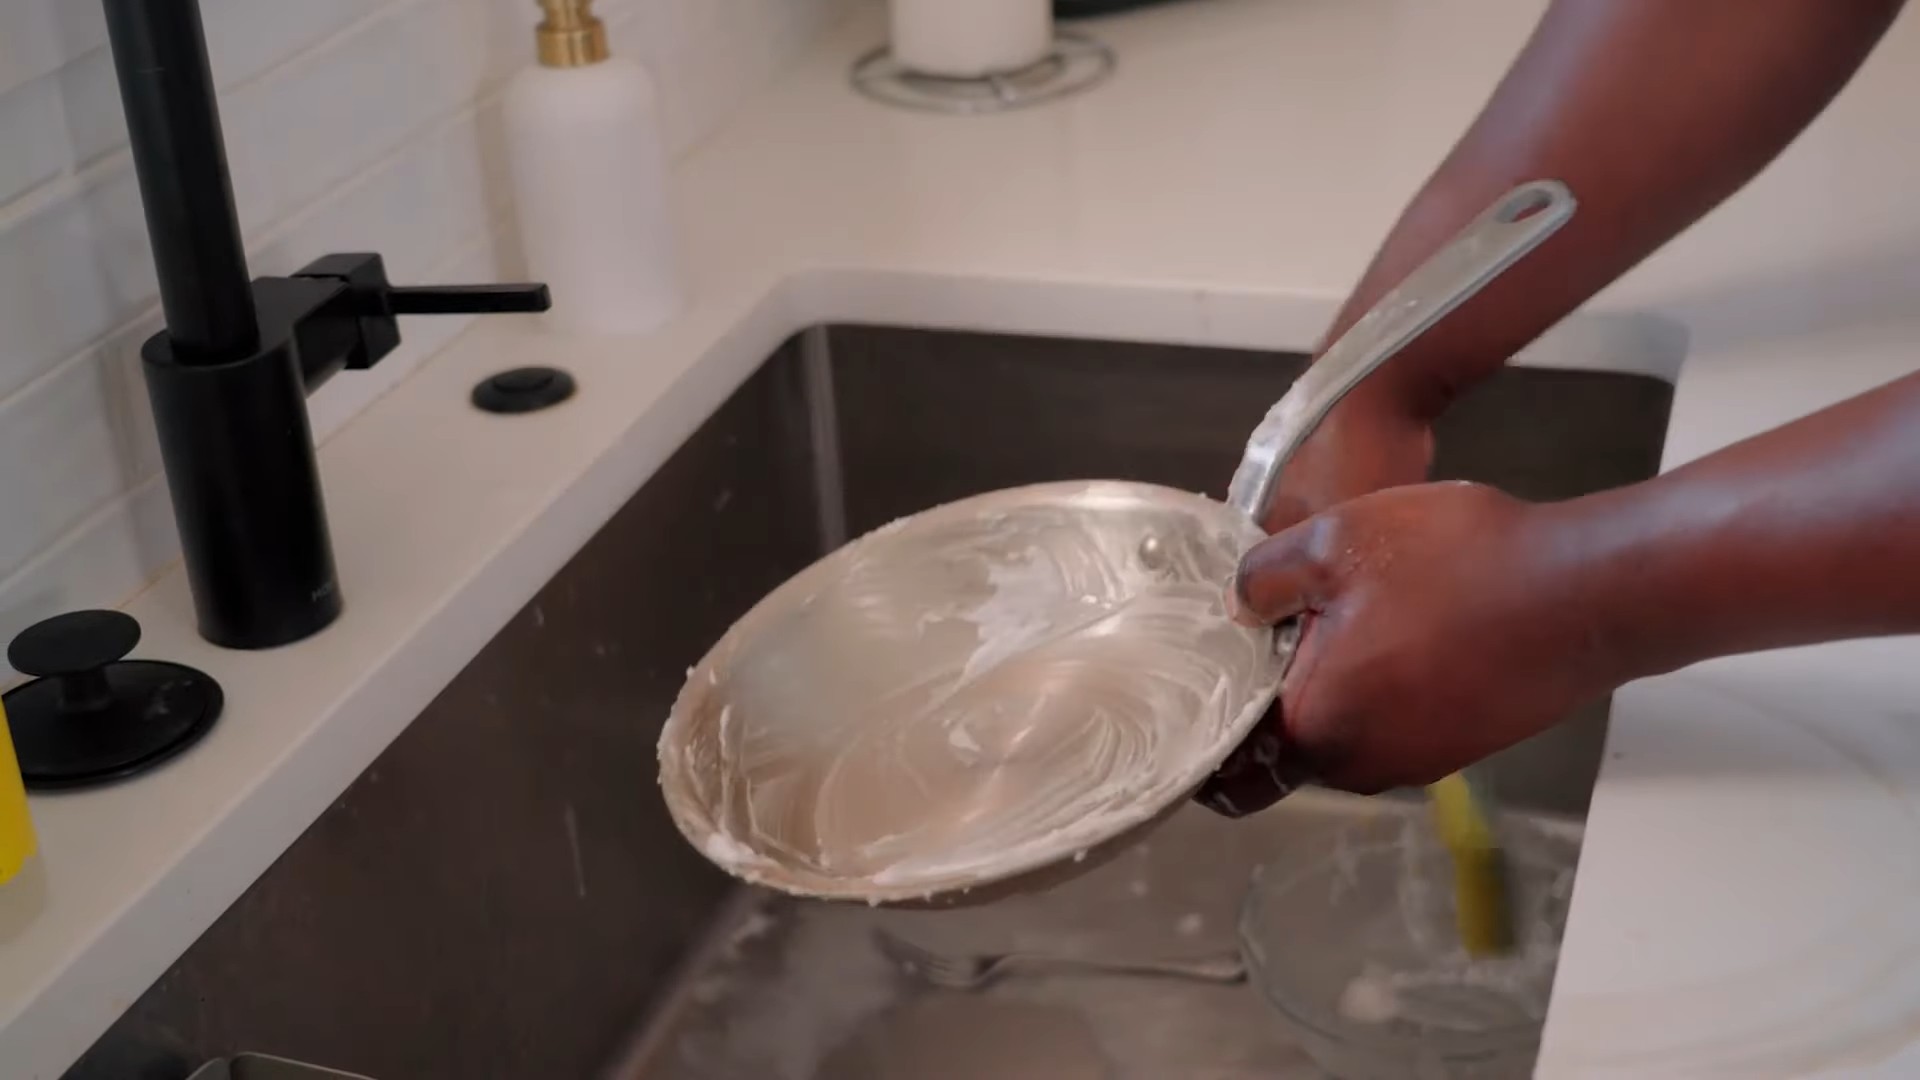
1. **Make a Baking Soda Paste:** In a small bowl, mix baking soda with a little water to form a thick paste. The consistency should be similar to toothpaste.
2. **Apply the Paste:** Apply the baking soda paste to the stained areas of the pan. Don’t be shy – cover the entire affected area generously.
3. **Gentle Scrubbing:** Using a soft sponge or cloth, gently scrub the paste into the stains. Use circular motions and apply a bit of pressure, but avoid scrubbing too hard, as you don’t want to scratch the stainless steel.
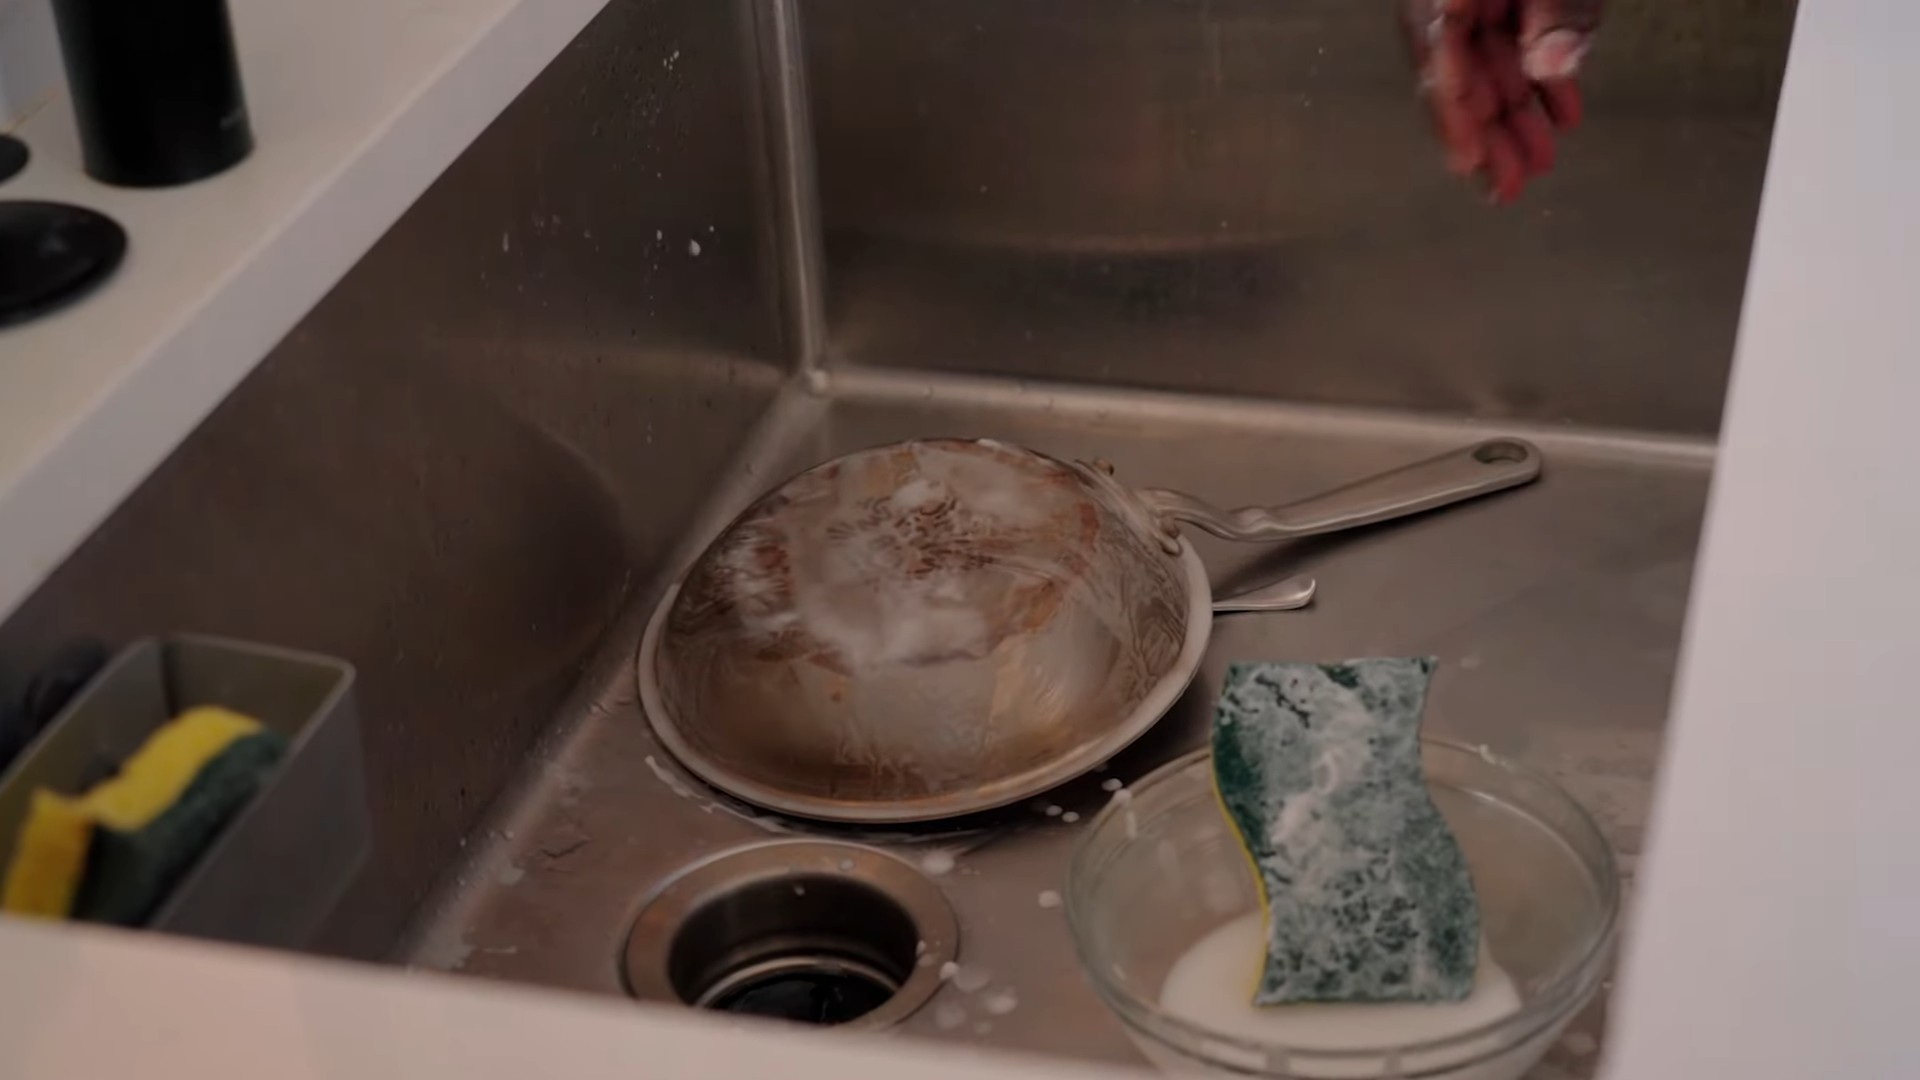
4. **Let it Sit:** Allow the baking soda paste to sit on the stains for at least 15-20 minutes. This gives the baking soda time to work its magic and lift the stains.
5. **Rinse Thoroughly:** Rinse the pan thoroughly with hot water to remove all traces of the baking soda paste.
3. Vinegar Power: Tackling Mineral Deposits and Discoloration
If you’re still seeing stubborn stains or that rainbow discoloration, vinegar is your next weapon of choice.
1. **Vinegar Bath:** Fill the pan with a mixture of equal parts white vinegar and water.
2. **Boil the Mixture (Optional):** For particularly stubborn stains, you can bring the vinegar and water mixture to a boil on the stovetop for a few minutes. Be sure to do this in a well-ventilated area, as the vinegar fumes can be strong.
3. **Soak Again:** Allow the vinegar solution to soak in the pan for at least 30 minutes.
4. **Scrub and Rinse:** After soaking, use a soft sponge or cloth to scrub the pan again. You should notice the stains and discoloration starting to lift. Rinse the pan thoroughly with hot water.
4. Bar Keeper’s Friend (Optional): The Extra Shine Booster
If you have Bar Keeper’s Friend on hand, this is a great way to give your pans an extra boost of shine.
1. **Apply Bar Keeper’s Friend:** Sprinkle a small amount of Bar Keeper’s Friend onto a damp sponge or cloth.
2. **Gentle Scrubbing:** Gently scrub the pan with the Bar Keeper’s Friend, focusing on any remaining stains or discoloration.
3. **Rinse Thoroughly:** Rinse the pan thoroughly with hot water to remove all traces of Bar Keeper’s Friend.
5. Lemon Power (Optional): For Stubborn Grease and Odors
If your pan has lingering grease or odors, lemon juice can be a great solution.
1. **Lemon Juice Application:** Cut a lemon in half and rub the cut side over the surface of the pan.
2. **Let it Sit:** Allow the lemon juice to sit on the pan for about 10-15 minutes.
3. **Rinse and Wash:** Rinse the pan thoroughly with hot water and wash with dish soap.
6. Drying and Polishing: The Finishing Touches
Now that your pan is clean, let’s dry and polish it to perfection.
1. **Dry Thoroughly:** Use a clean paper towel or microfiber cloth to dry the pan thoroughly. This is important to prevent water spots from forming.
2. **Olive Oil Polish (Optional):** For an extra shine and to help protect the stainless steel, you can apply a small amount of olive oil to a clean cloth and rub it over the surface of the pan. Buff the pan with a clean, dry cloth to remove any excess oil. This will leave your pan looking gleaming and new!
Dealing with Specific Problems: Troubleshooting Tips
Sometimes, you might encounter specific problems that require a little extra attention. Here are a few troubleshooting tips:
* **Burnt Food:** If you have severely burnt food stuck to the bottom of your pan, try boiling water with a few tablespoons of baking soda in the pan for about 15-20 minutes. This should help to loosen the burnt food, making it easier to scrub away.
* **Rainbow Discoloration (Heat Tint):** This discoloration is caused by overheating the pan. Vinegar is usually effective at removing it. If vinegar doesn’t work, try using Bar Keeper’s Friend.
* **Water Spots:** To prevent water spots, always dry your stainless steel pans thoroughly after washing. You can also use a stainless steel cleaner and polish to help prevent water spots from forming.
* **Rust:** While stainless steel is rust-resistant, it can sometimes develop rust spots if exposed to certain conditions. You can usually remove rust spots with a stainless steel cleaner or by scrubbing with a paste of baking soda and water.
Preventative Measures: Keeping Your Pans Sparkling
Prevention is always better than cure! Here are a few tips to help keep your stainless steel pans clean and prevent stains from forming in the first place:
* **Don’t Overheat:** Avoid overheating your pans, as this can cause food to burn and stick.
* **Use the Right Amount of Oil:** Using enough oil or fat when cooking can help prevent food from sticking to the pan.
* **Clean Immediately After Use:** The sooner you clean your pans after using them, the easier it will be to remove any food residue.
* **Avoid Abrasive Cleaners:** Avoid using steel wool or abrasive scrubbers, as they can scratch the stainless steel.
* **Dry Thoroughly:** Always dry your stainless steel pans thoroughly after washing to prevent water spots from forming.
Final Thoughts: Enjoy Your Sparkling Pans!
And there you have it! With a little elbow grease and these simple cleaning methods, you can keep your stainless steel pans looking their best for years to come. Don’t be afraid to experiment and find what works best for you. Happy cooking and cleaning! I hope this helps you keep your pans looking brand new!
Conclusion
So, there you have it! This simple yet incredibly effective DIY trick to clean stainless steel pans is a game-changer for anyone who values a sparkling clean kitchen without resorting to harsh chemicals or endless scrubbing. We’ve all been there, staring at a seemingly impossible-to-remove stain on our favorite pan, wondering if it’s destined for the trash. But with just a few common household ingredients – baking soda, vinegar, and a little elbow grease – you can restore your stainless steel cookware to its former glory.
Why is this a must-try? Because it’s not just about aesthetics. A clean pan cooks more evenly, prevents food from sticking, and ultimately contributes to better-tasting meals. Plus, extending the life of your cookware is a sustainable choice that saves you money in the long run. Think of it as an investment in your kitchen and your culinary creations.
But don’t just take our word for it! The beauty of this DIY method lies in its versatility. Feel free to experiment with variations to suit your specific needs and the severity of the stains. For instance, if you’re dealing with particularly stubborn burnt-on food, try adding a squeeze of lemon juice to the baking soda paste for an extra boost of cleaning power. You can also let the baking soda paste sit on the stain for a longer period, even overnight, for maximum effectiveness. Another variation involves using a gentle scouring pad instead of a sponge for tougher stains, but be sure to test it in an inconspicuous area first to avoid scratching the surface.
Consider using cream of tartar instead of baking soda for a slightly different abrasive action. Some people swear by it for removing water spots and discoloration. For a truly deep clean, you can even boil a mixture of water and vinegar in the pan for a few minutes before scrubbing. This loosens up the grime and makes it easier to remove.
Remember, the key is patience and persistence. Don’t expect miracles overnight, especially with heavily soiled pans. But with a little effort and the right technique, you’ll be amazed at the results.
We are confident that this DIY trick will become your go-to solution for keeping your stainless steel pans looking their best. It’s cost-effective, environmentally friendly, and incredibly satisfying to see those stubborn stains disappear.
Now, it’s your turn! We encourage you to try this DIY trick and share your experience with us. Did it work for you? Did you discover any helpful variations? We’d love to hear your tips and tricks in the comments below. Let’s build a community of clean pan enthusiasts and help each other keep our kitchens sparkling! Share your before and after photos on social media using #CleanStainlessSteelPansDIY – we can’t wait to see your amazing transformations! Your feedback will not only help other readers but also inspire us to continue sharing valuable DIY solutions. Happy cleaning!
Frequently Asked Questions (FAQ)
Q: Is this DIY method safe for all types of stainless steel pans?
A: Generally, yes. This method is safe for most types of stainless steel pans. However, it’s always a good idea to test it on a small, inconspicuous area first, especially if you have a particularly delicate or expensive pan. Avoid using abrasive scouring pads on polished or brushed stainless steel, as they can scratch the surface. Opt for a soft sponge or microfiber cloth instead. If your pan has a non-stick coating, avoid using this method as it can damage the coating.
Q: Can I use this method on other stainless steel items besides pans?
A: Absolutely! This DIY cleaning trick is effective on a wide range of stainless steel items, including pots, sinks, utensils, and even appliances. Just be mindful of the surface texture and use appropriate cleaning tools to avoid scratches. For larger items like sinks, you can simply apply the baking soda paste and vinegar solution, let it sit for a few minutes, and then scrub and rinse.
Q: How often should I clean my stainless steel pans using this method?
A: The frequency depends on how often you use your pans and how much food gets burnt or stuck on them. For regular maintenance, cleaning them after each use with soap and water is usually sufficient. However, for deeper cleaning to remove stubborn stains, you can use this DIY method as needed, typically once a week or every few weeks.
Q: What if the stains are really stubborn and don’t come off easily?
A: For extremely stubborn stains, you can try a few things. First, let the baking soda paste sit on the stain for a longer period, even overnight. Second, try adding a squeeze of lemon juice to the baking soda paste for extra cleaning power. Third, you can boil a mixture of water and vinegar in the pan for a few minutes before scrubbing. This will help loosen up the grime. Finally, if all else fails, you can try using a commercially available stainless steel cleaner, but be sure to follow the manufacturer’s instructions carefully.
Q: Can I use this method on stainless steel pans with a copper bottom?
A: Yes, you can use this method on the stainless steel portion of pans with a copper bottom. However, avoid getting the baking soda and vinegar mixture on the copper, as it can cause discoloration. For cleaning the copper bottom, use a specialized copper cleaner or a mixture of lemon juice and salt.
Q: Is there a way to prevent food from sticking to my stainless steel pans in the first place?
A: Yes, there are several ways to prevent food from sticking to your stainless steel pans. First, make sure the pan is properly preheated before adding any oil or food. Second, use enough oil or fat to coat the bottom of the pan. Third, don’t overcrowd the pan, as this can lower the temperature and cause food to stick. Fourth, avoid moving the food around too much while it’s cooking, as this can also cause it to stick. Finally, use a high-quality stainless steel pan with a thick bottom for even heat distribution.
Q: What are some other natural cleaning alternatives for stainless steel pans?
A: Besides baking soda and vinegar, there are several other natural cleaning alternatives for stainless steel pans. Lemon juice is a great option for removing water spots and discoloration. Cream of tartar can also be used as a gentle abrasive cleaner. For removing grease, you can try using a mixture of dish soap and hot water. And for polishing stainless steel, you can use a small amount of olive oil or mineral oil.
Q: How do I store my stainless steel pans to prevent scratches?
A: To prevent scratches, avoid stacking your stainless steel pans directly on top of each other. Instead, use pan protectors or place a soft cloth between each pan. You can also hang your pans on a pot rack to keep them from getting scratched. Store them in a dry place to prevent rust.
Q: Can I put my stainless steel pans in the dishwasher?
A: While many stainless steel pans are dishwasher safe, it’s generally recommended to hand wash them to prolong their lifespan and prevent discoloration. Dishwasher detergents can be harsh and abrasive, which can damage the surface of the pan over time. If you do choose to put your stainless steel pans in the dishwasher, use a mild detergent and avoid using the heated drying cycle.
Leave a Comment