

DIY Beeswax Wood Polish: Ever looked at your beloved wooden furniture and wished you could restore its natural luster without harsh chemicals? I know I have! There’s something incredibly satisfying about breathing new life into well-loved pieces, and that’s exactly what this DIY project is all about.
For centuries, beeswax has been treasured for its protective and beautifying properties. From ancient Egyptians using it in cosmetics and embalming to artisans polishing fine furniture, beeswax has a rich history of enhancing and preserving natural materials. Think of it as a time-tested secret weapon for keeping your wood looking its best!
In today’s world, we’re all becoming more conscious of the products we use in our homes. Many commercial wood polishes are packed with synthetic ingredients that can be harmful to our health and the environment. That’s where this DIY Beeswax Wood Polish comes in. It’s a simple, natural, and cost-effective way to nourish and protect your wooden surfaces. Plus, it’s incredibly easy to make! I’m going to show you how to create your own batch of this amazing polish, so you can say goodbye to dull, lifeless wood and hello to a radiant, healthy shine. Get ready to unleash your inner artisan and give your furniture the love it deserves!
DIY Beeswax Wood Polish: Revive Your Furniture with Natural Shine!
Hey there, fellow DIY enthusiasts! I’m so excited to share one of my favorite projects with you: making your own beeswax wood polish. Not only is it incredibly satisfying to create something useful from scratch, but this polish is also fantastic for your furniture. It’s all-natural, smells amazing, and leaves your wood looking absolutely gorgeous. Plus, you know exactly what’s going into it – no harsh chemicals or mystery ingredients!
This recipe is super simple, and I promise, even if you’re a complete beginner, you can totally nail it. Let’s get started!
What You’ll Need
Before we dive into the instructions, let’s gather all the necessary supplies. This will make the whole process smoother and more enjoyable.
* Beeswax: This is the star of the show! You can find beeswax in pellet form or as a solid block. Pellets are easier to measure, but either will work. I usually buy mine online or at a local beekeeping supply store.
* Carrier Oil: This helps to thin the beeswax and makes the polish easier to apply. My go-to is mineral oil because it’s affordable and readily available. However, you can also use other oils like olive oil, jojoba oil, or even coconut oil (melted, of course!). Just keep in mind that some oils might have a slight scent that will affect the final product.
* Essential Oils (Optional): This is where you can get creative! Adding a few drops of your favorite essential oils will give your polish a lovely scent. I personally love using lemon, orange, or lavender.
* Double Boiler or Heat-Safe Bowl and Saucepan: We’ll be melting the beeswax using a double boiler method to prevent it from burning. If you don’t have a double boiler, don’t worry! A heat-safe bowl (like glass or stainless steel) placed over a saucepan of simmering water works just as well.
* Measuring Cups and Spoons: Accurate measurements are key to getting the right consistency.
* Wooden Spoon or Stir Stick: For stirring the ingredients together.
* Storage Container: You’ll need a container to store your finished polish. A small glass jar or tin works perfectly. Make sure it has a tight-fitting lid to prevent the polish from drying out.
* Cheesecloth or Fine-Mesh Strainer (Optional): If your beeswax has any impurities, you can use this to strain them out.
* Gloves: To protect your hands from the hot wax.
* Old Rags or Cloths: For applying and buffing the polish.
The Recipe: Getting the Ratios Right
The ratio of beeswax to oil is crucial for achieving the perfect consistency. I’ve experimented with different ratios, and this one consistently gives me the best results:
* 1 part Beeswax
* 3 parts Carrier Oil
* Optional: A few drops of your favorite essential oil (I usually use about 10-15 drops per cup of finished polish)
For example, if you want to make a small batch, you could use:
* 1/4 cup Beeswax
* 3/4 cup Carrier Oil
* 10 drops Essential Oil
Or, for a larger batch:
* 1 cup Beeswax
* 3 cups Carrier Oil
* 45 drops Essential Oil
Adjust the amounts based on how much polish you want to make.
Step-by-Step Instructions: Making Your Beeswax Polish
Alright, let’s get down to business! Follow these steps carefully, and you’ll have your own homemade beeswax polish in no time.
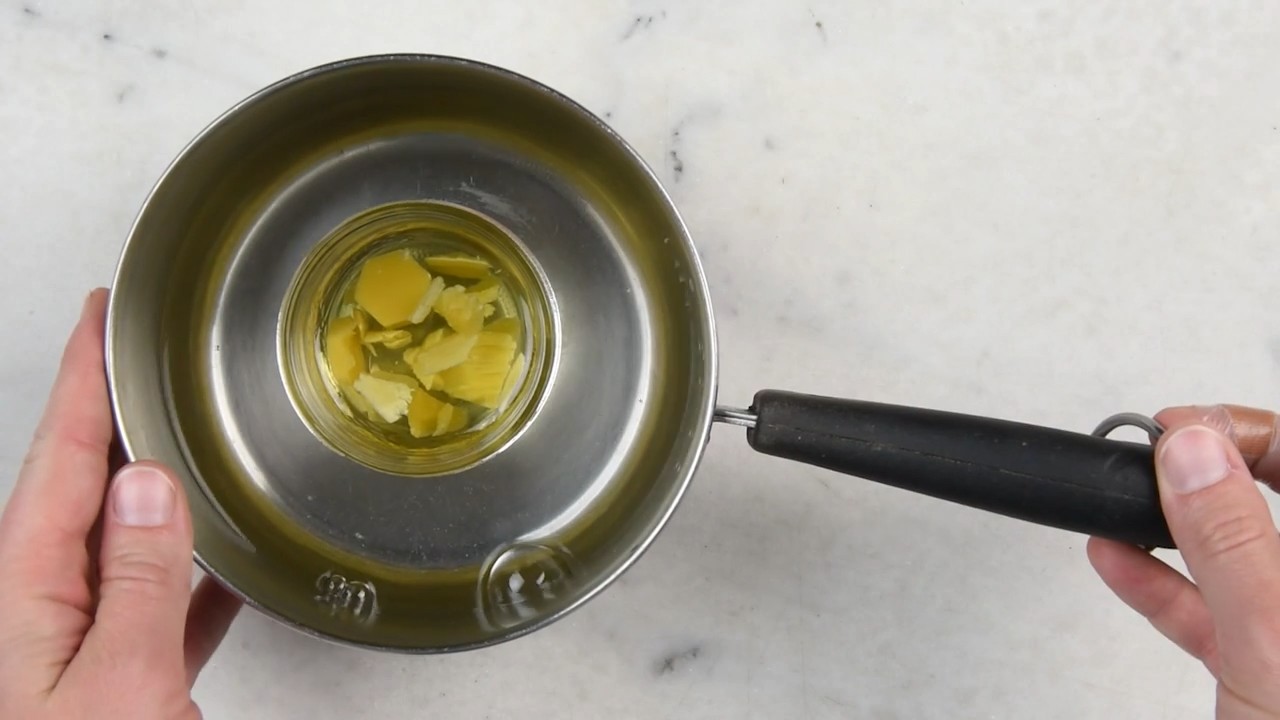
1. Prepare Your Double Boiler: If you’re using a double boiler, fill the bottom pot with water and bring it to a simmer. If you’re using a bowl and saucepan, fill the saucepan with about an inch or two of water and bring it to a simmer. Make sure the bowl fits snugly over the saucepan without touching the water.
2. Melt the Beeswax: Place the beeswax in the top of the double boiler or in the heat-safe bowl. Let it melt slowly over the simmering water, stirring occasionally with your wooden spoon or stir stick. This might take a little while, so be patient!
3. Add the Carrier Oil: Once the beeswax is completely melted, slowly pour in the carrier oil. Stir continuously until the beeswax and oil are fully combined and the mixture is smooth and homogenous.
4. Add Essential Oils (Optional): If you’re using essential oils, now’s the time to add them. Remove the mixture from the heat and let it cool slightly for a minute or two. Then, add your chosen essential oils and stir well to incorporate them evenly.
5. Strain the Mixture (Optional): If you notice any impurities in your beeswax, you can strain the mixture through a cheesecloth or fine-mesh strainer into your storage container. This will ensure a smooth and clean polish.
6. Pour into Storage Container: Carefully pour the melted polish into your storage container. Be careful, as the mixture will be hot!
7. Let it Cool and Harden: Allow the polish to cool completely at room temperature. This will take several hours, or you can speed up the process by placing it in the refrigerator. As it cools, the polish will solidify and become a creamy, paste-like consistency.
Using Your Beeswax Polish: Bringing Your Furniture Back to Life
Now that you’ve made your own beeswax polish, it’s time to put it to use! Here’s how to apply it to your furniture:
1. Clean the Surface: Before applying the polish, make sure the surface of your furniture is clean and free of dust, dirt, and grime. You can use a damp cloth or a mild cleaning solution to clean the surface. Allow it to dry completely before proceeding.
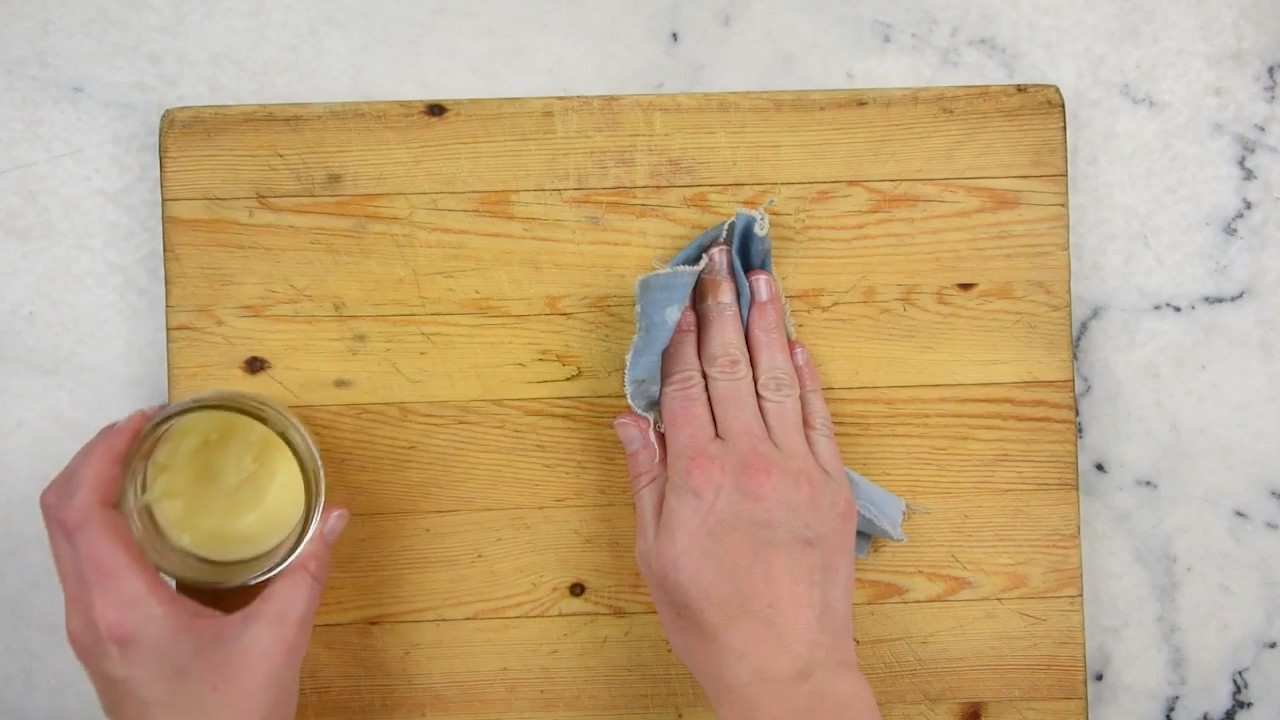
2. Apply the Polish: Using a clean, soft cloth, scoop out a small amount of polish from your storage container. Apply the polish to the wood surface in a thin, even layer. Work in small sections, using circular motions to massage the polish into the wood.
3. Let it Sit: Allow the polish to sit on the surface for about 15-20 minutes. This will give the beeswax time to penetrate the wood and nourish it.
4. Buff the Surface: After the polish has sat for the allotted time, use a clean, dry cloth to buff the surface. Use firm, circular motions to remove any excess polish and bring out the shine. Keep buffing until the surface is smooth and glossy.
5. Repeat as Needed: For heavily worn or dry furniture, you may need to apply a second coat of polish. Repeat the process as needed until you achieve the desired level of shine and protection.
Tips and Tricks for the Best Results
Here are a few extra tips and tricks to help you get the most out of your homemade beeswax polish:
* Test in an Inconspicuous Area: Before applying the polish to the entire piece of furniture, test it in a small, inconspicuous area to make sure it doesn’t discolor or damage the wood.
* Use Sparingly: A little bit of polish goes a long way! Applying too much polish can leave a sticky or greasy residue.
* Buff Thoroughly: Buffing is key to achieving a beautiful, glossy finish. Don’t skimp on the buffing!
* Reapply Regularly: To keep your furniture looking its best, reapply the polish every few months or as needed.
* Experiment with Essential Oils: Don’t be afraid to experiment with different essential oils to find your favorite scent. You can even create custom blends to suit your preferences.
* Adjust the Ratio: If you find that your polish is too hard or too soft, you can adjust the ratio of beeswax to oil in your next batch. More beeswax will make the polish harder, while more oil will make it softer.
* Warm the Polish: If your polish becomes too hard to work with, you can warm it slightly by placing the container in a bowl of warm water for a few minutes.
* Clean Your Cloths: After using your cloths to apply and buff the polish, wash them thoroughly with soap and water. This will prevent the polish from building up and hardening on the cloths.
Troubleshooting: Common Issues and Solutions
Even with the best instructions, sometimes things don’t go exactly as planned. Here are a few common issues you might encounter and how to fix them:
* Polish is Too Hard: If your polish is too hard to spread easily, it means there’s too much beeswax in the mixture. Next time, use a higher ratio of oil to beeswax. You can also try warming the polish slightly before applying it.
* Polish is Too Soft/Oily: If your polish is too soft or oily, it means there’s too much oil in the mixture. Next time, use a higher ratio of beeswax to oil.
* Polish is Sticky: If your polish is leaving a sticky residue on your furniture, it
Conclusion
So, there you have it! Crafting your own DIY beeswax wood polish is not just a cost-effective alternative to store-bought products; it’s a gateway to understanding and appreciating the natural beauty of your wooden furniture and surfaces. It’s about taking control of the ingredients, ensuring they are safe for your family and the environment, and ultimately, creating a polish that nourishes and protects your wood for years to come.
Why is this DIY trick a must-try? Because it’s simple, effective, and customizable. You’re avoiding harsh chemicals often found in commercial polishes, opting instead for the gentle power of beeswax and oil. The beeswax creates a protective layer, shielding your wood from moisture and scratches, while the oil penetrates deep, replenishing its natural oils and bringing out its inherent luster. The result is a finish that’s not only beautiful but also durable.
But the benefits extend beyond just the practical. There’s a certain satisfaction that comes from creating something with your own hands, knowing exactly what went into it. It’s a mindful activity that connects you to the materials and the process, fostering a deeper appreciation for the objects you’re caring for.
Looking for variations? Absolutely! Experiment with different types of oils to achieve different results. Linseed oil offers a durable, slightly glossy finish, while walnut oil provides a rich, warm tone. For a subtle scent, consider adding a few drops of essential oils like lavender, cedarwood, or orange. Just be sure to use essential oils that are safe for wood and dilute them properly. You can also adjust the ratio of beeswax to oil to achieve a thicker or thinner consistency, depending on your preference and the type of wood you’re working with. A higher beeswax content will result in a harder, more protective polish, while a higher oil content will create a softer, more penetrating polish.
Don’t be afraid to experiment and find what works best for you and your furniture. Start with a small batch and test it on an inconspicuous area first to ensure you’re happy with the results.
We wholeheartedly encourage you to try this DIY beeswax wood polish recipe. It’s a rewarding experience that will leave your wooden surfaces looking their best. And more importantly, we want to hear about your experience! Share your photos, tips, and variations in the comments below. Let’s build a community of DIY enthusiasts who are passionate about preserving the beauty of wood, naturally. What oil did you use? Did you add any essential oils? What kind of wood did you use it on? We are eager to hear all about it!
Ready to transform your wood care routine?
Give this DIY beeswax wood polish a try and discover the difference it can make. You won’t be disappointed!
Frequently Asked Questions (FAQ)
What type of beeswax should I use?
We recommend using pure, filtered beeswax for the best results. You can find beeswax in various forms, such as blocks, pellets, or pastilles. Pellets and pastilles are generally easier to measure and melt. Avoid beeswax that contains additives or fragrances, as these can affect the final product and potentially damage your wood. Organic beeswax is a great option if you’re looking for a more sustainable and environmentally friendly choice.
What kind of oil is best for this DIY wood polish?
The best oil depends on the desired finish and the type of wood you’re working with. Mineral oil is a good general-purpose option that’s readily available and affordable. It’s non-drying, meaning it won’t harden or yellow over time. Linseed oil provides a durable, slightly glossy finish and is excellent for protecting wood from moisture. However, it can yellow slightly over time. Walnut oil offers a rich, warm tone and is a good choice for darker woods. Avoid using cooking oils like olive oil or vegetable oil, as they can become rancid and attract pests.
How do I apply the beeswax wood polish?
First, ensure the wood surface is clean and dry. Apply a small amount of polish to a soft, lint-free cloth. Gently rub the polish into the wood in a circular motion, working it into the grain. Allow the polish to sit for a few minutes to penetrate the wood. Then, use a clean cloth to buff the surface until it’s smooth and shiny. You may need to apply multiple coats for optimal results, especially on dry or porous wood.
How often should I apply beeswax wood polish?
The frequency of application depends on the type of wood, its exposure to the elements, and the level of wear and tear it experiences. Generally, you should apply beeswax wood polish every few months or as needed to maintain its luster and protection. If the wood appears dry or dull, it’s time for another application. For high-traffic areas or furniture that’s exposed to direct sunlight, you may need to apply the polish more frequently.
How do I store the DIY beeswax wood polish?
Store your homemade beeswax wood polish in an airtight container in a cool, dark place. A glass jar with a tight-fitting lid is ideal. Properly stored, the polish should last for several months. If you notice any changes in color, texture, or odor, it’s best to discard the polish and make a fresh batch.
Can I use this polish on all types of wood?
While beeswax wood polish is generally safe for most types of wood, it’s always a good idea to test it on an inconspicuous area first. Avoid using it on wood that has been treated with a water-based finish, as the oil in the polish can interfere with the finish. Also, be cautious when using it on antique furniture, as some finishes may be delicate.
What if my polish is too hard or too soft?
If your polish is too hard, it likely has too much beeswax. Gently melt the polish in a double boiler and add a small amount of oil until you reach the desired consistency. If your polish is too soft, it likely has too much oil. Melt the polish and add a small amount of beeswax until it thickens up. Remember to make small adjustments and test the consistency as you go.
Is this polish safe for food-contact surfaces like cutting boards?
While the ingredients in this polish are generally considered food-safe, it’s not recommended for use on surfaces that come into direct contact with food, such as cutting boards or wooden utensils. For these items, it’s best to use a food-grade mineral oil or a specialized cutting board oil.
Can I add essential oils to my DIY beeswax wood polish?
Yes, you can add essential oils for a pleasant scent and potential therapeutic benefits. However, it’s important to use essential oils that are safe for wood and dilute them properly. Lavender, cedarwood, orange, and lemon essential oils are popular choices. Add a few drops of essential oil to the melted polish and stir well before pouring it into a container. Be sure to research the safety of any essential oil before using it, especially if you have allergies or sensitivities.
How do I clean my furniture before applying the polish?
Before applying the DIY beeswax wood polish, it’s important to clean your furniture to remove any dirt, dust, or grime. You can use a soft cloth dampened with a mild soap and water solution. Be sure to wring out the cloth well to avoid getting the wood too wet. After cleaning, allow the wood to dry completely before applying the polish. For stubborn stains or buildup, you may need to use a specialized wood cleaner.

Leave a Comment