

DIY Grout Cleaner: Are you tired of staring at dingy, discolored grout lines that seem impossible to clean? I know I was! It felt like no matter how much I scrubbed, those stubborn stains just wouldn’t budge. But what if I told you that you could achieve sparkling clean grout with ingredients you probably already have in your pantry?
Grout, that porous material between your tiles, has been a staple in construction for centuries, dating back to ancient civilizations. While its primary function is to provide stability and prevent water damage, it’s also a magnet for dirt, grime, and mildew. Over time, this buildup can make your beautiful tile floors and backsplashes look dull and uninviting.
Let’s face it, nobody enjoys spending hours on their hands and knees scrubbing grout. Store-bought cleaners can be expensive and often contain harsh chemicals that can be harmful to your health and the environment. That’s why I’m so excited to share these simple and effective DIY grout cleaner recipes with you. These hacks will not only save you time and money but also allow you to achieve professional-level results without the elbow grease or harsh chemicals. Get ready to transform your grout from drab to fab with these easy-to-follow DIY solutions!
DIY Grout Cleaner: Say Goodbye to Grimy Lines!
Okay, let’s be honest, cleaning grout is nobody’s favorite chore. Those stubborn stains and discoloration can make even the cleanest tiles look dingy. But don’t despair! I’m going to show you how to make a super effective DIY grout cleaner using ingredients you probably already have in your pantry. This method is budget-friendly, eco-conscious, and, most importantly, it WORKS!
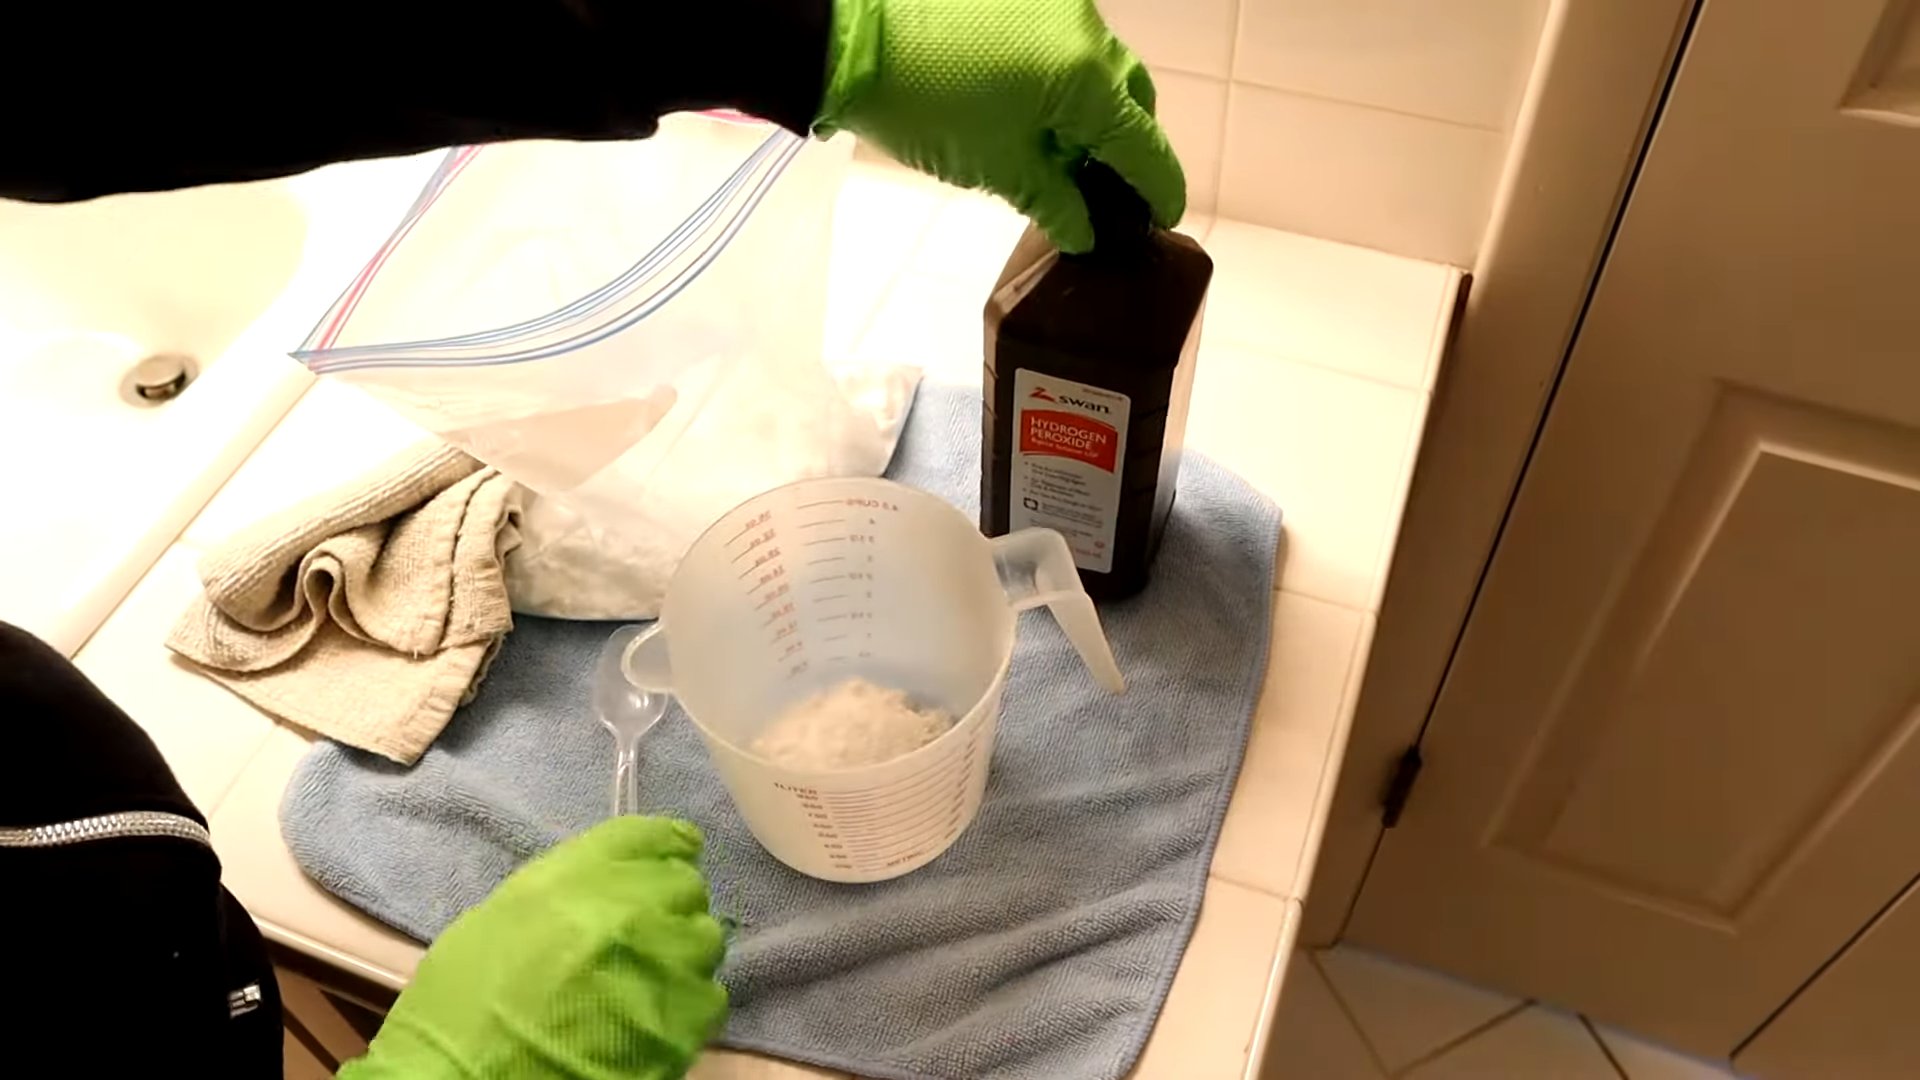
What You’ll Need: The Arsenal Against Grime
Before we dive in, let’s gather our supplies. Here’s what you’ll need to create your grout-cleaning masterpiece:
* Baking Soda: This is our gentle abrasive. It helps lift dirt and grime without scratching your tiles.
* Hydrogen Peroxide (3%): This is a mild bleaching agent and disinfectant. It helps brighten the grout and kill mold and mildew.
* Dish Soap (Dawn is my go-to!): This helps cut through grease and grime, making it easier to scrub away the dirt.
* Spray Bottle: For applying the cleaning solution.
* Old Toothbrush or Grout Brush: For scrubbing those stubborn stains. An electric toothbrush with a small brush head can also work wonders!
* Gloves: To protect your hands from the cleaning solution.
* Eye Protection (Optional, but Recommended): Just in case of splashes.
* Clean Cloth or Sponge: For wiping away the cleaner and rinsing the grout.
* Warm Water: For rinsing.
* Small Bowl: For mixing the paste.
* Optional: White Vinegar: For particularly stubborn stains. (Use with caution and test in an inconspicuous area first!)
Mixing the Magic Potion: Two Effective Recipes
I’m going to give you two different recipes, depending on the severity of your grout stains. The first is a paste, perfect for tackling really tough grime. The second is a spray, ideal for maintenance cleaning and lighter stains.
Recipe 1: The Power Paste for Stubborn Stains
This paste is my go-to for really grimy grout. It’s a bit more elbow grease, but the results are worth it!
1. Combine the Ingredients: In your small bowl, mix together baking soda and hydrogen peroxide. Start with about ½ cup of baking soda and slowly add hydrogen peroxide until you form a thick paste. You want it to be spreadable but not too runny.
2. Add the Dish Soap: Add a squirt (about a teaspoon) of dish soap to the paste and mix well. This will help the paste cling to the grout and cut through grease.
3. Optional Vinegar Boost: If your grout is REALLY stained, you can add a tablespoon of white vinegar to the paste. Be careful, as vinegar and baking soda will react and fizz. Mix quickly and use immediately. Remember to test this mixture in an inconspicuous area first to ensure it doesn’t damage your tiles.
Recipe 2: The Maintenance Spray for Everyday Cleaning
This spray is perfect for keeping your grout clean and preventing stains from setting in.
1. Combine the Ingredients: In your spray bottle, combine equal parts hydrogen peroxide and water. For example, ½ cup of hydrogen peroxide and ½ cup of water.
2. Add the Dish Soap: Add a squirt (about a teaspoon) of dish soap to the spray bottle.
3. Shake Well: Secure the spray bottle lid and shake well to combine all the ingredients.
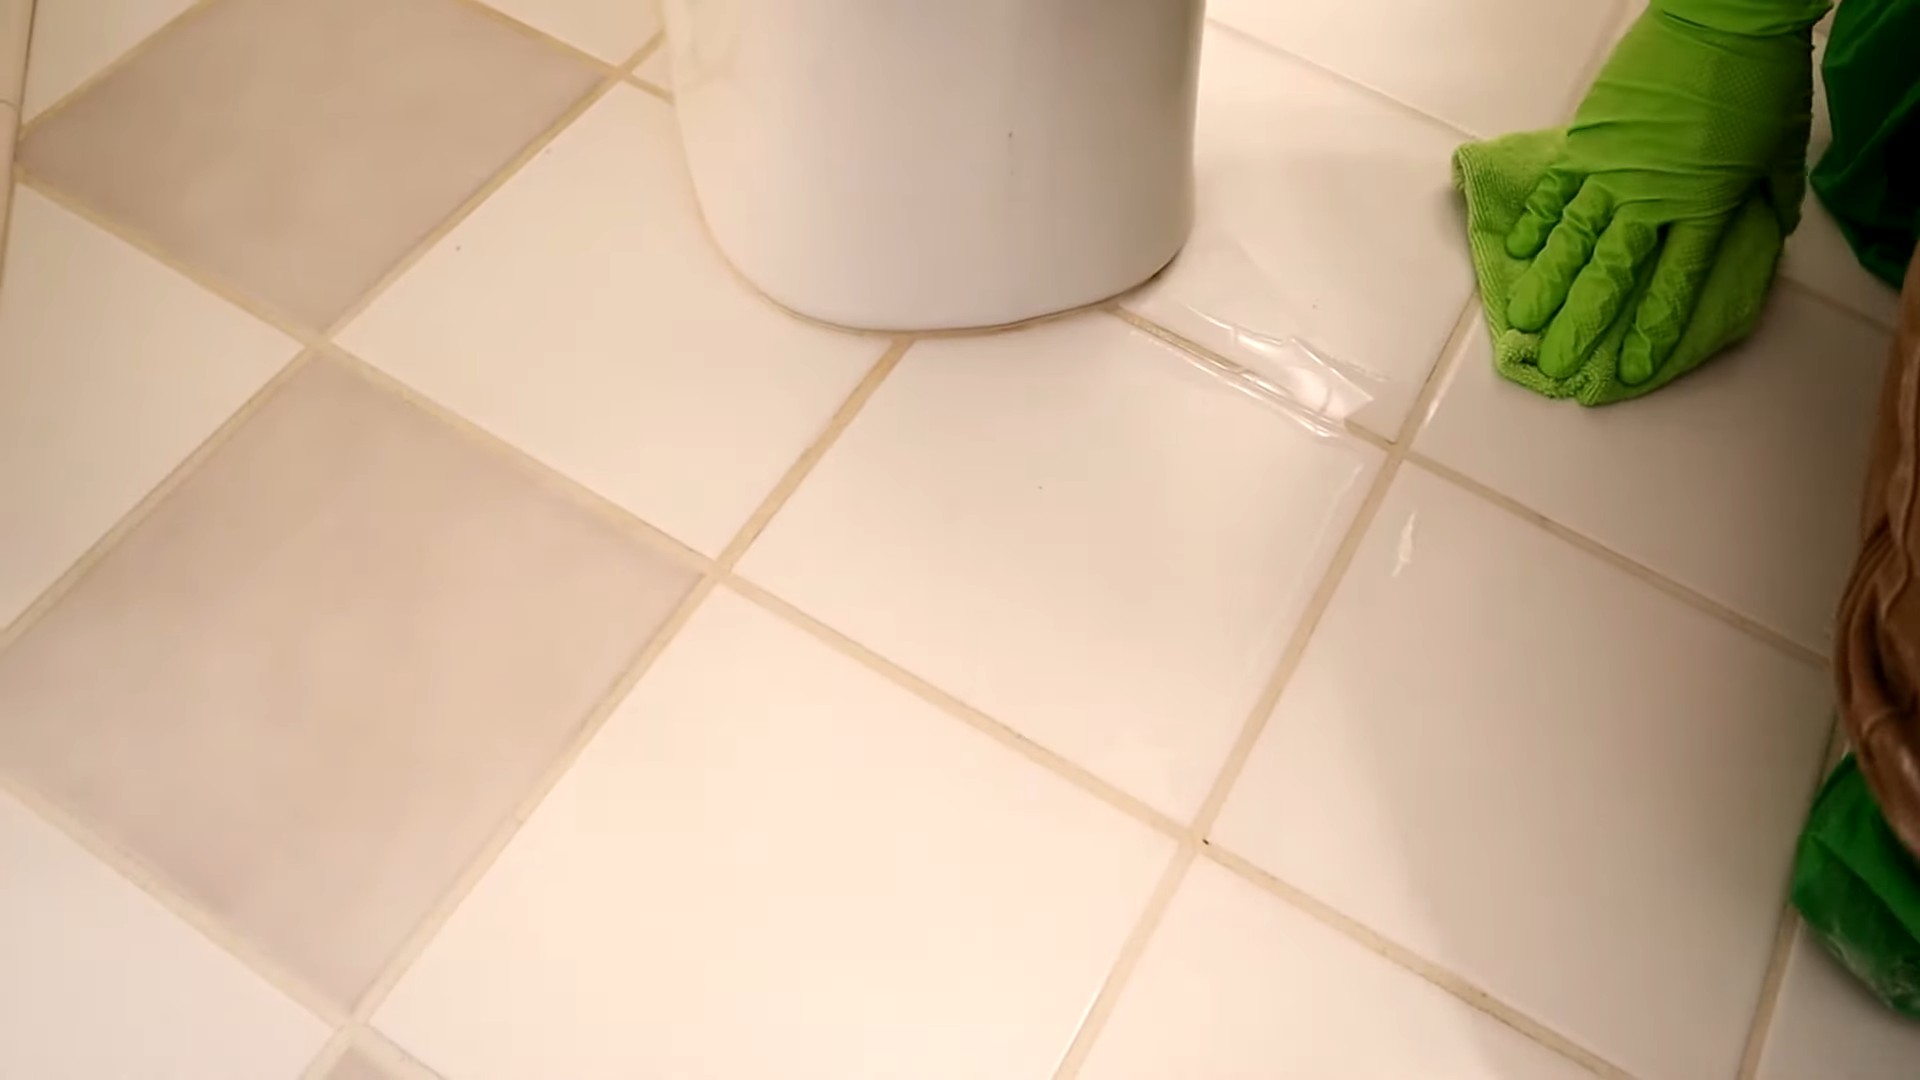
The Cleaning Process: Let’s Get Scrubbing!
Now for the fun part (well, maybe not fun, but definitely satisfying!). Here’s how to use your DIY grout cleaner to get those lines sparkling.
Section 1: Preparing the Area
1. Ventilate the Area: Open windows and doors to ensure good ventilation. This is especially important when using hydrogen peroxide and vinegar.
2. Protect Your Surroundings: Cover any nearby surfaces that might be sensitive to the cleaning solution, such as wood or metal.
3. Test in an Inconspicuous Area: Before applying the cleaner to the entire area, test it in a small, hidden spot to ensure it doesn’t damage your tiles or grout. Let it sit for a few minutes, then wipe it away and check for any discoloration or damage.
Section 2: Applying the Cleaner
1. For the Paste: Using your fingers (with gloves on, of course!), apply the paste liberally to the grout lines. Make sure to cover the entire area you want to clean.
2. For the Spray: Spray the grout lines thoroughly with the cleaning solution. Make sure the grout is completely saturated.
3. Let it Sit: Allow the cleaner to sit on the grout for at least 10-15 minutes. For really stubborn stains, you can let it sit for up to 30 minutes. This gives the cleaner time to penetrate the grime and loosen it up.
Section 3: Scrubbing and Rinsing
1. Scrub the Grout: Using your old toothbrush or grout brush, scrub the grout lines vigorously. Pay extra attention to areas with heavy staining. If you’re using an electric toothbrush, let the brush do the work for you.
2. Rinse Thoroughly: Once you’ve scrubbed the grout, rinse it thoroughly with warm water. You can use a clean cloth or sponge to wipe away the cleaner and rinse the grout. Make sure to remove all traces of the cleaning solution.
3. Dry the Area: Use a clean towel to dry the area. This will help prevent water spots and mildew growth.
Dealing with Stubborn Stains: Advanced Techniques
Sometimes, even the best DIY cleaner needs a little extra help. Here are a few tips for tackling those really stubborn stains:
* Repeat the Process: If the stains are still visible after the first cleaning, repeat the process. Sometimes it takes a few applications to completely remove the grime.
* Baking Soda Poultice: For particularly stubborn stains, you can create a baking soda poultice. Mix baking soda with a small amount of water to form a thick paste. Apply the paste to the stain and cover it with plastic wrap. Let it sit overnight, then scrub and rinse the area.
* Steam Cleaning: A steam cleaner can be a very effective way to clean grout. The hot steam helps to loosen dirt and grime, making it easier to scrub away.
* Commercial Grout Cleaners: If all else fails, you can try a commercial grout cleaner. Be sure to read the instructions carefully and test the cleaner in an inconspicuous area first.
* Consider Grout Colorant or Sealer: If your grout is permanently stained or discolored, you might consider using a grout colorant or sealer. These products can help to restore the grout to its original color and protect it from future stains.
Maintaining Your Sparkling Grout: Prevention is Key!
Once you’ve got your grout looking sparkling clean, you’ll want to keep it that way! Here are a few tips for maintaining your grout and preventing future stains:
* Wipe Up Spills Immediately: The sooner you wipe up spills, the less likely they are to stain your grout.
* Regular Cleaning: Clean your grout regularly with the maintenance spray to prevent stains from setting in.
* Seal Your Grout: Sealing your grout will help to protect it from stains and water damage. You can purchase grout sealer at most home improvement stores.
* Good Ventilation: Ensure good ventilation in your bathroom and kitchen to prevent mildew growth.
* Use a Squeegee: After showering, use a squeegee to remove excess water from your tiles and grout. This will help to prevent mildew growth.
Safety First! Important Precautions
While these DIY cleaners are generally safe, it’s important to take a few precautions:
* Wear Gloves: Always wear gloves when handling cleaning solutions to protect your hands from irritation.
* Protect Your Eyes: Wear eye protection to prevent splashes from getting into your eyes.
* Ventilate the Area: Ensure good ventilation to avoid inhaling fumes.
* Keep Out of Reach of Children and Pets: Store cleaning solutions out of reach of children and pets.
* Never Mix Bleach with Other Cleaners: Mixing bleach with other cleaners can create dangerous fumes.
And there you have it! With a little elbow grease and these simple DIY recipes, you can say goodbye to grimy grout and hello to sparkling clean tiles. Happy cleaning!
Conclusion
So, there you have it! This DIY grout cleaner isn’t just another cleaning hack; it’s a game-changer for anyone battling dingy, stained grout. We’ve all been there, scrubbing tirelessly with commercial cleaners that promise the world but deliver little more than a sore back and lingering chemical fumes. This method, however, harnesses the power of simple, readily available ingredients to create a truly effective and surprisingly gentle cleaning solution.
Why is this DIY grout cleaner a must-try? Because it’s effective, affordable, and eco-friendly. You’re likely to already have the ingredients in your pantry, saving you a trip to the store and the expense of purchasing harsh chemicals. Plus, you’ll be reducing your environmental impact by avoiding those same chemicals and their plastic packaging. The results speak for themselves: visibly brighter, cleaner grout that revitalizes your tile surfaces.
But the beauty of this DIY approach lies in its adaptability. Feel free to experiment with variations to suit your specific needs and preferences. For instance, if you’re dealing with particularly stubborn stains, consider adding a tablespoon of borax to the mixture for an extra boost of cleaning power. Or, if you prefer a more aromatic cleaning experience, a few drops of your favorite essential oil, like lemon or tea tree, can add a refreshing scent and even provide additional antibacterial benefits. Remember to always test any variation on an inconspicuous area first to ensure it doesn’t damage your grout or tile.
For colored grout, proceed with extra caution. While the baking soda and vinegar combination is generally safe, prolonged exposure or excessive scrubbing could potentially lighten the color. In such cases, consider reducing the concentration of vinegar or opting for a paste made primarily of baking soda and a small amount of water. A soft-bristled brush is also recommended to minimize the risk of abrasion.
Beyond the basic recipe, consider the tools you use. While a toothbrush is a classic choice for grout cleaning, a grout brush with a longer handle can save your back and make the process more comfortable. For larger areas, an electric grout brush can significantly reduce the amount of time and effort required.
Ultimately, the best way to discover the full potential of this DIY grout cleaner is to try it yourself. We’re confident that you’ll be amazed by the results. Don’t just take our word for it; give it a go and see the difference it can make in your home.
We’re eager to hear about your experiences! Share your before-and-after photos, tips, and variations in the comments below. Let’s create a community of DIY grout cleaning enthusiasts and help each other achieve sparkling clean tile surfaces. Your insights could be invaluable to others who are just discovering the power of this simple yet effective cleaning solution. So, grab your ingredients, put on your cleaning gloves, and get ready to transform your grout! We can’t wait to see your results!
FAQ
What exactly makes this DIY grout cleaner better than store-bought options?
Store-bought grout cleaners often contain harsh chemicals like bleach, ammonia, and strong acids. While they can be effective, they also pose risks to your health, the environment, and even your grout itself. These chemicals can irritate your skin and respiratory system, release harmful fumes, and potentially damage or discolor your grout over time. Our DIY grout cleaner, on the other hand, relies on the natural cleaning power of baking soda and vinegar. Baking soda is a mild abrasive that helps to scrub away dirt and grime, while vinegar is a natural disinfectant and deodorizer. This combination is effective at removing stains and killing mold and mildew without the harsh side effects of commercial cleaners. Plus, it’s significantly cheaper and more environmentally friendly.
Is this DIY grout cleaner safe for all types of grout and tile?
While the baking soda and vinegar combination is generally safe for most types of grout and tile, it’s always a good idea to test it on an inconspicuous area first, especially if you have colored grout or delicate tile like marble or natural stone. Vinegar is acidic and can potentially etch or discolor certain surfaces. If you’re concerned about the acidity of vinegar, you can dilute it with water or use a paste made primarily of baking soda and a small amount of water. For colored grout, be extra cautious and avoid prolonged exposure or excessive scrubbing. A soft-bristled brush is also recommended to minimize the risk of abrasion. If you’re unsure about the compatibility of this cleaner with your specific grout and tile, consult with a professional tile cleaner or the manufacturer of your tile.
How often should I use this DIY grout cleaner?
The frequency of cleaning depends on the amount of traffic and moisture your tile surfaces are exposed to. In high-traffic areas like bathrooms and kitchens, you may need to clean your grout every few weeks to prevent the buildup of dirt, grime, and mold. In less frequently used areas, you can clean your grout less often, perhaps once a month or as needed. Regular cleaning will help to prevent stains from setting in and make the cleaning process easier in the long run.
What if the stains are really stubborn and don’t come out with the first application?
For particularly stubborn stains, you may need to repeat the cleaning process several times. You can also try letting the baking soda paste sit on the stains for a longer period of time, perhaps 30 minutes to an hour, before scrubbing. Another option is to add a tablespoon of borax to the mixture for an extra boost of cleaning power. Borax is a natural mineral that has disinfecting and deodorizing properties. However, be sure to wear gloves when handling borax and avoid inhaling the dust. If the stains still persist after multiple attempts, you may need to consider using a stronger cleaning solution or consulting with a professional tile cleaner.
Can I use this DIY grout cleaner on vertical surfaces like shower walls?
Yes, you can use this DIY grout cleaner on vertical surfaces like shower walls. However, you may need to adjust the consistency of the paste to prevent it from running down the wall. Add a little more baking soda to create a thicker paste that will adhere to the surface. You can also use a spray bottle to apply the vinegar solution to the grout lines after applying the baking soda paste. Be sure to rinse the surface thoroughly with water after scrubbing.
What kind of brush is best for cleaning grout?
A grout brush with stiff bristles is ideal for cleaning grout. These brushes are specifically designed to reach into the narrow grout lines and scrub away dirt and grime. You can also use a toothbrush, but it may take longer and require more effort. For larger areas, an electric grout brush can significantly reduce the amount of time and effort required. When choosing a brush, consider the type of grout and tile you have. A soft-bristled brush is recommended for delicate tile or colored grout to minimize the risk of abrasion.
How do I prevent grout from getting dirty in the first place?
Prevention is key to keeping your grout clean and stain-free. Here are a few tips to help prevent grout from getting dirty:
* Seal your grout: Sealing your grout creates a protective barrier that prevents dirt, grime, and moisture from penetrating the surface. Apply a grout sealer according to the manufacturer’s instructions.
* Wipe up spills immediately: Spills can quickly stain grout, so it’s important to wipe them up as soon as they occur.
* Ventilate your bathroom: Proper ventilation helps to prevent the growth of mold and mildew in your bathroom. Run the exhaust fan during and after showering.
* Use a squeegee after showering: A squeegee can help to remove excess water from your shower walls and floor, preventing the buildup of soap scum and mildew.
* Clean your tile regularly: Regular cleaning will help to prevent stains from setting in and make the cleaning process easier in the long run.
Is there anything else I can add to this DIY grout cleaner to make it even more effective?
Besides borax and essential oils, some people add a small amount of hydrogen peroxide to their DIY grout cleaner for its bleaching properties. However, use hydrogen peroxide with caution, as it can potentially lighten the color of your grout. Always test it on an inconspicuous area first. Another option is to add a few drops of dish soap to the mixture to help cut through grease and grime. However, be sure to rinse the surface thoroughly with water after scrubbing to remove any soap residue.

Leave a Comment