

Dust hidden areas – those forgotten corners and crevices – can feel like a never-ending battle, right? I totally get it! We all strive for a clean and healthy home, but let’s be honest, life gets in the way. But what if I told you there are simple, DIY tricks that can make tackling those dusty spots a breeze?
For centuries, maintaining a clean home has been a symbol of prosperity and well-being across cultures. From ancient rituals to modern cleaning methods, the desire to rid our living spaces of dust and grime is deeply ingrained. But the real challenge lies in those hard-to-reach areas, the places where dust bunnies multiply in secret!
That’s where this article comes in! I’m going to share some of my favorite DIY hacks to help you conquer even the most stubborn dust hidden areas. These aren’t just quick fixes; they’re clever solutions that will save you time, effort, and maybe even a little sanity. Think about it: less sneezing, improved air quality, and a home that truly sparkles. Ready to say goodbye to those dusty demons? Let’s get started!
DIY Deep Clean: Conquering Hidden Dust Bunnies Like a Pro!
Okay, friends, let’s be honest. We all have those spots in our homes that seem to attract dust like magnets. You know, the places you conveniently “forget” about during your regular cleaning routine. Well, no more! Today, we’re tackling those hidden dust bunnies head-on with some clever DIY hacks that will leave your home feeling fresher and cleaner than ever. Get ready to roll up your sleeves – it’s time to dust like a boss!
Gather Your Arsenal: The Tools You’ll Need
Before we dive in, let’s make sure we have all the right tools for the job. Trust me, having everything ready beforehand will save you time and frustration.
* Microfiber Cloths: These are your best friends for dusting. They trap dust effectively and are washable, making them eco-friendly too.
* Vacuum Cleaner with Attachments: A vacuum with a hose and various attachments (crevice tool, brush attachment) is essential for reaching tight spaces and delicate surfaces.
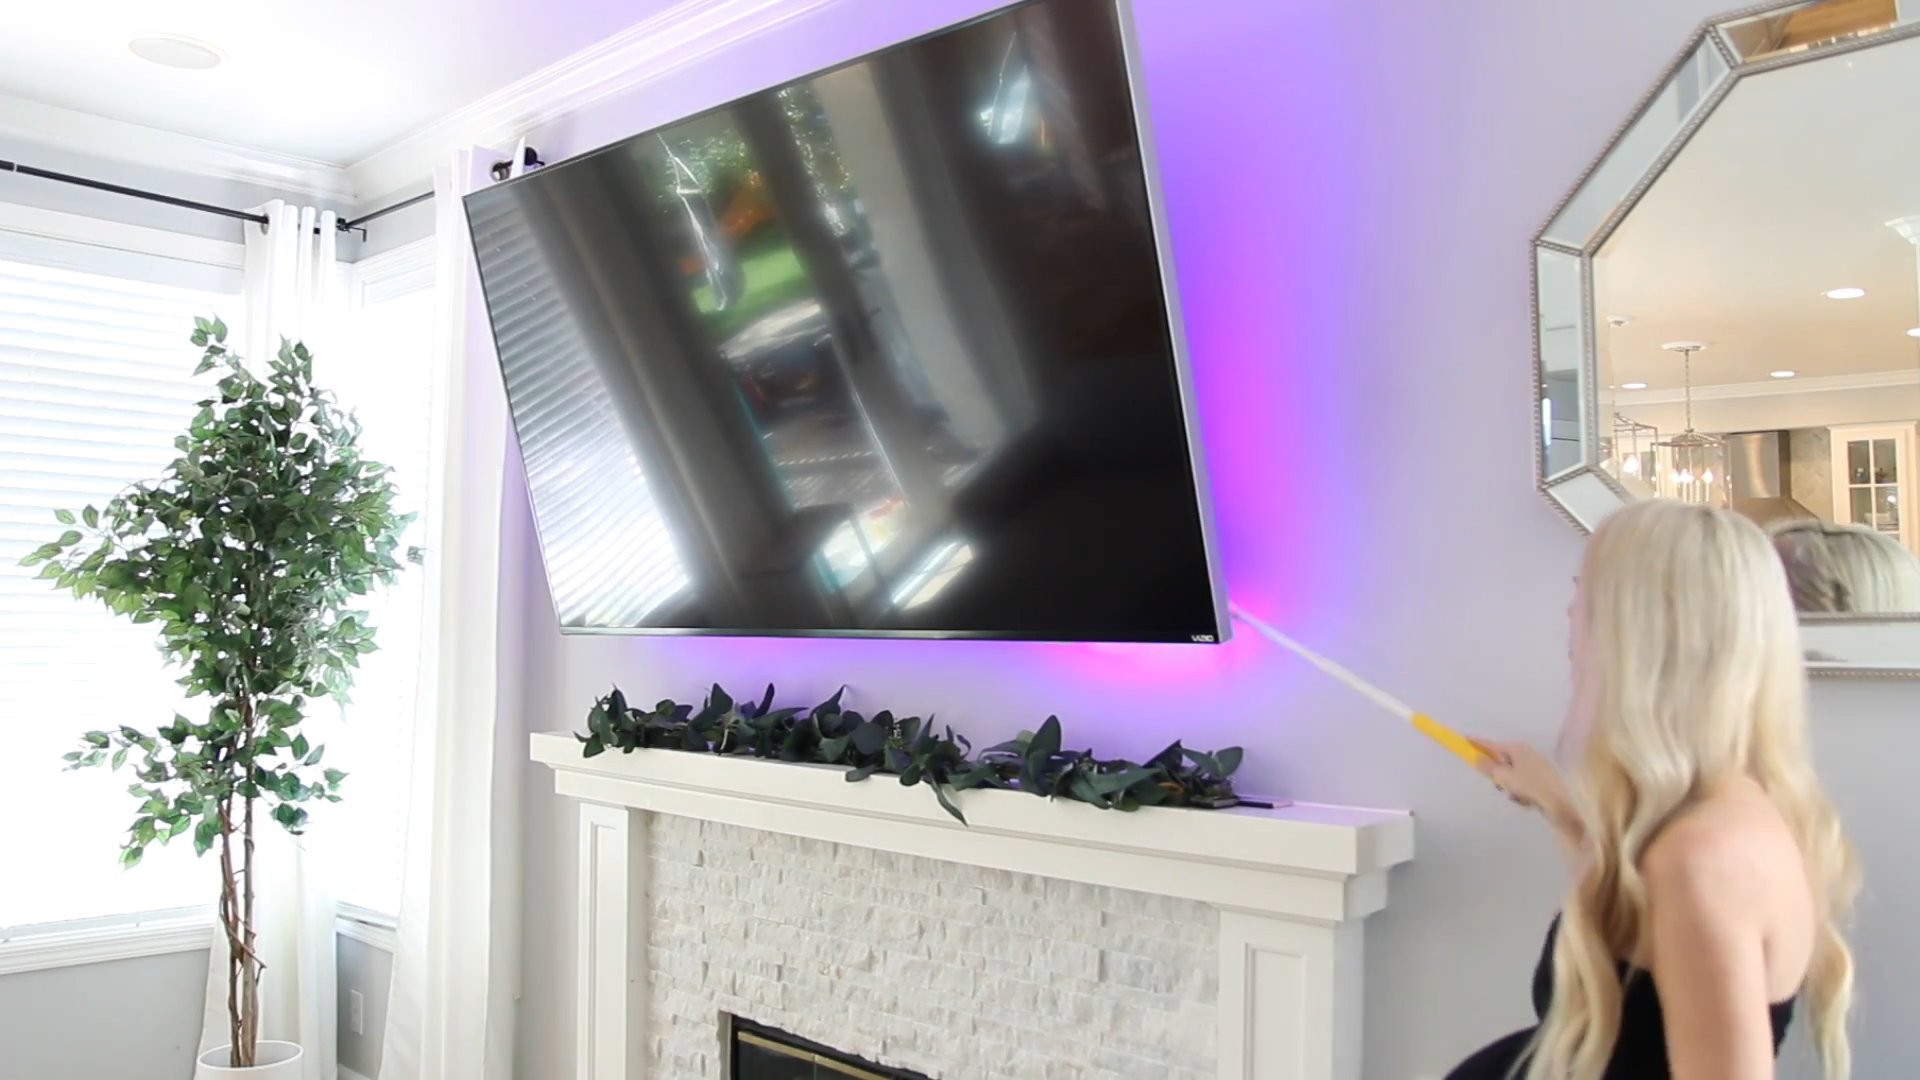
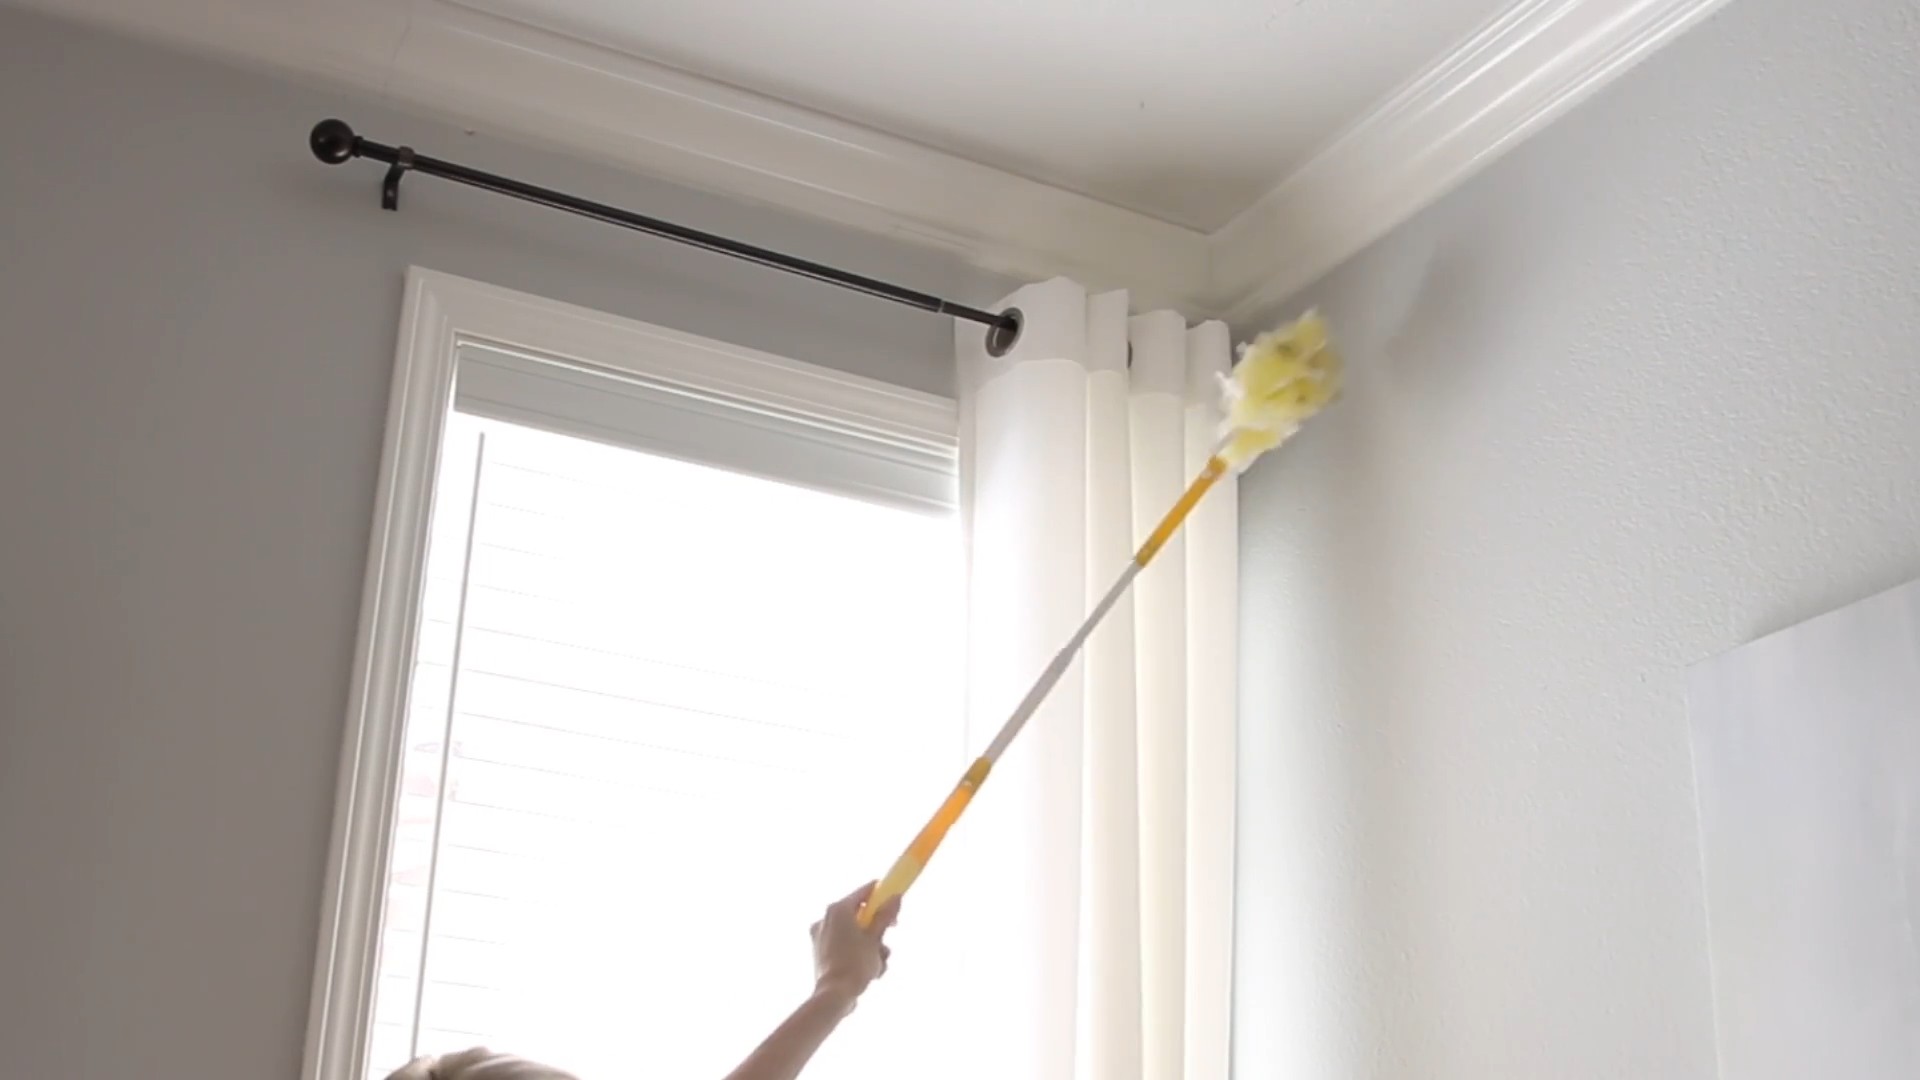
* Extension Wand: This is a game-changer for reaching high ceilings, ceiling fans, and under furniture without breaking your back.
* Old Socks: Yes, you read that right! Old socks make fantastic dusting tools for blinds, baseboards, and other hard-to-reach areas.
* Paint Brush (Soft Bristled): Perfect for dusting delicate items like lampshades, picture frames, and intricate carvings.
* Compressed Air: Ideal for blasting dust out of electronics, keyboards, and other small crevices.
* Dish Soap and Warm Water: For cleaning surfaces after dusting.
* Spray Bottle: For mixing your cleaning solution.
* Ladder or Step Stool: For reaching high places safely.
* Mask: Protect your lungs from dust, especially if you have allergies.
* Gloves: Keep your hands clean and protected.
Phase 1: The High and Mighty – Conquering Ceiling Dust
Let’s start from the top and work our way down. Dust tends to settle downwards, so tackling the ceilings first prevents re-dusting later.
1. Ceiling Fans: These are notorious dust collectors. Before you even think about turning them on, let’s get them clean.
* Safety First: Make sure the fan is turned off!
* The Pillowcase Trick: This is my favorite method. Take an old pillowcase and carefully slip it over one of the fan blades. Gently wipe the blade, trapping the dust inside the pillowcase. Repeat for each blade. This prevents dust from raining down on you and your furniture.
* Final Wipe: Use a damp microfiber cloth to wipe down the blades for any remaining residue.
2. Light Fixtures: Dust can dim the light and make your fixtures look dingy.
* Turn Off the Power: Always, always turn off the power to the fixture before cleaning.
* Remove Shades and Bulbs: Carefully remove any shades or bulbs. Wash the shades with warm, soapy water and let them dry completely. Dust the bulbs with a dry microfiber cloth.
* Dust the Fixture: Use a soft-bristled paint brush or a microfiber cloth to dust the fixture itself. For intricate fixtures, use compressed air to blow out dust from hard-to-reach areas.
* Reassemble: Once everything is dry and clean, reassemble the fixture.
3. Ceilings and Corners: Dust and cobwebs love to hang out in the corners of your ceilings.
* Extension Wand to the Rescue: Attach a microfiber cloth or the brush attachment to your vacuum cleaner’s extension wand.
* Gentle Sweep: Gently sweep along the ceiling and into the corners, removing dust and cobwebs.
Phase 2: Underneath It All – Dusting Under Furniture and Appliances
This is where things get a little more challenging, but trust me, the effort is worth it.
1. Under Furniture: Sofas, beds, and dressers are dust magnets.
* Vacuum with Crevice Tool: Use the crevice tool attachment on your vacuum to reach under furniture. Pay special attention to corners and along the edges.
* Extension Wand for Deeper Reach: If you can’t reach far enough with the crevice tool, use the extension wand.
* Consider Furniture Risers: If you have trouble reaching under your furniture, consider using furniture risers to lift it up a few inches. This will make cleaning much easier in the future.
2. Behind Appliances: Refrigerators, stoves, and washing machines are notorious for collecting dust and grime.
* Safety First: Unplug the appliance before cleaning behind it.
* Pull Out the Appliance: Carefully pull the appliance away from the wall. You may need help with this, especially for heavier appliances.
* Vacuum Thoroughly: Use the crevice tool and brush attachment to vacuum up dust, dirt, and debris from behind the appliance and along the floor.
* Wipe Down the Walls: Use a damp microfiber cloth to wipe down the walls behind the appliance.
* Clean the Appliance: Wipe down the back of the appliance with a damp cloth.
* Push Back into Place: Carefully push the appliance back into place.
3. Baseboards: These often get overlooked, but they can accumulate a surprising amount of dust.
* The Sock Trick: Dampen an old sock and slip it over your hand. Use it to wipe down the baseboards. The sock will conform to the shape of the baseboard, making it easy to clean.
* Vacuum First: For heavily soiled baseboards, vacuum them first to remove loose dust and debris.
Phase 3: The Delicate Touch – Dusting Electronics and Delicate Items
Electronics and delicate items require a gentler approach to avoid damage.
1. Electronics: TVs, computers, and stereos attract dust like crazy.
* Turn Off and Unplug: Always turn off and unplug electronics before cleaning them.
* Compressed Air: Use compressed air to blow dust out of vents, keyboards, and other small crevices.
* Microfiber Cloth: Gently wipe down the screens and surfaces with a dry microfiber cloth. Avoid using harsh chemicals or liquids, as they can damage the screens.
* Specialized Screen Cleaners: If you need to remove fingerprints or smudges, use a specialized screen cleaner designed for electronics.
2. Lampshades: These can be tricky to dust without damaging them.
* Soft-Bristled Paint Brush: Use a soft-bristled paint brush to gently dust the lampshade. Brush downwards to avoid pushing dust into the fabric.
* Vacuum with Brush Attachment: For fabric lampshades, you can also use the brush attachment on your vacuum cleaner.
3. Picture Frames and Artwork: Dust can accumulate on picture frames and artwork, making them look dull.
* Soft-Bristled Paint Brush: Use a soft-bristled paint brush to gently dust the frames and artwork.
* Microfiber Cloth: For glass-covered artwork, use a dry microfiber cloth to wipe down the glass.
4. Bookshelves: Bookshelves are notorious dust collectors.
* Remove Books: Remove the books from the shelves.
* Dust the Shelves: Use a microfiber cloth to dust the shelves.
* Dust the Books: Use a microfiber cloth to dust the tops of the books.
* Replace Books: Replace the books on the shelves.
Phase 4: The Finishing Touches – Maintaining a Dust-Free Home
Now that you’ve conquered the dust bunnies, let’s talk about how to keep them at bay.
* Regular Dusting: Aim to dust your home at least once a week. This will prevent dust from building up and make cleaning much easier.
* Air Purifier: Consider investing in an air purifier to help remove dust and allergens from the air.
* Change Air Filters: Regularly change the air filters in your HVAC system. This will help to improve air quality and reduce dust.
* Vacuum Regularly: Vacuum your floors and carpets at least once a week.
* Wash Bedding Regularly: Wash your bedding at least once a week to remove dust mites and allergens.
* Declutter: The less clutter you have, the less dust will accumulate.
* Control Humidity: High humidity can promote dust mite growth. Use a dehumidifier to control humidity levels in your home.
* Use Doormats: Place doormats at all entrances to your home to trap dirt and dust before it enters.
And there you have it! You’ve successfully tackled those hidden dust bunnies and
Conclusion
So, there you have it! This simple yet incredibly effective DIY trick for dusting hidden areas is a game-changer for anyone who wants a truly clean home. Forget struggling with bulky vacuums or awkwardly angled cloths. This method is not only easier and faster, but it also reaches those impossible-to-get-to spots where dust bunnies love to congregate. Think about it: under the refrigerator, behind the washing machine, between the dryer and the wall, those narrow gaps beside your furniture – all these areas are breeding grounds for dust, allergens, and even pests. By implementing this DIY solution, you’re not just cleaning; you’re creating a healthier and more comfortable living environment for yourself and your family.
This isn’t just about aesthetics, although a dust-free home certainly looks and feels better. It’s about improving air quality, reducing allergens, and preventing potential problems down the line. Dust accumulation can clog vents, overheat appliances, and even contribute to respiratory issues. Taking a proactive approach to dusting hidden areas is an investment in the long-term health and well-being of your home and its inhabitants.
Why is this DIY trick a must-try? Because it’s efficient, cost-effective, and adaptable. You likely already have the materials on hand, and the technique is so simple that anyone can master it in minutes. Plus, the results speak for themselves. You’ll be amazed at the amount of dust you can remove from these neglected areas, and you’ll breathe easier knowing that your home is truly clean from top to bottom.
Looking for variations? Consider adding a few drops of essential oil to your dusting spray for a pleasant scent. Lavender, lemon, and eucalyptus are all great choices for their cleaning and refreshing properties. You can also experiment with different types of cloths or attachments to find what works best for you. For particularly stubborn dust buildup, try using a slightly damp cloth or a specialized dusting tool with electrostatic properties.
Don’t just take our word for it – try this DIY trick for dusting hidden areas yourself! We’re confident that you’ll be amazed by the results. And once you’ve experienced the satisfaction of a truly dust-free home, we encourage you to share your experience with us. Leave a comment below, post a picture on social media, or tell a friend about this simple yet effective cleaning solution. Let’s spread the word and help everyone achieve a cleaner, healthier, and happier home! We are eager to hear your tips and tricks, and any modifications you made to the process. Your feedback will help others discover the best way to tackle those hard-to-reach dust bunnies. So, grab your supplies, get dusting, and let us know how it goes!
FAQ
What kind of materials do I need for this DIY dusting trick?
The beauty of this trick is its simplicity! You’ll generally need a long, thin object like a yardstick, paint stirrer, or even a sturdy ruler. You’ll also need a microfiber cloth or any soft, lint-free cloth. Optional items include a spray bottle with a dusting solution (water and a few drops of dish soap work well), rubber bands or tape to secure the cloth, and gloves to protect your hands. The specific materials will depend on the area you’re trying to reach and the amount of dust you anticipate. For example, if you’re dusting under a refrigerator, you might want a longer stick and a thicker cloth to absorb more dust.
How often should I dust these hidden areas?
The frequency of dusting hidden areas depends on several factors, including the number of people and pets in your home, the level of outdoor pollution, and your personal sensitivity to dust and allergens. As a general guideline, aim to dust these areas at least once every three months. However, if you notice a significant buildup of dust or if you experience allergy symptoms, you may need to dust more frequently. Consider adding it to your seasonal cleaning routine.
What are some other areas that are considered “hidden” and often overlooked?
Besides under appliances and behind furniture, other commonly overlooked hidden areas include:
* Inside drawers and cabinets (especially in the kitchen and bathroom)
* Behind and underneath beds
* On top of high shelves and cabinets
* Inside light fixtures and lampshades
* Behind toilets
* Inside computer towers and other electronic devices (unplug them first!)
* Underneath rugs and mats
Is it safe to use this method on all surfaces?
While this method is generally safe for most surfaces, it’s always a good idea to test it on an inconspicuous area first, especially if you’re using a cleaning solution. Avoid using harsh chemicals or abrasive cleaners, as these can damage delicate surfaces. For sensitive materials like wood furniture, use a dry cloth or a specialized wood cleaner. If you’re unsure about a particular surface, consult the manufacturer’s instructions or a professional cleaning service.
What if I can’t reach some areas with a stick and cloth?
For extremely tight or difficult-to-reach areas, consider using a vacuum cleaner with a crevice tool attachment. This can help to suck up dust and debris without having to physically reach into the space. You can also try using a flexible duster or a long-handled brush. In some cases, you may need to move the appliance or furniture slightly to gain better access. Always be careful when moving heavy objects, and ask for help if needed.
Can this DIY trick help with allergies?
Yes, absolutely! Dust is a major trigger for allergies, and removing it from hidden areas can significantly improve air quality and reduce allergy symptoms. Dust mites, pet dander, and mold spores often accumulate in these neglected spaces, contributing to respiratory problems and other allergic reactions. By regularly dusting hidden areas, you can minimize your exposure to these allergens and create a healthier living environment.
What’s the best way to store the materials after I’m done dusting?
After you’re finished dusting, be sure to wash the microfiber cloth thoroughly with soap and water. Allow it to air dry completely before storing it. The stick or other tool can be wiped down with a damp cloth and stored in a closet or utility room. If you used a dusting solution, make sure to store the spray bottle in a safe place, away from children and pets. Proper storage will help to keep your cleaning supplies organized and ready for the next time you need to dust hidden areas.
How can I prevent dust from accumulating so quickly in these hidden areas?
While it’s impossible to completely eliminate dust, there are several things you can do to minimize its accumulation:
* Use air purifiers with HEPA filters to remove dust and allergens from the air.
* Change your HVAC filters regularly.
* Vacuum frequently, paying attention to areas where dust tends to collect.
* Dust regularly with a microfiber cloth to trap dust instead of spreading it around.
* Use doormats to prevent dirt and debris from being tracked into your home.
* Keep windows and doors closed when possible to reduce the amount of outdoor dust entering your home.
* Declutter your home to reduce the number of surfaces where dust can accumulate.
Is there a way to make this DIY dusting trick more eco-friendly?
Absolutely! You can make this trick more eco-friendly by using natural cleaning solutions and sustainable materials. Instead of commercial dusting sprays, try using a mixture of water and vinegar or lemon juice. These natural ingredients are effective at cleaning and disinfecting surfaces without the use of harsh chemicals. You can also use reusable microfiber cloths instead of disposable wipes. When it’s time to replace your dusting tool, consider choosing one made from recycled materials or sustainable wood. By making these small changes, you can reduce your environmental impact and create a healthier home for yourself and your family.


Leave a Comment