

Grow Bell Peppers from Seed and unlock a world of vibrant colors and delicious flavors right in your own backyard! Have you ever dreamed of biting into a crisp, juicy bell pepper, knowing you nurtured it from a tiny seed to a bountiful harvest? Well, stop dreaming and start doing! This DIY guide is your passport to pepper paradise, offering simple yet effective techniques to cultivate these garden gems.
Bell peppers, originating from Central and South America, have been cultivated for thousands of years, becoming a staple in cuisines worldwide. From the fiery fajitas of Mexico to the colorful salads of the Mediterranean, their versatility is undeniable. But beyond their culinary appeal, growing your own bell peppers offers a unique connection to nature and a sense of accomplishment that’s hard to beat.
Why should you embark on this pepper-growing adventure? Because store-bought peppers simply can’t compare to the taste and satisfaction of homegrown ones. Plus, you’ll have complete control over the growing process, ensuring your peppers are free from harmful pesticides and bursting with natural goodness. I’m excited to share my favorite tips and tricks to help you successfully grow bell peppers from seed, even if you’re a complete beginner. Let’s get started and transform your garden into a pepper-producing powerhouse!
Growing Bell Peppers From Seed: A Comprehensive DIY Guide
Hey there, fellow gardening enthusiasts! I’m so excited to share my tried-and-true method for growing bell peppers from seed. It’s incredibly rewarding to nurture these vibrant veggies from tiny specks into plump, juicy peppers ready for your favorite recipes. While it might seem daunting at first, trust me, with a little patience and these detailed instructions, you’ll be harvesting your own homegrown bell peppers in no time!
Why Start From Seed?
Before we dive in, you might be wondering why bother starting from seed when you can just buy seedlings? Well, there are a few compelling reasons:
* Cost-Effective: Seeds are significantly cheaper than buying established plants, especially if you’re planning on growing a lot of peppers.
* Variety: You’ll have access to a much wider range of bell pepper varieties when starting from seed. Think beyond the standard green and red – explore purple, yellow, orange, and even chocolate bell peppers!
* Control: You have complete control over the growing environment from the very beginning, ensuring your peppers get the best possible start.
* Satisfaction: There’s just something incredibly satisfying about watching a tiny seed sprout and grow into a thriving plant that produces delicious food.
What You’ll Need
Here’s a list of everything you’ll need to get started:
* Bell Pepper Seeds: Choose your favorite varieties! Make sure they are from a reputable source and are relatively fresh (check the expiration date).
* Seed Starting Trays or Small Pots: I prefer seed starting trays with a clear plastic dome to help retain moisture. Small pots (2-3 inches in diameter) also work well.
* Seed Starting Mix: This is a lightweight, sterile soil mix specifically designed for starting seeds. Don’t use regular garden soil, as it can be too heavy and may contain diseases.
* Watering Can or Spray Bottle: For gentle watering.
* Heat Mat (Optional but Recommended): Bell peppers germinate best in warm temperatures (75-85°F). A heat mat will help maintain consistent warmth.
* Grow Lights (Optional but Recommended): If you don’t have a sunny windowsill, grow lights will provide the necessary light for healthy seedling growth.
* Small Labels and a Permanent Marker: To keep track of your different varieties.
* Small Fan (Optional): To provide gentle air circulation and prevent damping-off disease.
* Fertilizer: A balanced liquid fertilizer diluted to half strength.
Timing is Everything: When to Start Your Seeds
Bell peppers have a long growing season, so it’s crucial to start your seeds indoors 6-8 weeks before the last expected frost in your area. To determine your last frost date, consult your local weather service or agricultural extension office. I usually start my seeds in late February or early March.
Phase 1: Sowing the Seeds
This is where the magic begins! Follow these steps carefully to ensure successful germination:
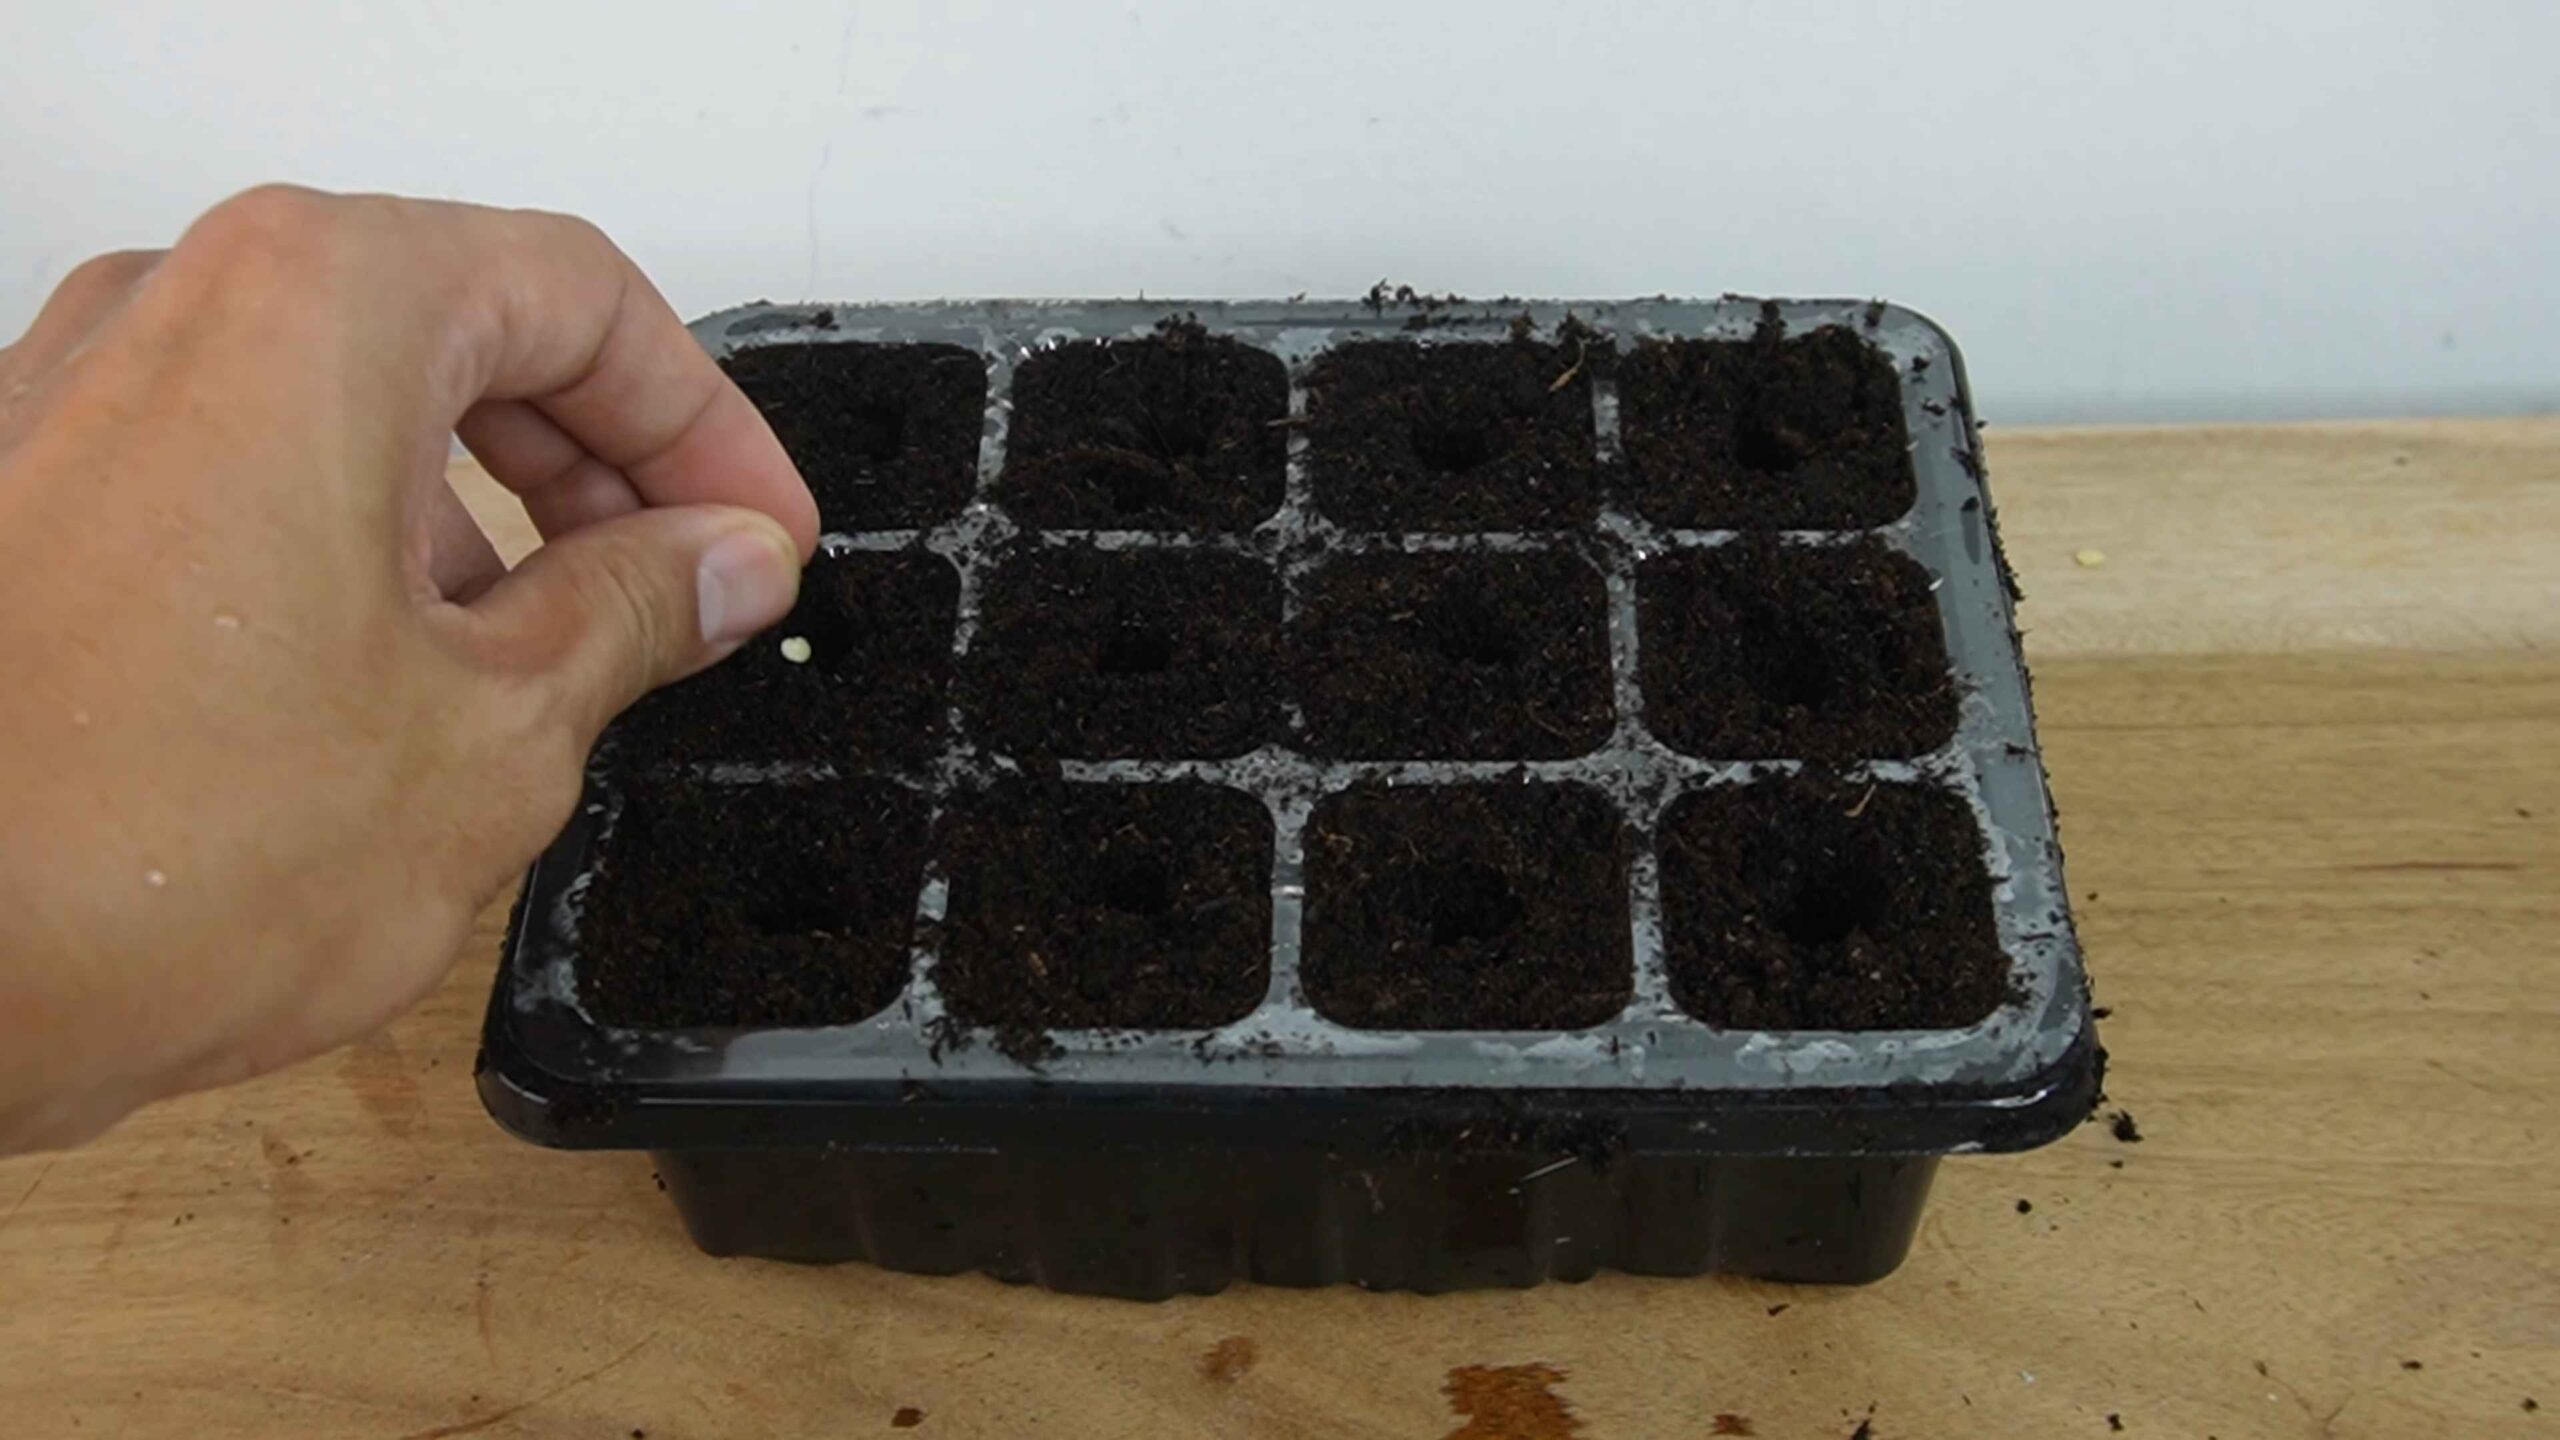
1. Prepare Your Seed Starting Trays or Pots: Fill your seed starting trays or pots with seed starting mix. Gently tap the trays or pots to settle the mix, but don’t pack it down too tightly.
2. Moisten the Seed Starting Mix: Water the mix thoroughly until it’s evenly moist but not soggy. You can use a spray bottle or a watering can with a gentle nozzle.
3. Sow the Seeds: Make a small indentation (about ¼ inch deep) in the center of each cell or pot. Place 2-3 seeds in each indentation. This increases your chances of at least one seed germinating.
4. Cover the Seeds: Gently cover the seeds with a thin layer of seed starting mix.
5. Water Again: Lightly water the surface of the mix to ensure good seed-to-soil contact.
6. Label Your Trays or Pots: Use your labels and permanent marker to clearly identify each variety of bell pepper.
7. Cover with a Dome (if using): Place the clear plastic dome over the seed starting tray to create a humid environment.
8. Place on a Heat Mat (if using): Place the seed starting tray on a heat mat set to 75-85°F.
9. Provide Light: If you don’t have a sunny windowsill, place the seed starting tray under grow lights. Position the lights a few inches above the tray.
Phase 2: Germination and Early Growth
Now comes the waiting game! Keep a close eye on your seeds and follow these steps to ensure successful germination and early growth:
1. Maintain Moisture: Check the moisture level of the seed starting mix daily. It should be consistently moist but not soggy. Use a spray bottle to gently mist the surface of the mix as needed.
2. Maintain Warmth: Keep the heat mat on until the seeds germinate.
3. Provide Light: If using grow lights, keep them on for 14-16 hours per day.
4. Ventilate (if using a dome): Once the seeds start to germinate (usually within 7-14 days), remove the dome for a few hours each day to provide ventilation and prevent damping-off disease. Gradually increase the ventilation time each day until you can remove the dome completely.
5. Thin Seedlings: Once the seedlings have developed their first true leaves (the second set of leaves that appear after the initial seed leaves), thin them to one seedling per cell or pot. Choose the strongest, healthiest-looking seedling and snip off the others at the soil line with a pair of scissors. Don’t pull them out, as this can disturb the roots of the remaining seedling.
6. Provide Air Circulation: If you’re growing your seedlings in a humid environment, use a small fan to provide gentle air circulation. This will help prevent damping-off disease.
Phase 3: Growing Strong Seedlings
Now that your seedlings have germinated and are growing, it’s time to focus on providing them with the nutrients and care they need to develop into strong, healthy plants:
1. Watering: Water your seedlings regularly, allowing the top inch of soil to dry out slightly between waterings. Avoid overwatering, as this can lead to root rot.
2. Fertilizing: Start fertilizing your seedlings with a balanced liquid fertilizer diluted to half strength once they have developed their second set of true leaves. Fertilize every 1-2 weeks.
3. Light: Continue to provide your seedlings with plenty of light. If using grow lights, adjust the height of the lights as the seedlings grow to keep them a few inches above the plants.
4. Hardening Off: About a week or two before you plan to transplant your seedlings outdoors, you’ll need to “harden them off.” This process gradually acclimates the seedlings to outdoor conditions, preventing them from being shocked when they’re transplanted. Start by placing the seedlings outdoors in a sheltered location for a few hours each day, gradually increasing the amount of time they spend outdoors each day. Protect them from direct sunlight and strong winds.
Phase 4: Transplanting Outdoors
Once the danger of frost has passed and your seedlings have been hardened off, it’s time to transplant them into your garden:
1. Choose a Sunny Location: Bell peppers need at least 6-8 hours of sunlight per day. Choose a location in your garden that receives plenty of sun.
2. Prepare the Soil: Bell peppers prefer well-drained soil that is rich in organic matter. Amend your soil with compost or well-rotted manure before planting.
3. Dig Holes: Dig holes that are slightly larger than the root balls of your seedlings. Space the holes about 18-24 inches apart.
4. Transplant the Seedlings: Gently remove the seedlings from their trays or pots. Loosen the roots slightly and place the seedlings in the holes.
5. Fill the Holes: Fill the holes with soil, gently firming the soil around the base of the plants.
6. Water Thoroughly: Water the newly transplanted seedlings thoroughly.
7. Mulch: Apply a layer of mulch around the base of the plants to help retain moisture and suppress weeds.
Ongoing Care
Once your bell pepper plants are in the ground, here’s how to keep them thriving:
1. Watering: Water your bell pepper plants regularly, especially during hot, dry weather. Aim to keep the soil consistently moist but not soggy.
2. Fertilizing: Continue to fertilize your bell pepper plants every 2-3 weeks with a balanced fertilizer.
3. Support: As your bell pepper plants grow, they may need support to prevent them from falling over. You can use stakes or cages to support the plants.
4. Pest and Disease Control: Keep an eye out for pests and diseases. Common pests of bell peppers include aphids, flea beetles, and tomato hornworms.
Conclusion
So, there you have it! Growing bell peppers from seed might seem daunting at first, but with a little patience and these simple steps, you can cultivate a thriving pepper patch right in your own home or garden. The satisfaction of harvesting your own crisp, colorful bell peppers, knowing you nurtured them from tiny seeds, is truly unparalleled. It’s a rewarding experience that connects you to the food you eat and offers a sustainable way to enjoy fresh produce.
Why is this DIY trick a must-try? Because it empowers you to control the entire growing process, from selecting the specific bell pepper varieties you crave (think vibrant yellows, oranges, purples, and even chocolate browns!) to ensuring they are grown organically and free from unwanted chemicals. Plus, starting from seed is often more cost-effective than purchasing transplants, especially if you plan to grow a large number of plants. You can tailor your pepper production to your exact needs and preferences.
But the benefits don’t stop there. Growing your own bell peppers allows you to extend the growing season, especially if you start seeds indoors well before the last frost. This means you can enjoy fresh, homegrown peppers for a longer period. And let’s not forget the sheer joy of watching those tiny seeds sprout and transform into robust, fruit-bearing plants. It’s a miniature miracle unfolding right before your eyes!
Looking for variations? Consider experimenting with different seed starting mediums. While a standard seed starting mix works well, you can also try using coconut coir or peat moss. Each medium has its own unique properties that can affect germination and seedling growth. You can also explore different hardening-off techniques to prepare your seedlings for the outdoor environment. Some gardeners prefer to gradually expose their plants to sunlight and wind over a period of several days, while others opt for a more rapid hardening-off process.
Another exciting variation is to try growing bell peppers in containers. This is a great option if you have limited space or want to move your plants indoors during colder weather. Choose a large container with good drainage and use a high-quality potting mix. Be sure to provide your container-grown peppers with plenty of sunlight and water.
Finally, don’t be afraid to experiment with different bell pepper varieties. There are countless options to choose from, each with its own unique flavor, color, and size. Try growing a mix of different varieties to add variety to your meals.
We wholeheartedly encourage you to give this DIY trick a try. It’s a fun, rewarding, and sustainable way to enjoy fresh, delicious bell peppers. And most importantly, remember that even experienced gardeners encounter challenges along the way. Don’t be discouraged if your first attempt isn’t perfect. Learn from your mistakes and keep experimenting. The key to success is patience, persistence, and a willingness to learn.
So, grab some seeds, gather your supplies, and get ready to embark on a bell pepper growing adventure! We’re confident that you’ll be amazed by the results. And once you’ve harvested your first crop of homegrown bell peppers, be sure to share your experience with us! We’d love to hear about your successes, challenges, and any tips or tricks you’ve learned along the way. Share your photos and stories on social media using [Your Hashtag Here] or leave a comment below. Let’s create a community of bell pepper enthusiasts and inspire others to grow their own food! Growing bell peppers from seed is a journey worth taking.
Frequently Asked Questions (FAQ)
What is the best time to start bell pepper seeds indoors?
The ideal time to start bell pepper seeds indoors is typically 6-8 weeks before the last expected frost in your area. This allows the seedlings ample time to develop a strong root system and prepare for transplanting outdoors once the weather warms up. To determine the last frost date for your region, consult your local weather service or agricultural extension office. Starting too early can result in leggy, weak seedlings, while starting too late may delay your harvest.
What type of soil is best for starting bell pepper seeds?
A light, well-draining seed starting mix is crucial for successful germination and seedling growth. Avoid using garden soil, as it can be too heavy and may contain pathogens that can harm young plants. Look for a commercially available seed starting mix that is specifically formulated for starting seeds. These mixes typically contain a blend of peat moss, vermiculite, and perlite, which provide excellent drainage and aeration. You can also make your own seed starting mix by combining equal parts peat moss, vermiculite, and perlite.
How often should I water bell pepper seedlings?
Bell pepper seedlings need consistent moisture to thrive, but overwatering can lead to root rot. Water the seedlings when the top inch of soil feels dry to the touch. Use a gentle watering can or spray bottle to avoid disturbing the delicate seedlings. Be sure to water thoroughly, allowing the water to drain out of the bottom of the container. Avoid letting the seedlings sit in standing water.
What kind of light do bell pepper seedlings need?
Bell pepper seedlings require plenty of light to grow strong and healthy. If you don’t have a sunny windowsill that receives at least 6-8 hours of direct sunlight per day, you’ll need to supplement with artificial lighting. Fluorescent grow lights or LED grow lights are excellent options. Position the lights a few inches above the seedlings and adjust the height as the plants grow. Provide the seedlings with 14-16 hours of light per day.
When should I transplant bell pepper seedlings outdoors?
Transplant bell pepper seedlings outdoors when the weather has warmed up and the danger of frost has passed. The soil temperature should be at least 60°F (15°C). Before transplanting, harden off the seedlings by gradually exposing them to outdoor conditions over a period of 7-10 days. Start by placing the seedlings in a sheltered location for a few hours each day, gradually increasing the amount of time they spend outdoors. This will help them acclimate to the sun, wind, and temperature changes.
How far apart should I plant bell pepper plants?
Bell pepper plants should be spaced 18-24 inches apart in rows that are 24-36 inches apart. This allows the plants ample room to grow and prevents overcrowding, which can lead to disease problems. If you are growing bell peppers in containers, use a large container that is at least 12 inches in diameter.
What are some common problems when growing bell peppers from seed?
Some common problems when growing bell peppers from seed include damping off, leggy seedlings, and blossom end rot. Damping off is a fungal disease that can kill young seedlings. To prevent damping off, use a sterile seed starting mix and avoid overwatering. Leggy seedlings are tall and spindly due to insufficient light. To prevent leggy seedlings, provide them with plenty of light. Blossom end rot is a condition that causes the bottom of the pepper to rot. To prevent blossom end rot, ensure that the plants receive consistent watering and are not stressed by drought.
How long does it take for bell peppers to mature?
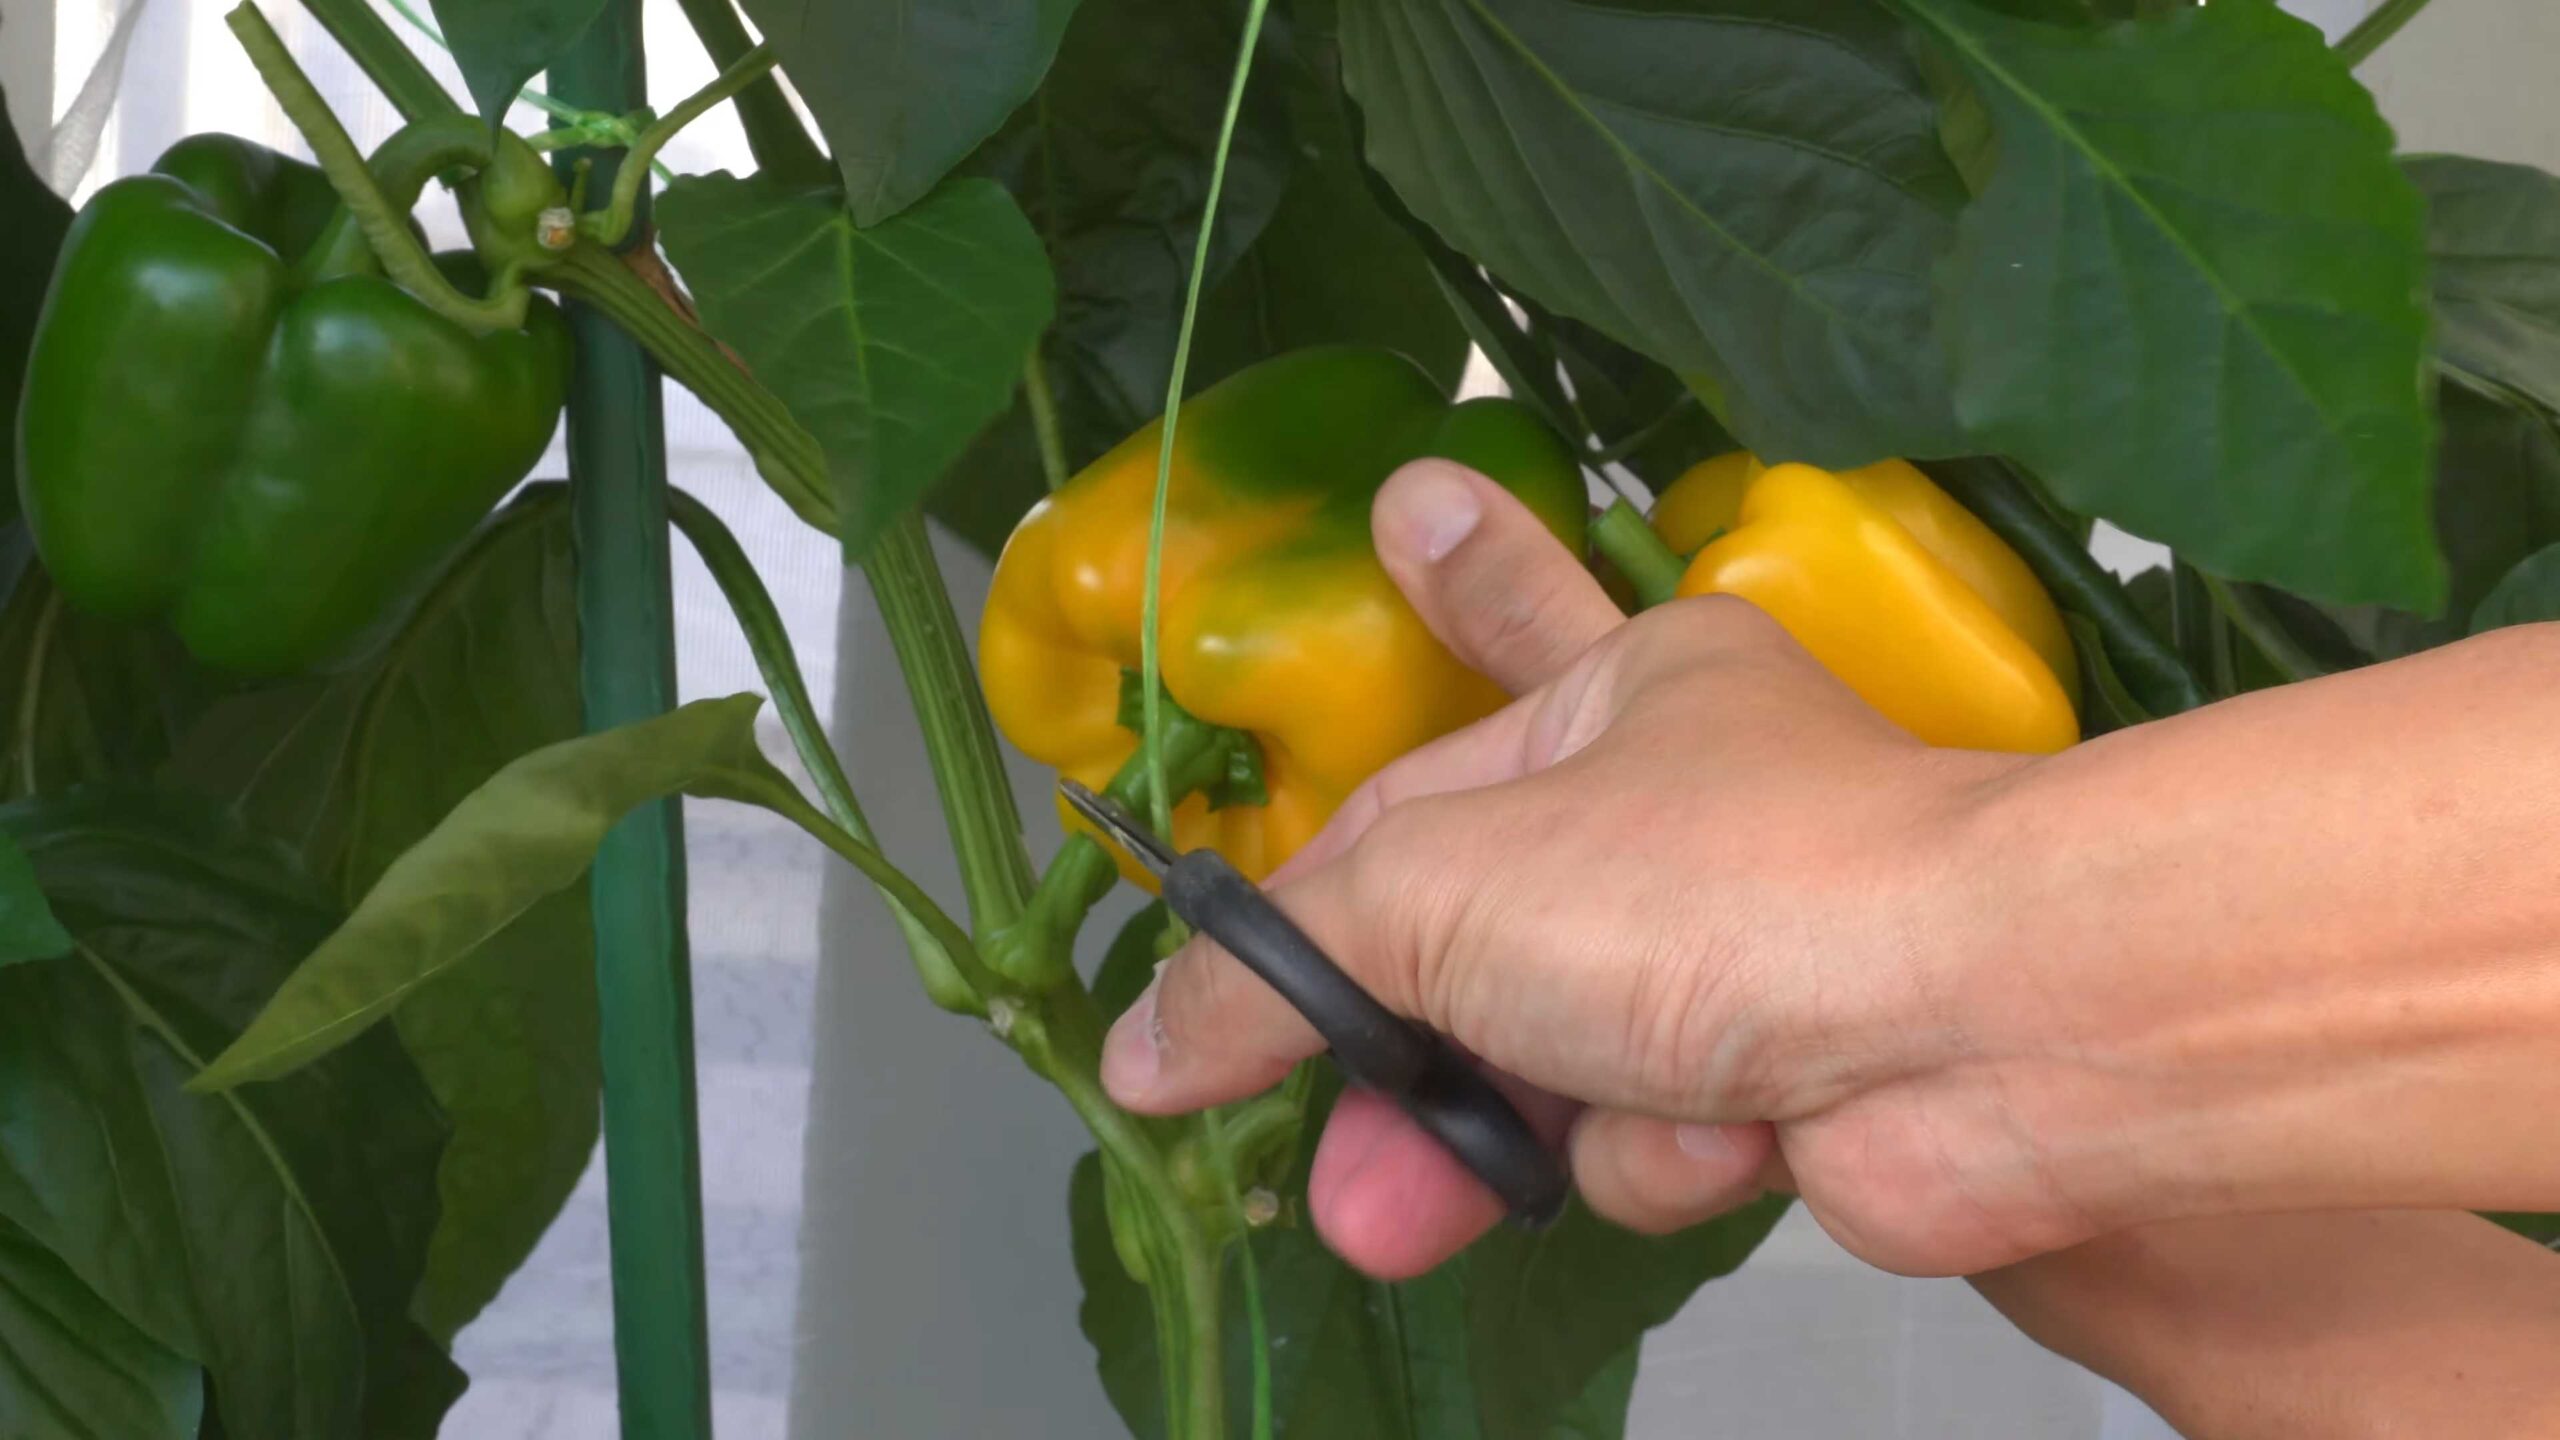
Bell peppers typically take 60-90 days to mature, depending on the variety. Green bell peppers are usually harvested sooner than colored bell peppers. You can harvest bell peppers when they are firm, glossy, and have reached their mature size. Use a sharp knife or pruning shears to cut the peppers from the plant.
Can I save seeds from my homegrown bell peppers?
Yes, you can save seeds from your homegrown bell peppers, but keep in mind that if your peppers were grown near other pepper varieties, there is a chance they may have cross-pollinated. This means that the seeds may not produce plants that are true to type. To save seeds, allow the peppers to fully ripen on the plant. Then, cut the peppers open and remove the seeds. Spread the seeds out on a paper towel to dry completely. Once the seeds are dry, store them in an airtight container in a cool, dark place.
What are some good companion plants for bell peppers?
Good companion plants for bell peppers include basil, carrots, onions, garlic, and marigolds. Basil helps to repel pests and improve the flavor of bell peppers. Carrots help to loosen the soil and improve drainage. Onions and garlic help to deter pests and diseases. Marigolds help to repel nematodes and other soil pests. Avoid planting bell peppers near fennel, as it can inhibit their growth.
Leave a Comment