

Grow Birds Eye Chili Home, and unlock a world of fiery flavor right at your fingertips! Have you ever dreamed of adding a zesty kick to your dishes with chilies you’ve nurtured yourself? Imagine the satisfaction of plucking vibrant, tiny peppers from your own plant, knowing exactly where they came from and how they were grown. For centuries, chilies have been a staple in cuisines around the globe, adding not just heat but also depth and complexity to countless recipes. From the ancient Aztecs who revered them to the modern-day foodies who crave their spice, chilies have a rich and fascinating history.
But let’s be honest, sometimes the idea of growing your own food can feel a little daunting. That’s where these simple, yet effective, DIY tricks come in! I’m here to show you that you don’t need a sprawling garden or a green thumb to successfully grow Birds Eye Chili home. Whether you’re a seasoned gardener or a complete beginner, these hacks will empower you to cultivate your own thriving chili plants, even in a small apartment. Get ready to spice up your life, one chili pepper at a time!
Growing Birds Eye Chilies at Home: A Fiery DIY Guide
Hey there, fellow chili enthusiasts! Ever dreamt of having a constant supply of fiery Birds Eye chilies right at your fingertips? Well, you’ve come to the right place! I’m going to walk you through everything you need to know to successfully grow these little flavor bombs in your own home. Trust me, it’s easier than you think, and the satisfaction of harvesting your own chilies is incredibly rewarding.
Choosing Your Growing Method
Before we dive into the nitty-gritty, let’s consider the two main ways you can grow Birds Eye chilies indoors:
* Starting from Seeds: This is the most common and cost-effective method. You’ll have complete control over the entire process, from germination to harvest.
* Using Seedlings/Starter Plants: If you’re short on time or a bit intimidated by starting from seed, buying seedlings from a nursery is a great option. It gives you a head start and reduces the risk of early failures.
I’ll cover both methods in detail, so you can choose the one that best suits your needs and experience level.
Section 1: Starting from Seeds
Okay, let’s get our hands dirty! Starting from seeds requires a bit more patience, but it’s totally worth it.
What You’ll Need:
* Birds Eye chili seeds (easily available online or at garden centers)
* Seed starting tray or small pots
* Seed starting mix (a light, well-draining soil mix specifically designed for seedlings)
* Spray bottle with water
* Clear plastic wrap or a humidity dome
* Warm, sunny location or grow light
* Small pots (3-4 inch diameter) for transplanting
* Larger pot (at least 5 gallons) for final planting
Step-by-Step Instructions:
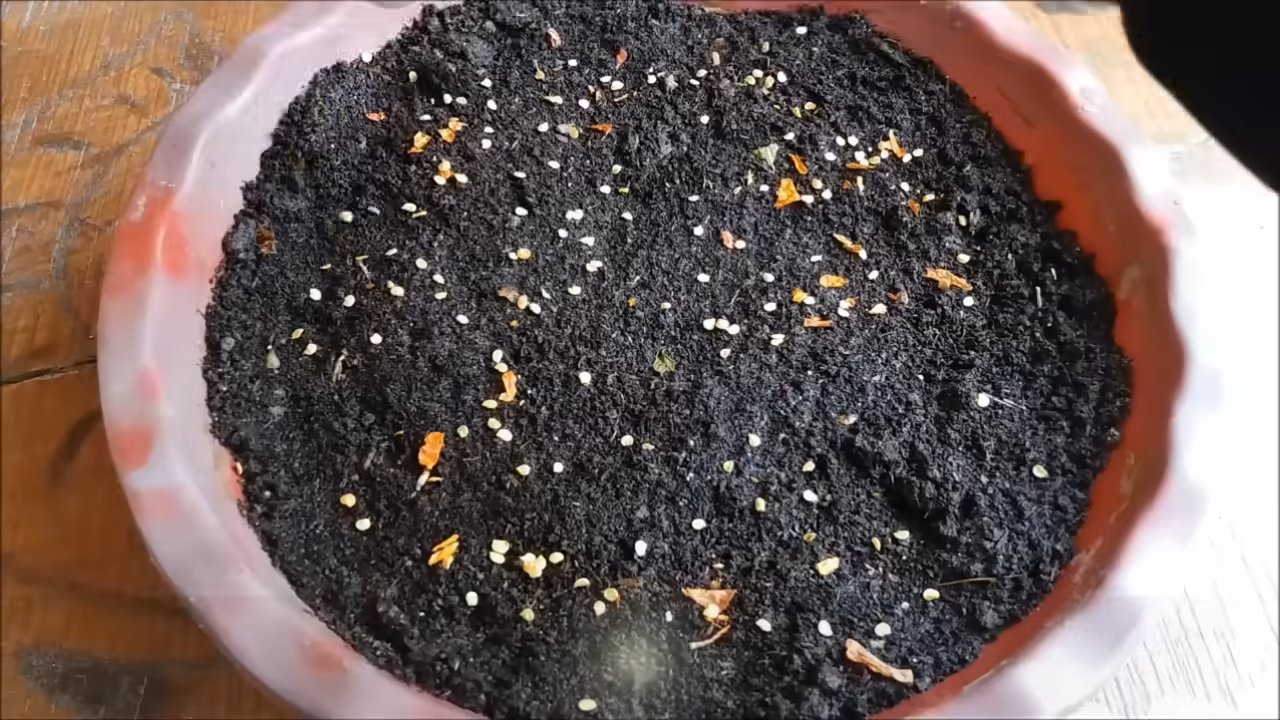
1. Soaking the Seeds (Optional but Recommended): To speed up germination, soak your chili seeds in warm water for 12-24 hours before planting. This helps soften the seed coat and encourages sprouting. I usually put them in a small bowl of water on a warm windowsill.
2. Preparing the Seed Starting Tray: Fill your seed starting tray or small pots with seed starting mix. Gently tap the tray to settle the soil.
3. Sowing the Seeds: Make a small indentation (about ¼ inch deep) in the soil of each cell or pot. Place 1-2 seeds in each indentation. Covering with two seeds increases the chance of at least one germinating.
4. Covering the Seeds: Gently cover the seeds with a thin layer of seed starting mix. Lightly pat down the soil.
5. Watering: Use a spray bottle to thoroughly moisten the soil. Avoid overwatering, as this can lead to fungal diseases. The soil should be damp, not soggy.
6. Creating a Humid Environment: Cover the seed starting tray with clear plastic wrap or a humidity dome. This helps retain moisture and create a warm, humid environment that’s ideal for germination.
7. Finding the Right Location: Place the seed starting tray in a warm, sunny location. A south-facing windowsill is ideal. If you don’t have enough natural light, use a grow light. Keep the temperature consistently between 75-85°F (24-29°C) for optimal germination.
8. Monitoring and Watering: Check the soil moisture daily. If the soil feels dry, lightly mist it with water. Remove the plastic wrap or humidity dome for a few hours each day to allow for air circulation and prevent mold growth.
9. Germination: Be patient! Birds Eye chili seeds can take anywhere from 7 to 21 days to germinate, sometimes even longer depending on the conditions. Once you see seedlings emerge, remove the plastic wrap or humidity dome completely.
10. Transplanting to Small Pots: Once the seedlings have developed their first set of true leaves (the leaves that appear after the initial seed leaves), it’s time to transplant them to small pots (3-4 inch diameter). Gently remove the seedlings from the seed starting tray, being careful not to damage the roots. Plant each seedling in its own pot filled with potting mix.
11. Caring for Seedlings: Place the transplanted seedlings in a sunny location or under a grow light. Water them regularly, allowing the soil to dry out slightly between waterings. Fertilize them with a diluted liquid fertilizer every 2-3 weeks.
Section 2: Starting with Seedlings/Starter Plants
If you’re opting for seedlings, you’re already a few steps ahead! Here’s how to ensure they thrive:
What You’ll Need:
* Birds Eye chili seedlings from a reputable nursery
* Larger pot (at least 5 gallons)
* Potting mix (a well-draining mix specifically formulated for container gardening)
* Watering can or hose
* Fertilizer (balanced liquid fertilizer or slow-release granules)
* Optional: Stakes or tomato cages for support
Step-by-Step Instructions:
1. Choosing Healthy Seedlings: When selecting seedlings, look for plants that are healthy, vibrant green, and free from pests or diseases. Avoid plants that are leggy (tall and spindly) or have yellowing leaves.
2. Preparing the Pot: Fill your larger pot with potting mix, leaving a few inches of space at the top.
3. Transplanting the Seedling: Gently remove the seedling from its nursery pot. Loosen the roots slightly if they are tightly bound.
4. Planting the Seedling: Place the seedling in the center of the pot, ensuring that the top of the root ball is level with the soil surface.
5. Filling the Pot: Fill in the remaining space around the seedling with potting mix. Gently pat down the soil.
6. Watering: Water the seedling thoroughly until water drains out of the bottom of the pot.
7. Providing Support (Optional): Birds Eye chili plants can get quite tall and may need support. Insert a stake or tomato cage into the pot to provide support as the plant grows.
Section 3: Ongoing Care for Your Birds Eye Chili Plants
Whether you started from seeds or seedlings, consistent care is crucial for a bountiful harvest.
Sunlight:
Birds Eye chilies need at least 6-8 hours of direct sunlight per day. If you’re growing them indoors, place them in a sunny location or use a grow light. Rotate the plants regularly to ensure even growth.
Watering:
Water your chili plants regularly, allowing the soil to dry out slightly between waterings. Avoid overwatering, as this can lead to root rot. Check the soil moisture by sticking your finger into the soil. If the top inch feels dry, it’s time to water.
Fertilizing:
Feed your chili plants with a balanced liquid fertilizer every 2-3 weeks during the growing season. You can also use slow-release fertilizer granules. Follow the instructions on the fertilizer packaging. I personally like using a fertilizer that’s higher in phosphorus, as this encourages flowering and fruit production.
Temperature:
Birds Eye chilies thrive in warm temperatures, ideally between 70-85°F (21-29°C). Avoid exposing them to temperatures below 50°F (10°C).
Humidity:
While they can tolerate lower humidity, Birds Eye chilies prefer moderate humidity levels. If the air in your home is very dry, you can increase humidity by placing a tray of water near the plants or using a humidifier.
Pruning:
Pruning isn’t strictly necessary, but it can help encourage bushier growth and more fruit production. You can pinch off the tips of the branches to encourage side growth. Remove any yellowing or dead leaves.
Pest and Disease Control:
Keep an eye out for common pests like aphids, spider mites, and whiteflies. If you spot any pests, treat them with insecticidal soap or neem oil. Prevent fungal diseases by ensuring good air circulation and avoiding overwatering.
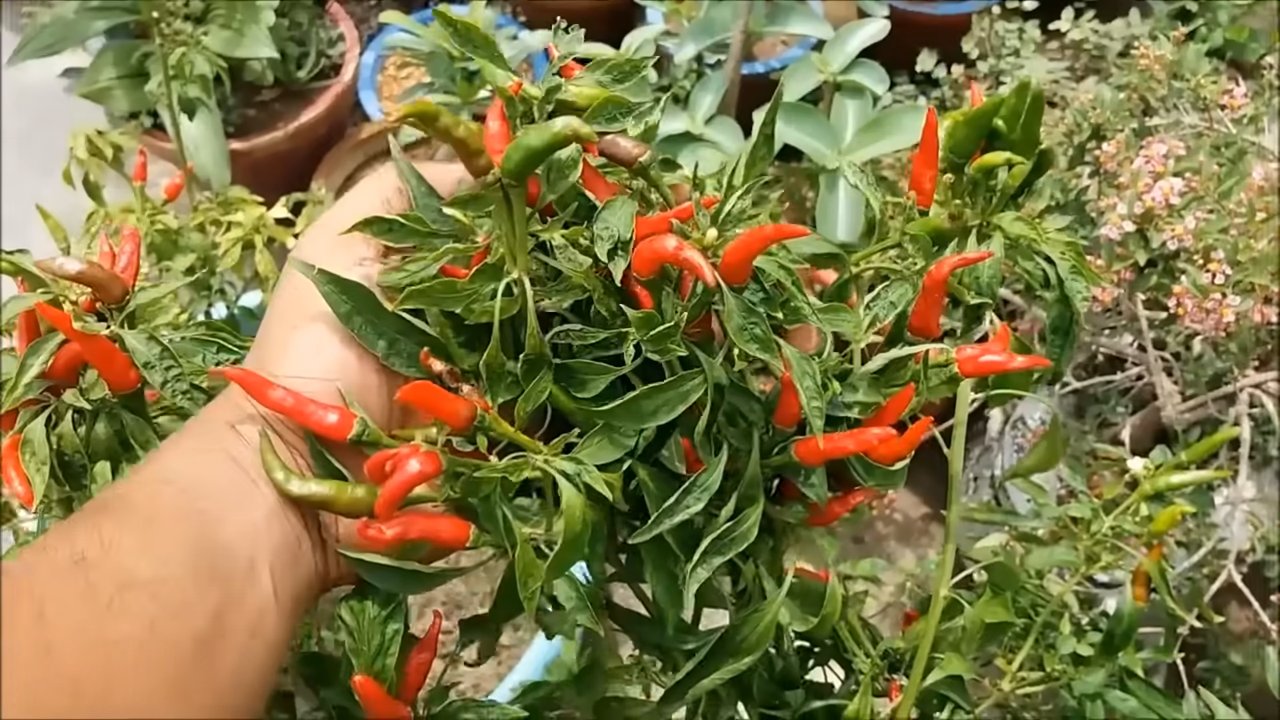
Section 4: Harvesting Your Chilies
The moment you’ve been waiting for!
When to Harvest:
Birds Eye chilies are typically ready to harvest when they turn bright red. You can also harvest them when they are green, but they will be less spicy.
How to Harvest:
Use scissors or pruning shears to cut the chilies from the plant. Be careful not to damage the plant.
Storing Your Chilies:
Freshly harvested Birds Eye chilies can be stored in the refrigerator for up to a week. You can also dry them, freeze them, or pickle them for longer storage. I love stringing them together and hanging them to dry – it looks beautiful and keeps them fresh for ages!
Troubleshooting
Even with the best care, you might encounter some challenges. Here are a few common problems and how to address them:
* Yellowing Leaves: Could be caused by overwatering, underwatering
Conclusion
So, there you have it! Growing Birds Eye Chili at home isn’t just a fun project; it’s a gateway to a world of culinary possibilities and a sustainable way to add intense flavor to your dishes. We’ve walked you through the process, from selecting the right seeds to nurturing your plants to a bountiful harvest.
Why is this DIY trick a must-try? Because it puts you in control. You know exactly where your chilies are coming from, what’s been used to grow them (or, more importantly, what hasn’t!), and you get the unparalleled satisfaction of enjoying something you’ve cultivated yourself. Store-bought chilies, while convenient, often lack the vibrant freshness and fiery kick of homegrown varieties. Plus, the sheer abundance you can achieve with even a few well-tended plants will keep your spice rack stocked for months.
But the beauty of growing your own Birds Eye Chili lies in its adaptability. Feel free to experiment! Try different soil mixes to see what works best in your climate. Consider companion planting with herbs like basil or oregano, which can help deter pests and enhance the flavor of your chilies. You can even explore different container sizes and shapes to optimize growth in limited spaces.
And don’t be afraid to get creative with your harvest! Beyond simply adding them to curries and stir-fries, try pickling your chilies for a tangy condiment, infusing them in olive oil for a spicy drizzle, or drying them to create your own chili flakes or powder. The possibilities are endless!
We wholeheartedly encourage you to give this DIY trick a try. It’s a rewarding experience that connects you to your food and empowers you to create something truly special. And once you’ve tasted the difference between homegrown and store-bought Birds Eye Chili, you’ll never look back.
More importantly, we want to hear about your experience! Share your tips, tricks, and triumphs in the comments below. Let us know what challenges you faced and how you overcame them. Post pictures of your thriving plants and mouthwatering dishes. By sharing our knowledge and experiences, we can all become better gardeners and cooks. Let’s cultivate a community of chili-loving enthusiasts! So, grab your seeds, get your hands dirty, and prepare to embark on a fiery adventure. Happy growing!
Frequently Asked Questions (FAQs)
What is the best time of year to start growing Birds Eye Chili?
The best time to start growing Birds Eye Chili depends on your climate. In warmer regions with mild winters, you can start seeds indoors in late winter or early spring, about 6-8 weeks before the last expected frost. In colder climates, it’s best to wait until all danger of frost has passed before transplanting seedlings outdoors. You can also start seeds indoors later in the spring to ensure a longer growing season. The key is to provide warm temperatures and plenty of sunlight for optimal germination and growth. If you live in an area with a very short growing season, consider using a greenhouse or cold frame to extend the season.
How much sunlight do Birds Eye Chili plants need?
Birds Eye Chili plants thrive in full sunlight, requiring at least 6-8 hours of direct sunlight per day. Insufficient sunlight can lead to leggy growth, reduced flowering, and smaller, less flavorful chilies. If you’re growing your plants indoors, supplement natural sunlight with grow lights to ensure they receive adequate illumination. When transplanting seedlings outdoors, choose a location that receives plenty of sun throughout the day.
What type of soil is best for growing Birds Eye Chili?
Birds Eye Chili plants prefer well-draining, fertile soil with a slightly acidic to neutral pH (around 6.0-7.0). A good soil mix should retain moisture but also allow excess water to drain away easily. You can create your own mix by combining equal parts of potting soil, compost, and perlite or vermiculite. Avoid using heavy clay soils, as they can become waterlogged and inhibit root growth. Amending the soil with organic matter, such as compost or well-rotted manure, will improve its fertility and drainage.
How often should I water my Birds Eye Chili plants?
Water your Birds Eye Chili plants regularly, especially during hot, dry weather. The frequency of watering will depend on the climate, soil type, and size of the container. As a general rule, water when the top inch of soil feels dry to the touch. Avoid overwatering, as this can lead to root rot. When watering, water deeply and thoroughly, ensuring that the entire root ball is moistened. During periods of heavy rain, you may need to reduce watering frequency.
What are some common pests and diseases that affect Birds Eye Chili plants?
Birds Eye Chili plants can be susceptible to various pests and diseases, including aphids, spider mites, whiteflies, and fungal infections like powdery mildew and blossom end rot. Regularly inspect your plants for signs of infestation or disease. To prevent pest problems, consider using organic pest control methods, such as introducing beneficial insects or spraying with neem oil. To prevent fungal diseases, ensure good air circulation around your plants and avoid overwatering. Blossom end rot, caused by calcium deficiency, can be prevented by adding calcium to the soil or using a calcium-rich fertilizer.
How do I harvest Birds Eye Chili?
Birds Eye Chili are typically ready to harvest when they turn from green to red and are firm to the touch. Use scissors or pruning shears to cut the chilies from the plant, leaving a small stem attached. You can harvest chilies at any stage of ripeness, but the flavor and heat will intensify as they mature. Wear gloves when handling chilies, as the capsaicin (the compound that makes them hot) can irritate the skin.
How can I store Birds Eye Chili?
There are several ways to store Birds Eye Chili. You can dry them by stringing them together and hanging them in a well-ventilated area until they are completely dry. Dried chilies can be stored in an airtight container in a cool, dark place for several months. You can also freeze fresh chilies by placing them in a freezer bag or container. Frozen chilies will retain their flavor and heat for up to a year. Another option is to pickle your chilies in vinegar or brine. Pickled chilies can be stored in the refrigerator for several weeks.
Can I grow Birds Eye Chili indoors?
Yes, you can grow Birds Eye Chili indoors, provided you provide them with adequate sunlight and warmth. Place your plants near a sunny window or supplement with grow lights. Use a well-draining potting mix and water regularly. Indoor plants may require more frequent fertilization than outdoor plants. Be sure to monitor for pests and diseases and take appropriate action if necessary.
How hot are Birds Eye Chili?
Birds Eye Chili are known for their intense heat, ranging from 50,000 to 100,000 Scoville heat units (SHU). This puts them in the medium to high range of chili peppers. Handle them with care and use them sparingly in your cooking, especially if you’re not accustomed to spicy food. Always wash your hands thoroughly after handling chilies to avoid irritating your skin or eyes.
What are some uses for homegrown Birds Eye Chili?
Homegrown Birds Eye Chili can be used in a variety of culinary applications. They are commonly used in Asian cuisine, particularly in Thai and Indonesian dishes. They can be added to curries, stir-fries, soups, and sauces to add heat and flavor. You can also use them to make chili oil, chili flakes, or chili powder. In addition to their culinary uses, Birds Eye Chili can also be used for medicinal purposes. Capsaicin, the active compound in chilies, has been shown to have anti-inflammatory and pain-relieving properties.
Leave a Comment