

Grow Jicama at Home Easily? Absolutely! Imagine biting into a crisp, refreshing jicama you nurtured from seed to harvest, right in your own backyard. It’s not just a dream; it’s an achievable reality with a few simple tricks and a little DIY spirit. For centuries, jicama, also known as the Mexican turnip, has been a staple in Central and South American cuisine, prized for its sweet, nutty flavor and satisfying crunch. It’s a versatile ingredient, perfect for salads, slaws, or even enjoyed raw with a squeeze of lime and chili powder.
But why should you bother growing your own jicama? Well, for starters, store-bought jicama can sometimes be a bit bland or lack that fresh, vibrant taste. Plus, knowing exactly where your food comes from and how it’s grown is incredibly rewarding. In this article, I’m going to share some easy-to-follow DIY hacks that will empower you to grow jicama at home easily, even if you have limited space or gardening experience. We’ll cover everything from seed starting to harvesting, ensuring you have a bountiful supply of this delicious and nutritious root vegetable. Get ready to roll up your sleeves and embark on a fun and fulfilling gardening adventure!
Grow Jicama at Home: A Beginner’s Guide
Hey there, fellow gardening enthusiasts! Ever wanted to try growing something a little different, something that adds a satisfying crunch to your salads and a unique flavor to your stir-fries? Well, let me introduce you to jicama! This root vegetable, also known as Mexican turnip or yam bean, is surprisingly easy to grow at home, and I’m here to walk you through the entire process. Get ready to impress your friends and family with your homegrown jicama!
What You’ll Need
Before we dive in, let’s gather all the necessary supplies. Trust me, having everything ready beforehand will make the whole experience much smoother.
* Jicama Seeds: You can find these online or at your local garden center. Make sure to choose a reputable supplier to ensure good germination rates.
* Seed Starting Trays or Pots: These will be used to start your jicama seeds indoors.
* Seed Starting Mix: This is a lightweight, sterile soil mix specifically designed for starting seeds.
* Larger Pots or Garden Bed: Once your seedlings are big enough, you’ll need a place to transplant them. Jicama needs plenty of space to grow.
* Well-Draining Soil: Jicama thrives in soil that drains well. Amend your garden soil with compost or other organic matter to improve drainage.
* Trellis or Support System: Jicama is a vine, so it needs something to climb on. A trellis, fence, or even sturdy stakes will work.
* Watering Can or Hose: Essential for keeping your jicama plants hydrated.
* Fertilizer: A balanced fertilizer will help your jicama plants grow strong and healthy.
* Gardening Gloves: To protect your hands from dirt and potential irritants.
* Gardening Tools: A trowel, hand rake, and pruning shears will come in handy.
Starting Your Jicama Seeds Indoors
Starting your jicama seeds indoors gives them a head start, especially if you live in a region with a shorter growing season. I’ve found this method to be incredibly effective.
1. Soak the Seeds: Before planting, soak your jicama seeds in warm water for 24 hours. This helps to soften the seed coat and improve germination. I usually put them in a small bowl on my kitchen counter.
2. Prepare the Seed Starting Trays: Fill your seed starting trays or pots with seed starting mix. Gently press the soil down to create a firm surface.
3. Plant the Seeds: Sow the jicama seeds about ½ inch deep in the soil. Place one or two seeds per cell or pot.
4. Water Gently: Water the soil gently to moisten it. Avoid overwatering, as this can lead to rot.
5. Provide Warmth and Light: Place the seed starting trays in a warm location, such as on top of a refrigerator or near a sunny window. You can also use a heat mat to provide bottom heat. Jicama seeds need warmth to germinate.
6. Maintain Moisture: Keep the soil consistently moist, but not soggy. You can cover the trays with a plastic dome or plastic wrap to help retain moisture.
7. Wait for Germination: Jicama seeds typically germinate in 7-14 days. Be patient!
8. Provide Adequate Light: Once the seedlings emerge, remove the plastic dome or wrap and provide them with plenty of light. If you don’t have a sunny window, you can use a grow light. I use a simple LED grow light I got online.
9. Thin the Seedlings: If you planted two seeds per cell or pot and both germinate, thin them out by snipping off the weaker seedling at the soil line. This will give the remaining seedling more room to grow.
Transplanting Your Jicama Seedlings
Once your jicama seedlings have developed a few sets of true leaves (the leaves that look like miniature versions of the adult plant’s leaves), they’re ready to be transplanted into larger pots or your garden bed.
1. Harden Off the Seedlings: Before transplanting, you need to harden off the seedlings. This means gradually exposing them to outdoor conditions to help them adjust. Start by placing them outside for an hour or two each day, gradually increasing the amount of time they spend outdoors over the course of a week.
2. Prepare the Planting Site: Choose a sunny location with well-draining soil. Amend the soil with compost or other organic matter to improve drainage and fertility. Jicama needs at least 6-8 hours of sunlight per day.
3. Dig Holes: Dig holes that are slightly larger than the root balls of your seedlings. Space the holes about 12-18 inches apart. Jicama vines can get quite large, so give them plenty of room to spread out.
4. Transplant the Seedlings: Gently remove the seedlings from their pots or trays. Be careful not to damage the roots. Place the seedlings in the holes and backfill with soil.
5. Water Thoroughly: Water the seedlings thoroughly after transplanting. This will help to settle the soil and reduce transplant shock.
6. Provide Support: Install a trellis or other support system for your jicama plants to climb on. You can use bamboo stakes, a wire fence, or even a sturdy tomato cage.
7. Mulch Around the Plants: Apply a layer of mulch around the plants to help retain moisture, suppress weeds, and regulate soil temperature. I like to use straw or wood chips.
Caring for Your Jicama Plants
Now that your jicama plants are in the ground, it’s time to provide them with the care they need to thrive.
1. Water Regularly: Jicama plants need consistent moisture, especially during hot, dry weather. Water deeply whenever the top inch of soil feels dry to the touch. Avoid overwatering, as this can lead to root rot.
2. Fertilize Regularly: Feed your jicama plants with a balanced fertilizer every few weeks. Follow the instructions on the fertilizer package. I usually use a liquid fertilizer diluted in water.
3. Prune the Vines: Jicama plants can produce long, sprawling vines. To encourage the development of the root (the part we eat), prune the vines regularly. You can simply pinch off the tips of the vines or cut them back with pruning shears. I usually prune them back to about 3-4 feet long.
4. Remove Flowers: Jicama plants produce flowers, but these flowers can divert energy away from the root development. To encourage larger roots, remove the flowers as soon as they appear. This is a crucial step for getting a good harvest.
5. Control Pests and Diseases: Jicama plants are generally resistant to pests and diseases, but they can occasionally be affected by aphids, spider mites, or fungal diseases. Inspect your plants regularly and take action if you notice any problems. You can use insecticidal soap or neem oil to control pests, and a fungicide to control fungal diseases.
6. Weed Regularly: Keep the area around your jicama plants free of weeds. Weeds can compete with your plants for water and nutrients.
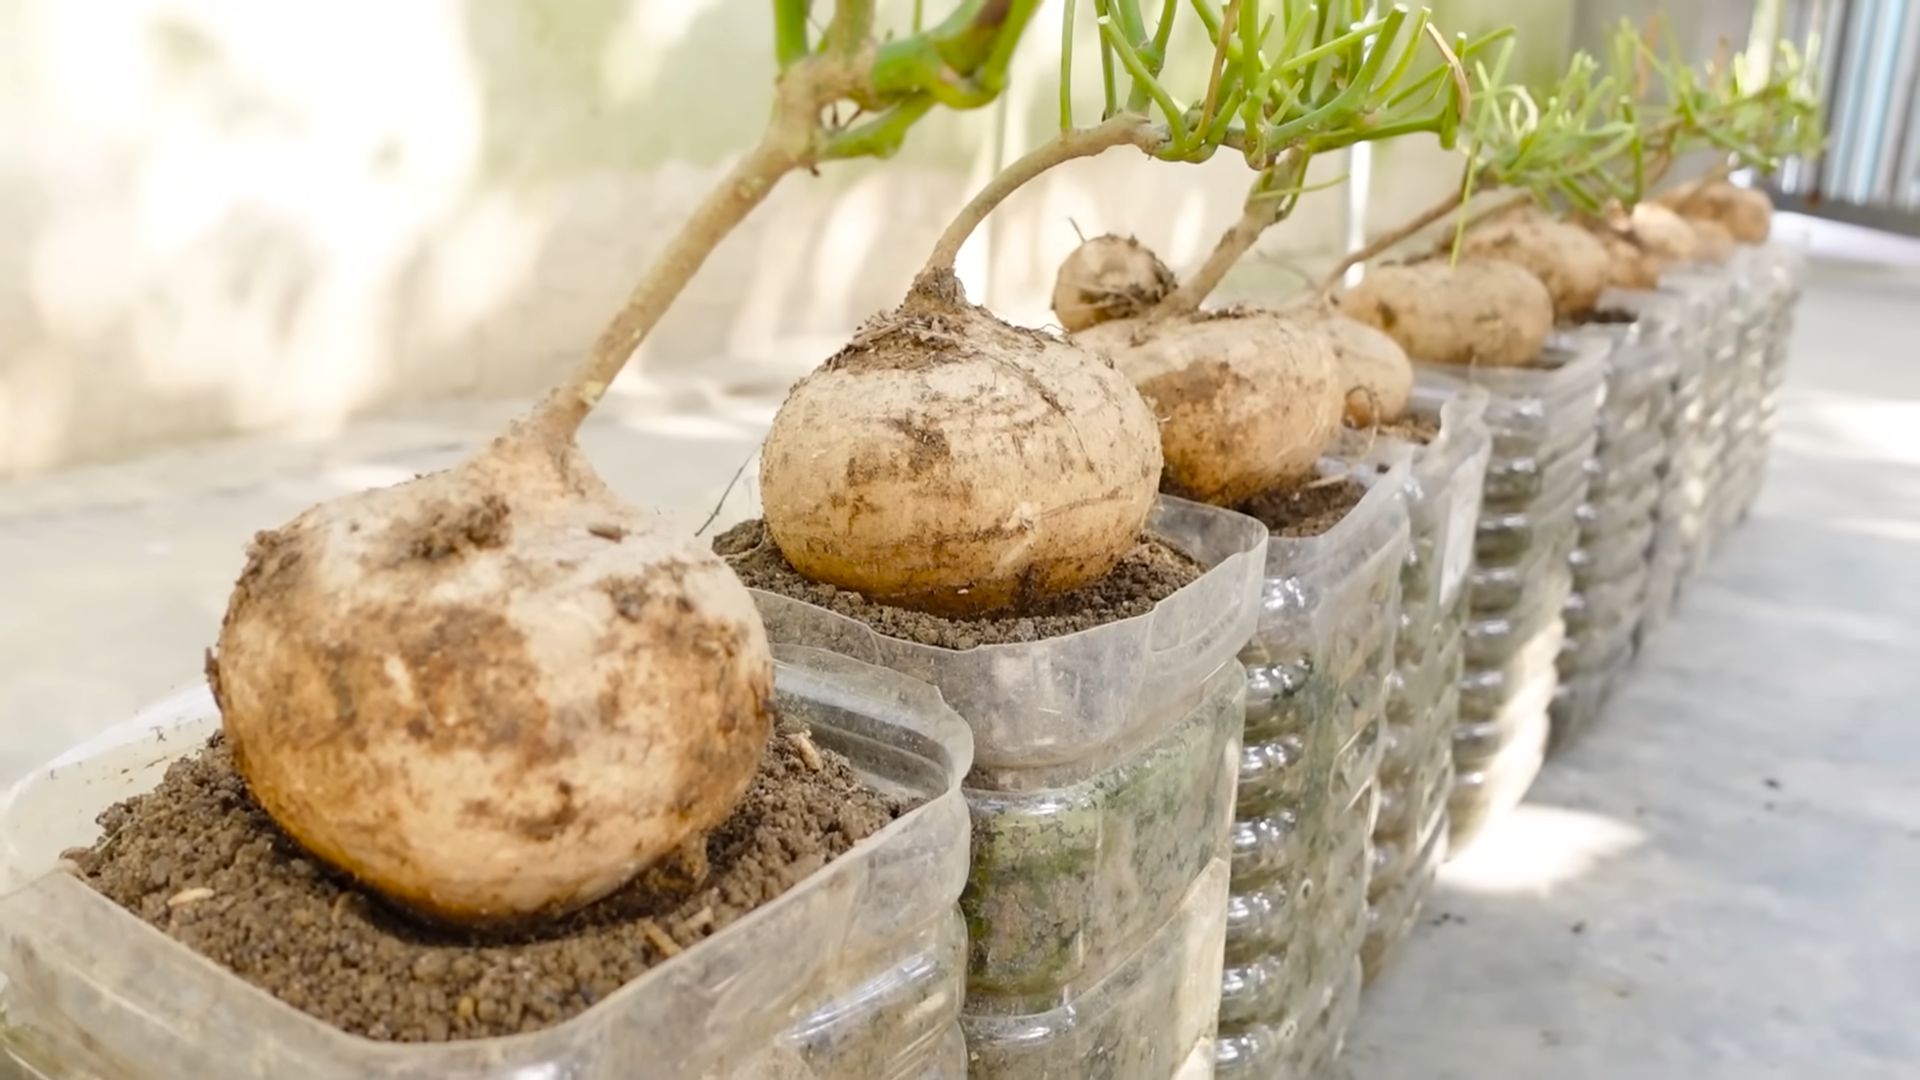
Harvesting Your Jicama
The moment you’ve been waiting for! Harvesting your homegrown jicama is incredibly rewarding.
1. Timing is Key: Jicama typically takes 150-200 days to mature. The best time to harvest is after the first frost, as this will sweeten the flavor of the root. However, if you live in a region with mild winters, you can harvest your jicama anytime after it reaches a desirable size.
2. Check the Size: The size of the jicama root is a good indicator of its maturity. A mature jicama root will typically be 4-6 inches in diameter.
3. Dig Carefully: Use a garden fork or shovel to carefully dig around the jicama plant. Be careful not to damage the root.
4. Lift the Root: Gently lift the jicama root out of the ground.
5. Clean the Root: Brush off any excess soil from the root.
6. Store Properly: Store your jicama roots in a cool, dry place. They can last for several months if stored properly. I usually store mine in the refrigerator.
Important Considerations
* Climate: Jicama thrives in warm climates with long growing seasons. If you live in a cooler climate, you may need to start your seeds indoors earlier and provide extra protection from frost.
* Soil: Jicama needs well-draining soil. Amend your soil with compost or other organic matter to improve drainage.
* Sunlight: Jicama needs at least 6-8 hours of sunlight per day.
* Watering: Jicama needs consistent moisture, especially during hot, dry weather.
* Fertilizing: Feed your jicama plants with a balanced fertilizer every few weeks.
* Pest and Disease Control: Inspect your plants regularly and take

Conclusion
So, there you have it! Growing jicama at home isn’t just a gardening project; it’s an adventure in flavor, sustainability, and self-sufficiency. We’ve walked through the steps, demystified the process, and hopefully, ignited a spark of excitement for you to cultivate your own delicious, crunchy tubers.
Why is this DIY trick a must-try? Because store-bought jicama, while readily available, often lacks the vibrant freshness and satisfying crunch of homegrown produce. Plus, you have complete control over the growing conditions, ensuring your jicama is free from unwanted pesticides and herbicides. Imagine the satisfaction of harvesting your own jicama, knowing exactly where it came from and how it was nurtured. It’s a connection to your food that’s both rewarding and empowering.
Beyond the basic method we’ve outlined, there’s plenty of room for experimentation and personalization. Consider these variations to tailor your jicama-growing experience:
* **Vertical Gardening:** If you’re short on space, explore vertical gardening techniques. Jicama vines can be trained to climb trellises or fences, maximizing your yield in a limited area.
* **Companion Planting:** Enhance your jicama’s growth by planting beneficial companion plants nearby. Marigolds can deter pests, while beans can help fix nitrogen in the soil, creating a healthier environment for your jicama to thrive.
* **Different Varieties:** While the common variety is fantastic, research other jicama cultivars. Some may offer different flavor profiles or be better suited to your specific climate.
* **Seed Saving:** Once you’ve successfully grown jicama, consider saving the seeds from mature pods for future plantings. This ensures a continuous supply of jicama and allows you to adapt the plant to your local conditions over time.
* **Container Gardening:** For those with limited garden space, growing jicama in large containers is a viable option. Ensure the container is large enough to accommodate the tuber’s growth and provide adequate drainage.
Growing jicama at home is more than just a way to get fresh produce; it’s a chance to connect with nature, learn new skills, and enjoy the fruits (or rather, tubers) of your labor. The crisp, slightly sweet flavor of homegrown jicama is unparalleled, and the satisfaction of knowing you grew it yourself is simply unbeatable.
We wholeheartedly encourage you to give this DIY trick a try. Don’t be intimidated by the process; it’s simpler than you might think. Start with a small patch or a single container, and watch as your jicama plant flourishes.
And most importantly, we want to hear about your experience! Share your successes, your challenges, and your tips with us in the comments below. Let’s create a community of jicama growers, sharing our knowledge and inspiring others to embark on this rewarding journey. Did you find a particular fertilizer that worked wonders? Did you discover a unique way to protect your plants from pests? Your insights could be invaluable to other aspiring jicama farmers. Let’s cultivate not only jicama but also a thriving community of gardeners! So, get your hands dirty, embrace the process, and enjoy the delicious rewards of growing your own jicama. Happy gardening!
Frequently Asked Questions
What exactly is jicama, and what does it taste like?
Jicama (pronounced HEE-kah-mah) is a root vegetable, specifically a tuber, native to Mexico. It’s known for its crisp, slightly sweet flavor and crunchy texture, often compared to a cross between an apple, a potato, and a water chestnut. It’s incredibly versatile and can be eaten raw or cooked. Raw, it’s a refreshing addition to salads, slaws, and crudités platters. Cooked, it can be used in stir-fries, soups, and stews, retaining its satisfying crunch even after being heated. The flavor is mild, making it a great canvas for absorbing other flavors in your dishes.
How long does it take to grow jicama from seed?
Growing jicama from seed requires patience. Generally, it takes around 150 to 200 days from planting the seed to harvesting a mature tuber. This timeframe can vary depending on your climate, soil conditions, and the specific variety of jicama you’re growing. Warmer climates with longer growing seasons are ideal for jicama cultivation. Starting seeds indoors a few weeks before the last expected frost can give you a head start and extend your growing season. Remember to provide consistent watering and fertilization throughout the growing period to ensure healthy tuber development.
What are the ideal growing conditions for jicama?
Jicama thrives in warm climates with plenty of sunshine. It needs at least 6-8 hours of direct sunlight per day to produce a good yield. The ideal soil is well-draining, sandy loam with a slightly acidic to neutral pH (around 6.0 to 7.0). Jicama is sensitive to frost, so it’s crucial to protect the plants from freezing temperatures. Consistent watering is essential, especially during dry periods, but avoid overwatering, which can lead to root rot. Regular fertilization with a balanced fertilizer will also promote healthy growth and tuber development.
How do I know when my jicama is ready to harvest?
Determining the right time to harvest jicama is crucial for optimal flavor and texture. Generally, jicama is ready to harvest when the vines begin to yellow and die back, typically around 150 to 200 days after planting. The size of the tuber is also a good indicator. A mature jicama tuber typically weighs between 1 to 3 pounds, but some varieties can grow larger. To check for readiness, gently dig around the base of the plant and feel the size of the tuber. If it feels firm and has reached a desirable size, it’s likely ready to harvest. Be careful not to damage the tuber during the digging process.
Are there any common pests or diseases that affect jicama, and how can I prevent them?
While jicama is relatively pest-resistant, it can be susceptible to certain pests and diseases. Common pests include aphids, spider mites, and nematodes. Aphids and spider mites can be controlled with insecticidal soap or neem oil. Nematodes can be more challenging to manage, but incorporating organic matter into the soil and practicing crop rotation can help reduce their populations. Fungal diseases, such as root rot, can occur in poorly drained soil. To prevent root rot, ensure your soil is well-draining and avoid overwatering. Regularly inspect your plants for signs of pests or diseases and take action promptly to prevent them from spreading. Companion planting with marigolds can also help deter pests naturally.
Can I eat the leaves or seeds of the jicama plant?
No, the leaves and seeds of the jicama plant are toxic and should not be consumed. They contain rotenone, a natural insecticide that can be harmful to humans and animals. Only the tuber is edible. It’s important to clearly label your jicama plants to avoid accidental ingestion of the toxic parts. Keep children and pets away from the plants to prevent them from nibbling on the leaves or seeds. If you suspect someone has ingested the leaves or seeds, seek medical attention immediately.
How should I store harvested jicama?
Proper storage is essential to maintain the freshness and quality of harvested jicama. After harvesting, brush off any excess soil and allow the tubers to air dry for a few hours. Store jicama in a cool, dry, and dark place, such as a root cellar or a refrigerator. The ideal storage temperature is between 50°F and 60°F (10°C and 15°C). Avoid storing jicama in a humid environment, as this can promote spoilage. When stored properly, jicama can last for several weeks or even months. Check the tubers periodically for any signs of spoilage, such as soft spots or mold.
What are some creative ways to use homegrown jicama in recipes?
Homegrown jicama is incredibly versatile and can be used in a wide variety of recipes. Here are a few creative ideas:
* **Jicama Fries:** Cut jicama into fry shapes, toss with olive oil and spices, and bake or air fry until crispy.
* **Jicama Slaw:** Shred jicama and combine it with shredded carrots, cabbage, and a tangy dressing for a refreshing slaw.
* **Jicama Salad:** Dice jicama and mix it with other vegetables, such as cucumbers, tomatoes, and bell peppers, for a crisp and refreshing salad.
* **Jicama Stir-Fry:** Add diced jicama to your favorite stir-fry for a satisfying crunch.
* **Jicama Soup:** Incorporate diced jicama into soups and stews for added texture and flavor.
* **Jicama Wraps:** Use thin slices of jicama as a low-carb alternative to tortillas for wraps and tacos.
* **Jicama Salsa:** Dice jicama and combine it with tomatoes, onions, cilantro, and lime juice for a refreshing salsa.
The possibilities are endless! Experiment with different flavors and textures to discover your favorite ways to enjoy homegrown jicama.
Leave a Comment