

Grow Queen Cabbage at Home and unlock the secrets to cultivating your own regal harvest! Have you ever dreamed of strolling through your garden, plucking a vibrant, healthy cabbage fit for a queen (or king!) right from your backyard? Well, dream no more! This DIY guide is your passport to cabbage royalty, offering simple yet effective tricks to transform your garden into a thriving kingdom of leafy greens.
Cabbage, a humble vegetable with a rich history, has been a staple in diets across the globe for centuries. From ancient Roman banquets to traditional sauerkraut recipes, cabbage has nourished communities and cultures. But growing your own isn’t just about tradition; it’s about taking control of your food source, enjoying fresher, more flavorful produce, and experiencing the immense satisfaction of nurturing life from seed to table.
In today’s world, where access to fresh, organic produce can be challenging and expensive, learning to grow Queen Cabbage at Home offers a practical and rewarding solution. This DIY article will equip you with the knowledge and skills to overcome common gardening hurdles, ensuring a bountiful harvest even if you’re a beginner. I’m excited to share these tips and tricks with you, so let’s get started and cultivate some cabbage magic!
Grow Your Own Queen Cabbage: A DIY Guide to Royal Veggies!
Hey there, fellow gardening enthusiasts! Ever dreamt of harvesting a cabbage so magnificent, so grand, it deserves a crown? Well, get ready to make that dream a reality! I’m going to walk you through the process of growing your very own “Queen Cabbage” right in your backyard (or even in a large container!). It might seem daunting, but trust me, with a little patience and these simple steps, you’ll be enjoying fresh, homegrown cabbage in no time.
Choosing the Right Variety
Before we dive into the nitty-gritty, let’s talk about cabbage varieties. While any cabbage can be grown with care, some are better suited for certain climates and growing conditions. For a truly “Queenly” cabbage, consider these options:
* ‘Brunswick’: This is a classic, reliable variety known for its large, dense heads. It’s a great choice for beginners and tolerates a wide range of conditions.
* ‘Danish Ballhead’: Another excellent choice for large, firm heads. It’s particularly well-suited for storage, so you can enjoy your harvest for longer.
* ‘January King’: If you’re looking for something a little different, this variety boasts beautiful, slightly crinkled leaves with a reddish-purple hue. It’s also incredibly cold-hardy.
* ‘Savoy Cabbage’: For a more textured and flavorful cabbage, Savoy varieties are a fantastic option. They have deeply crinkled leaves and a slightly sweeter taste.
Getting Started: From Seed to Seedling
Okay, let’s get our hands dirty! We’ll start by germinating our cabbage seeds. You can either sow them directly into the garden (if your climate allows) or start them indoors for a head start. I personally prefer starting them indoors, as it gives me more control over the growing environment and protects the delicate seedlings from pests and harsh weather.
1. Gather Your Supplies: You’ll need:
* Cabbage seeds (of your chosen variety)
* Seed starting trays or small pots
* Seed starting mix (a light, well-draining soil mix)
* A spray bottle filled with water
* A warm, sunny location or a grow light
2. Sow the Seeds: Fill your seed starting trays or pots with the seed starting mix. Gently press the soil down to create a firm surface. Sow 2-3 seeds per cell or pot, about ¼ inch deep.
3. Water Gently: Use the spray bottle to moisten the soil. Avoid overwatering, as this can lead to damping off (a fungal disease that can kill seedlings).
4. Provide Warmth and Light: Place the trays or pots in a warm, sunny location (ideally around 70-75°F). If you don’t have a sunny spot, use a grow light. Keep the light on for 12-16 hours per day.
5. Keep the Soil Moist: Check the soil daily and water as needed to keep it consistently moist, but not soggy.
6. Thin the Seedlings: Once the seedlings have emerged and have a couple of true leaves (the second set of leaves), thin them out, leaving only the strongest seedling in each cell or pot. To thin, simply snip off the weaker seedlings at the soil line with scissors. Don’t pull them out, as this can disturb the roots of the remaining seedling.
Preparing the Garden Bed
While your seedlings are growing, it’s time to prepare the garden bed. Cabbage needs rich, well-drained soil and plenty of sunlight.
1. Choose a Sunny Location: Cabbage needs at least 6 hours of direct sunlight per day.
2. Prepare the Soil: Cabbage thrives in fertile, well-drained soil with a pH between 6.0 and 7.5. Amend the soil with plenty of compost or well-rotted manure to improve its fertility and drainage. I usually add a generous layer of compost (about 2-3 inches) and work it into the top 6-8 inches of soil.
3. Test the Soil pH (Optional): If you’re unsure about your soil’s pH, you can purchase a soil testing kit from your local garden center. This will help you determine if you need to add lime (to raise the pH) or sulfur (to lower the pH).
4. Remove Weeds and Debris: Clear the garden bed of any weeds, rocks, or other debris.
5. Create Planting Holes: Space the planting holes about 18-24 inches apart. This will give your cabbage plants enough room to grow and develop large heads.
Transplanting Your Seedlings
Once your seedlings are about 4-6 inches tall and have several sets of true leaves, they’re ready to be transplanted into the garden.
1. Harden Off the Seedlings: Before transplanting, you’ll need to “harden off” the seedlings. This means gradually exposing them to outdoor conditions over a period of 7-10 days. Start by placing the seedlings outdoors in a sheltered location for a few hours each day, gradually increasing the amount of time they spend outside. This will help them acclimate to the sun, wind, and temperature changes.
2. Water the Seedlings: Water the seedlings thoroughly before transplanting.
3. Carefully Remove the Seedlings: Gently remove the seedlings from their trays or pots, being careful not to damage the roots. If the roots are tightly bound, gently loosen them with your fingers.
4. Plant the Seedlings: Place each seedling in a planting hole, making sure the top of the root ball is level with the surrounding soil.
5. Fill the Holes: Fill the holes with soil and gently firm the soil around the base of the plants.
6. Water Thoroughly: Water the newly transplanted seedlings thoroughly.
7. Mulch (Optional): Apply a layer of mulch around the plants to help retain moisture, suppress weeds, and regulate soil temperature. I like to use straw or shredded leaves.
Caring for Your Cabbage Plants
Now that your cabbage plants are in the ground, it’s time to provide them with the care they need to thrive.
1. Water Regularly: Cabbage needs consistent moisture, especially during hot, dry weather. Water deeply and regularly, aiming to keep the soil consistently moist, but not soggy.
2. Fertilize: Cabbage is a heavy feeder, so it needs regular fertilization. Apply a balanced fertilizer (such as 10-10-10) every 2-3 weeks, following the instructions on the fertilizer label. You can also side-dress the plants with compost or well-rotted manure.
3. Control Pests: Cabbage plants are susceptible to a variety of pests, including cabbage worms, aphids, and flea beetles. Inspect your plants regularly for signs of pests and take action promptly.
* Cabbage Worms: These green caterpillars can quickly devour cabbage leaves. Handpick them off the plants or use a biological insecticide like Bacillus thuringiensis (Bt).
* Aphids: These tiny insects suck the sap from plants, causing them to weaken and become distorted. Spray the plants with a strong stream of water or use insecticidal soap.
* Flea Beetles: These small, jumping beetles can create tiny holes in cabbage leaves. Cover the plants with row covers to prevent flea beetles from reaching them.
4. Control Weeds: Keep the garden bed free of weeds, as they can compete with your cabbage plants for nutrients and water. Hand-pull weeds or use a hoe to cultivate the soil.
5. Monitor for Diseases: Cabbage plants can also be affected by diseases, such as black rot and clubroot. Choose disease-resistant varieties and practice good sanitation to prevent these problems.
* Black Rot: This bacterial disease causes yellowing and browning of the leaves. Remove infected plants immediately and avoid planting cabbage in the same location for several years.
* Clubroot: This fungal disease causes swollen, distorted roots. Raise the soil pH to 7.0 or higher and avoid planting cabbage in the same location for several years.
Harvesting Your Queen Cabbage
The moment you’ve been waiting for! It’s time to harvest your magnificent Queen Cabbage.
1. Check for Firmness: Cabbage is ready to harvest when the head is firm and dense. Gently squeeze the head to check for firmness.
2. Cut the Head: Use a sharp knife to cut the head from the stem, leaving a few outer leaves attached.
3. Store Properly: Store your harvested cabbage in a cool, dry place, such as the refrigerator. It can last for several weeks if stored properly.
Troubleshooting Tips
* Cabbage Heads Splitting: This can happen when cabbage plants receive too much water after a period of drought. Water regularly and consistently

Conclusion
So, there you have it! Growing your own Queen Cabbage at home isn’t just a gardening project; it’s an investment in fresh, flavorful, and nutritious food right at your fingertips. We’ve walked you through the essential steps, from selecting the right seeds to nurturing your cabbage through its growth cycle. But why is this DIY trick a must-try?
Firstly, the taste difference is undeniable. Store-bought cabbage, often transported long distances and stored for extended periods, simply can’t compare to the crisp, vibrant flavor of a freshly harvested Queen Cabbage from your own garden. You control the growing conditions, ensuring optimal taste and texture.
Secondly, you’re in charge of what goes into your food. No more worrying about harmful pesticides or herbicides. Growing your own Queen Cabbage allows you to use organic methods, ensuring a healthy and safe product for you and your family. This peace of mind is invaluable.
Thirdly, it’s incredibly rewarding! There’s something deeply satisfying about nurturing a plant from seed to harvest. Watching your Queen Cabbage flourish is a testament to your hard work and dedication, providing a sense of accomplishment that’s hard to replicate.
But the benefits don’t stop there. Growing your own food is also a sustainable practice, reducing your carbon footprint and contributing to a healthier planet. Plus, it’s a fantastic way to get outdoors, connect with nature, and enjoy some fresh air and sunshine.
Variations and Suggestions:
Don’t be afraid to experiment! Try different varieties of Queen Cabbage to find your favorite. Some are sweeter, while others have a more robust flavor. You can also adjust the growing conditions to suit your local climate.
Consider companion planting. Marigolds, for example, can help deter pests, while dill can attract beneficial insects. Experiment with different combinations to see what works best for your garden.
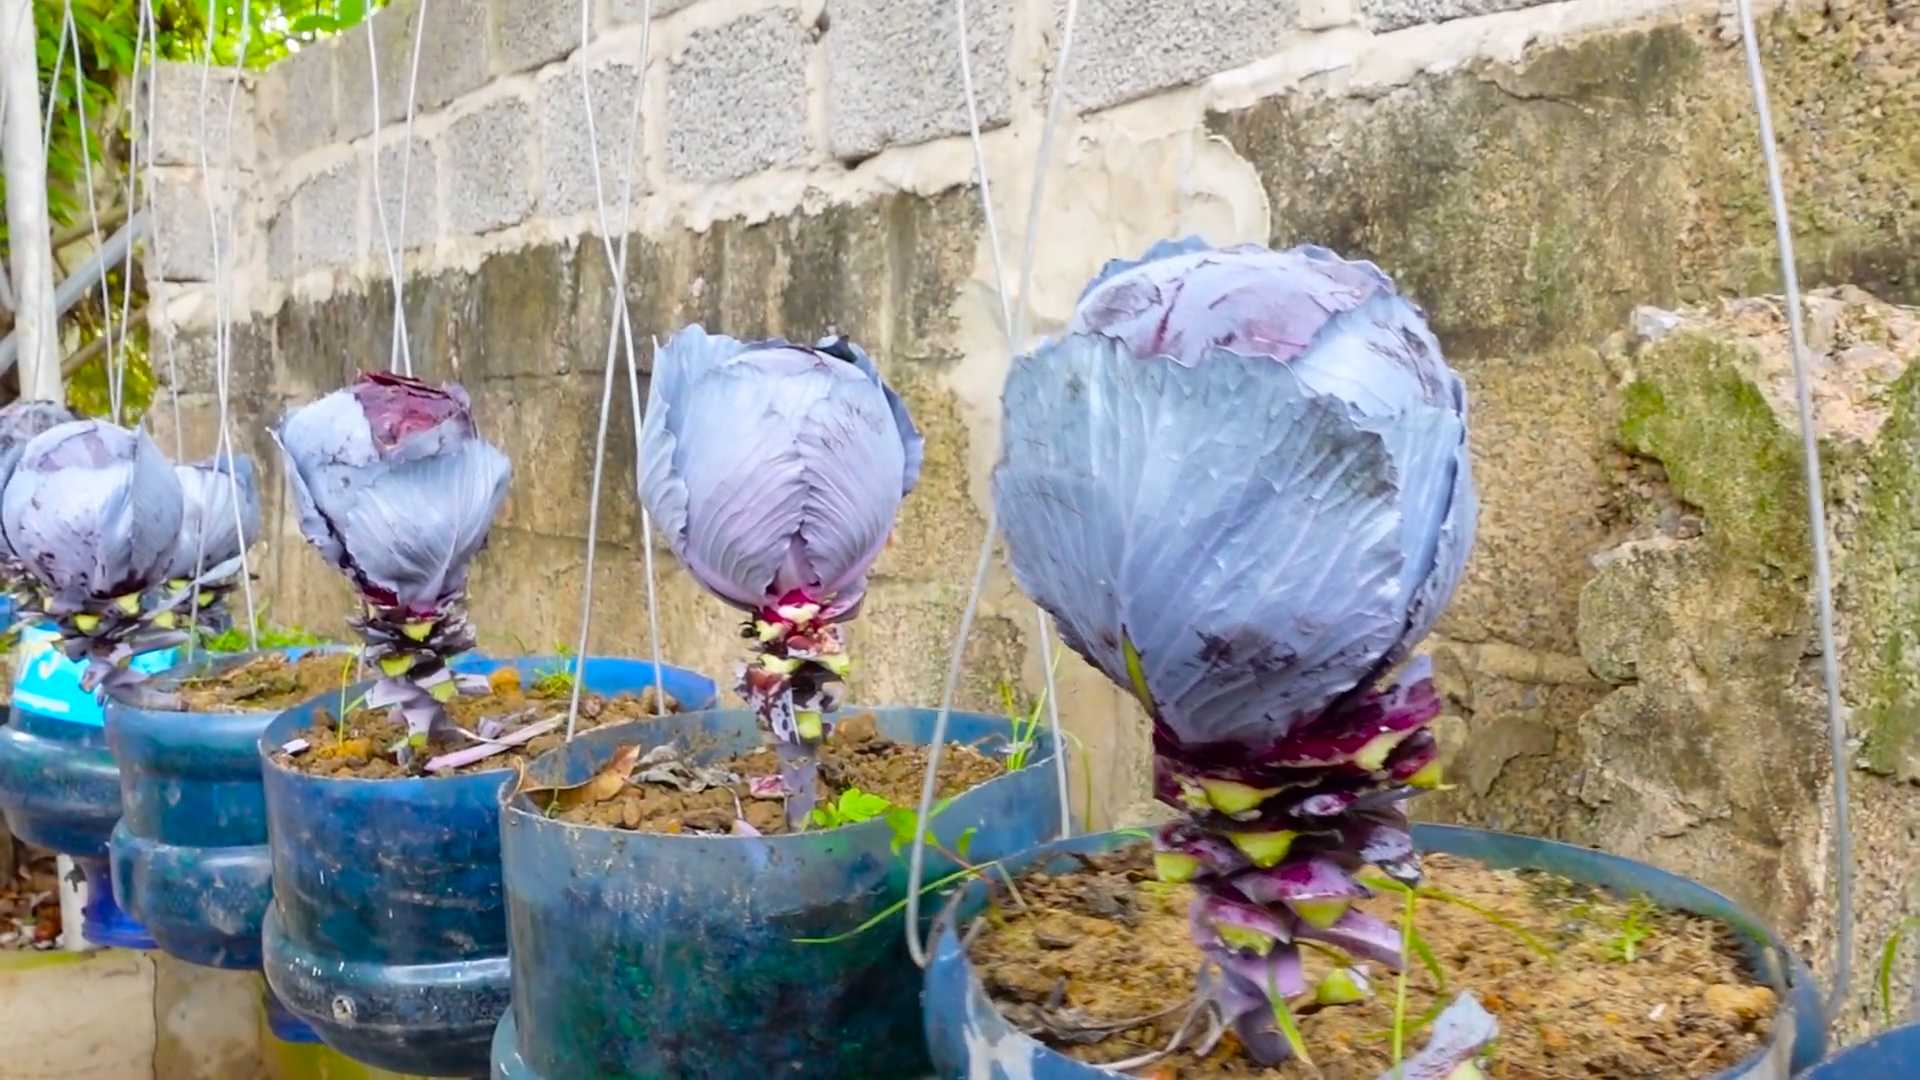
If you’re short on space, you can even grow Queen Cabbage in containers. Just make sure to choose a large enough pot and provide adequate drainage.
And finally, don’t forget to share your harvest with friends and neighbors! Homegrown Queen Cabbage makes a wonderful gift, and it’s a great way to spread the joy of gardening.
We truly believe that growing your own Queen Cabbage is a worthwhile endeavor. It’s a simple, sustainable, and rewarding way to enjoy fresh, healthy food. So, what are you waiting for? Grab some seeds, get your hands dirty, and start growing your own Queen Cabbage today!
We encourage you to try this DIY trick and share your experience with us. Let us know what worked well for you, what challenges you faced, and any tips or tricks you discovered along the way. Your feedback is invaluable, and it helps us to improve our guides and provide even better information to our readers. Share your photos and stories on our social media channels using #GrowQueenCabbage and let’s build a community of passionate home gardeners!
Frequently Asked Questions (FAQ)
What is Queen Cabbage and why should I grow it?
Queen Cabbage is a variety of cabbage known for its sweet, mild flavor and tender leaves. It’s a great choice for salads, slaws, and stir-fries. Growing it yourself ensures you get the freshest, most flavorful cabbage possible, free from harmful pesticides and herbicides. Plus, it’s a rewarding and sustainable gardening practice.
How long does it take to grow Queen Cabbage from seed?
Generally, it takes about 70-90 days from seed to harvest for Queen Cabbage. However, this can vary depending on your climate, growing conditions, and the specific variety you’re growing. Starting seeds indoors 6-8 weeks before the last expected frost can help speed up the process.
What are the best growing conditions for Queen Cabbage?
Queen Cabbage thrives in cool weather with plenty of sunshine (at least 6 hours per day). It prefers well-drained soil that is rich in organic matter. The ideal soil pH is between 6.0 and 7.0. Consistent watering is crucial, especially during dry periods.
How often should I water my Queen Cabbage plants?
Water your Queen Cabbage plants regularly, especially during hot, dry weather. Aim to keep the soil consistently moist but not waterlogged. A good rule of thumb is to water deeply once or twice a week, depending on the weather conditions. Mulching around the plants can help retain moisture and suppress weeds.
What kind of fertilizer should I use for Queen Cabbage?
Queen Cabbage is a heavy feeder, so it benefits from regular fertilization. Use a balanced fertilizer (e.g., 10-10-10) at planting time and then side-dress with a nitrogen-rich fertilizer every few weeks during the growing season. Organic options like compost tea or fish emulsion are also excellent choices.
How do I protect my Queen Cabbage from pests and diseases?
Common pests that affect Queen Cabbage include cabbage worms, aphids, and flea beetles. You can control these pests with organic methods like hand-picking, insecticidal soap, or Bacillus thuringiensis (Bt). Row covers can also help prevent pests from reaching your plants. Diseases like black rot and clubroot can be prevented by practicing crop rotation, ensuring good drainage, and using disease-resistant varieties.
Can I grow Queen Cabbage in containers?
Yes, you can grow Queen Cabbage in containers, but you’ll need to choose a large enough pot (at least 12 inches in diameter) to accommodate the plant’s root system. Use a well-draining potting mix and provide regular watering and fertilization. Container-grown cabbage may require more frequent watering than those grown in the ground.
When is the best time to harvest Queen Cabbage?
Harvest your Queen Cabbage when the head is firm and feels solid to the touch. The size of the head will vary depending on the variety, but generally, you can harvest when it reaches about 6-8 inches in diameter. Use a sharp knife to cut the head from the stem, leaving a few outer leaves intact.
How do I store Queen Cabbage after harvesting?
Store your Queen Cabbage in the refrigerator, ideally in a plastic bag or container to prevent it from drying out. It can last for several weeks if stored properly. Avoid storing it near fruits like apples and bananas, as they release ethylene gas, which can cause the cabbage to spoil more quickly.
What are some creative ways to use my homegrown Queen Cabbage?
Beyond the traditional coleslaw, Queen Cabbage can be used in a variety of dishes. Try it in stir-fries, soups, stews, or even grilled. You can also ferment it to make sauerkraut or kimchi. The possibilities are endless! Don’t be afraid to experiment and discover new ways to enjoy your homegrown Queen Cabbage.


Leave a Comment