

Grow Yellow Habanero Peppers, and set your garden ablaze with vibrant color and fiery flavor! Have you ever dreamed of harvesting your own sunshine-yellow peppers, ready to spice up your salsas, sauces, and culinary creations? Well, dream no more! This DIY guide is your passport to pepper paradise, offering simple yet effective tricks to cultivate these beauties right in your own backyard.
The habanero, with its roots tracing back to the Amazon basin, has a rich history of adding zest to dishes across the Americas. From Mayan cuisine to modern-day Caribbean flavors, this pepper has long been celebrated for its unique heat and fruity undertones. But why buy them at the store when you can experience the joy of nurturing your own plants and reaping the rewards of fresh, homegrown goodness?
Let’s face it, store-bought peppers can be expensive and sometimes lack the vibrant flavor of freshly picked produce. Plus, there’s something incredibly satisfying about growing your own food. This DIY article will equip you with the knowledge and techniques to successfully grow Yellow Habanero Peppers, even if you’re a beginner gardener. I’ll share my tried-and-true methods for seed starting, transplanting, pest control, and everything in between, ensuring you have a bountiful harvest of these fiery gems. Get ready to turn up the heat in your garden and your kitchen!
Growing Yellow Habanero Peppers: A DIY Guide From Seed to Spicy Harvest
Okay, pepper-loving friends! So you want to grow your own fiery yellow habaneros? Excellent choice! These little sunshine bombs pack a serious punch and are surprisingly easy to cultivate at home. I’m going to walk you through everything you need to know, from starting seeds indoors to harvesting your beautiful, blazing peppers. Let’s get started!
What You’ll Need: The Essential Supplies
Before we dive in, let’s gather our supplies. Having everything ready will make the whole process smoother and more enjoyable.
* Habanero Seeds: Obviously! Make sure you get them from a reputable source to ensure good germination rates and true-to-type peppers. I personally love ordering online, but your local garden center should have some options too.
* Seed Starting Trays or Small Pots: These will be your nurseries for the baby pepper plants. I prefer trays with individual cells because they make transplanting easier.
* Seed Starting Mix: This is a light, sterile soil mix specifically designed for starting seeds. Don’t use regular garden soil; it’s too heavy and can harbor diseases.
* Grow Lights: While a sunny windowsill *might* work, grow lights provide consistent and adequate light for strong, healthy seedlings. I use a simple fluorescent shop light, and it works wonders.
* Heat Mat (Optional but Recommended): Habaneros love warmth, and a heat mat will significantly improve germination rates, especially if your house is on the cooler side.
* Spray Bottle: For gently watering the seedlings.
* Small Pots (3-4 inch): For transplanting the seedlings once they’ve grown a bit.
* Potting Mix: A good quality potting mix for the larger pots. Again, avoid garden soil.
* Larger Pots (5-gallon or larger) or a Garden Bed: Where your peppers will live their adult lives.
* Fertilizer: A balanced fertilizer for the seedling stage and a fertilizer higher in phosphorus and potassium for flowering and fruiting.
* Watering Can or Hose: For watering your plants.
* Gardening Gloves: To protect your hands.
* Optional: Stakes or cages to support the plants as they grow.
Phase 1: Starting Your Habanero Seeds Indoors
Habaneros have a long growing season, so starting them indoors is crucial, especially if you live in a cooler climate. I usually start mine about 8-10 weeks before the last expected frost.
1. Prepare Your Seed Starting Trays: Fill your seed starting trays or small pots with seed starting mix. Gently tap the trays to settle the mix, but don’t pack it down too tightly.
2. Sow the Seeds: Make a small indentation (about 1/4 inch deep) in the center of each cell or pot. Place 1-2 habanero seeds in each indentation. Covering with more than 1/4 inch of soil may inhibit germination.
3. Cover the Seeds: Gently cover the seeds with seed starting mix.
4. Water Thoroughly: Use your spray bottle to thoroughly moisten the soil. You want it to be damp, but not soggy.
5. Provide Warmth: Place your seed starting trays on a heat mat. This will help maintain a consistent temperature of around 80-85°F (27-29°C), which is ideal for habanero germination.
6. Provide Light: Position your grow lights about 2-3 inches above the seed starting trays. Turn the lights on for 14-16 hours per day.
7. Maintain Moisture: Keep the soil consistently moist, but not waterlogged. Check the soil daily and mist with your spray bottle as needed.
8. Be Patient: Habanero seeds can take anywhere from 7 to 21 days to germinate, so don’t get discouraged if you don’t see sprouts right away.
9. Remove from Heat Mat: Once the seedlings emerge, remove the trays from the heat mat.
10. Adjust Light Height: As the seedlings grow, adjust the height of your grow lights to keep them about 2-3 inches above the plants.
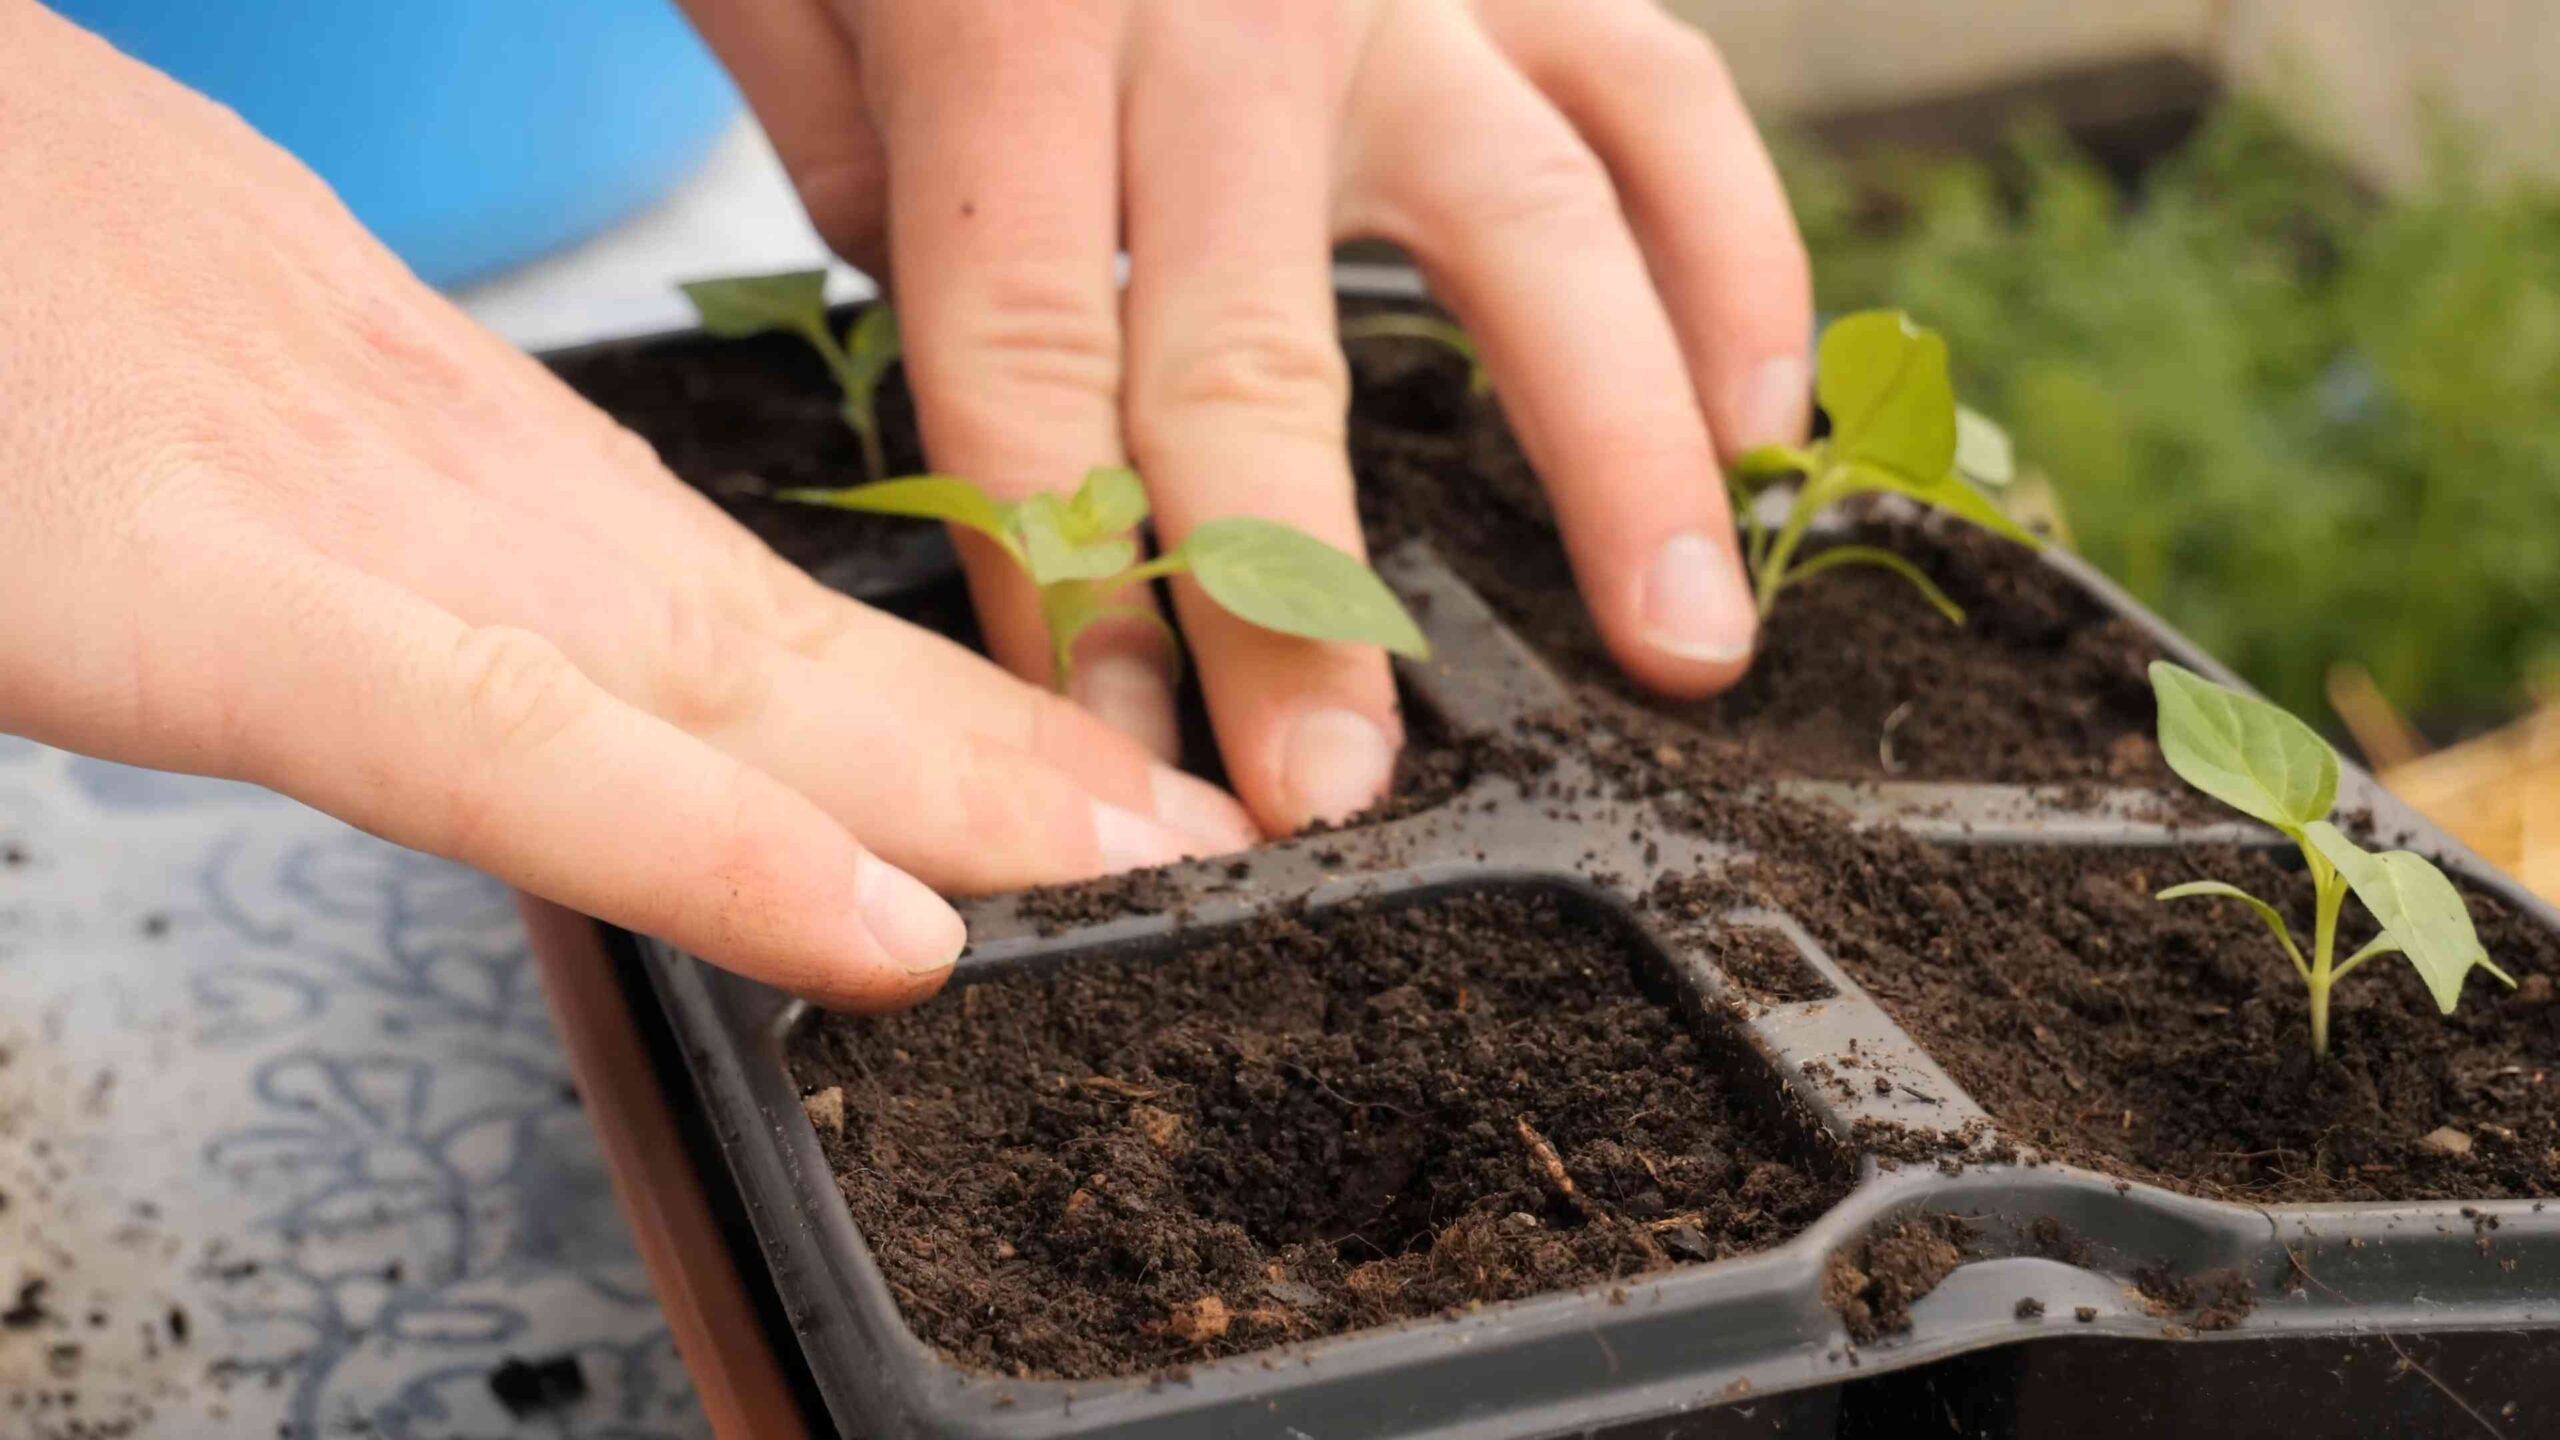
Phase 2: Transplanting Your Seedlings
Once your seedlings have developed their first set of true leaves (the leaves that look like miniature pepper leaves, not the initial seed leaves), it’s time to transplant them into larger pots.
1. Prepare Your Pots: Fill your 3-4 inch pots with potting mix.
2. Gently Remove the Seedlings: Carefully remove the seedlings from the seed starting trays. I like to use a small spoon or fork to gently lift them out, being careful not to damage the roots.
3. Plant the Seedlings: Make a hole in the center of each pot and gently place the seedling in the hole. The top of the root ball should be level with the soil surface.
4. Fill and Water: Fill in around the seedling with potting mix and gently water.
5. Fertilize: After a week, begin fertilizing with a balanced liquid fertilizer diluted to half strength. Follow the instructions on the fertilizer package.
6. Continue Providing Light: Keep the seedlings under the grow lights for 14-16 hours per day.
7. Harden Off: Before transplanting your seedlings outdoors, you need to “harden them off.” This process gradually acclimates them to the outdoor environment. Start by placing the seedlings outdoors in a sheltered location for an hour or two each day, gradually increasing the amount of time they spend outside over the course of a week or two. Protect them from direct sunlight and strong winds during this process.
Phase 3: Planting Your Habaneros Outdoors
Now for the exciting part! Once the danger of frost has passed and your seedlings are hardened off, it’s time to plant them in their final home.
1. Choose a Location: Habaneros need at least 6-8 hours of sunlight per day. Choose a location in your garden or on your patio that receives plenty of sun.
2. Prepare the Soil: If you’re planting in the ground, amend the soil with compost or other organic matter to improve drainage and fertility. If you’re planting in pots, make sure the pots have drainage holes.
3. Plant the Seedlings: Dig a hole that is slightly larger than the root ball of the seedling. Gently remove the seedling from its pot and place it in the hole. The top of the root ball should be level with the soil surface.
4. Space Appropriately: Space plants 18-24 inches apart.
5. Fill and Water: Fill in around the seedling with soil and gently water.
6. Mulch: Apply a layer of mulch around the plants to help retain moisture and suppress weeds.
7. Stake or Cage (Optional): As the plants grow, they may need support. You can use stakes or cages to prevent them from falling over.
Phase 4: Caring for Your Habanero Plants
Now that your habaneros are planted, it’s time to provide them with the care they need to thrive.
1. Watering: Water your plants regularly, especially during hot, dry weather. Habaneros like consistent moisture, but don’t overwater them. Allow the soil to dry out slightly between waterings.
2. Fertilizing: Fertilize your plants every 2-3 weeks with a fertilizer that is high in phosphorus and potassium. This will encourage flowering and fruiting. I like to use a tomato fertilizer, as it’s specifically formulated for fruiting plants.
3. Pest Control: Keep an eye out for pests such as aphids, spider mites, and whiteflies. If you notice any pests, treat them with an insecticidal soap or neem oil.
4. Pruning (Optional): You can prune your habanero plants to encourage bushier growth and more fruit production. Simply pinch off the tips of the branches.
5. Weeding: Keep the area around your plants free of weeds. Weeds compete with your plants for water and nutrients.
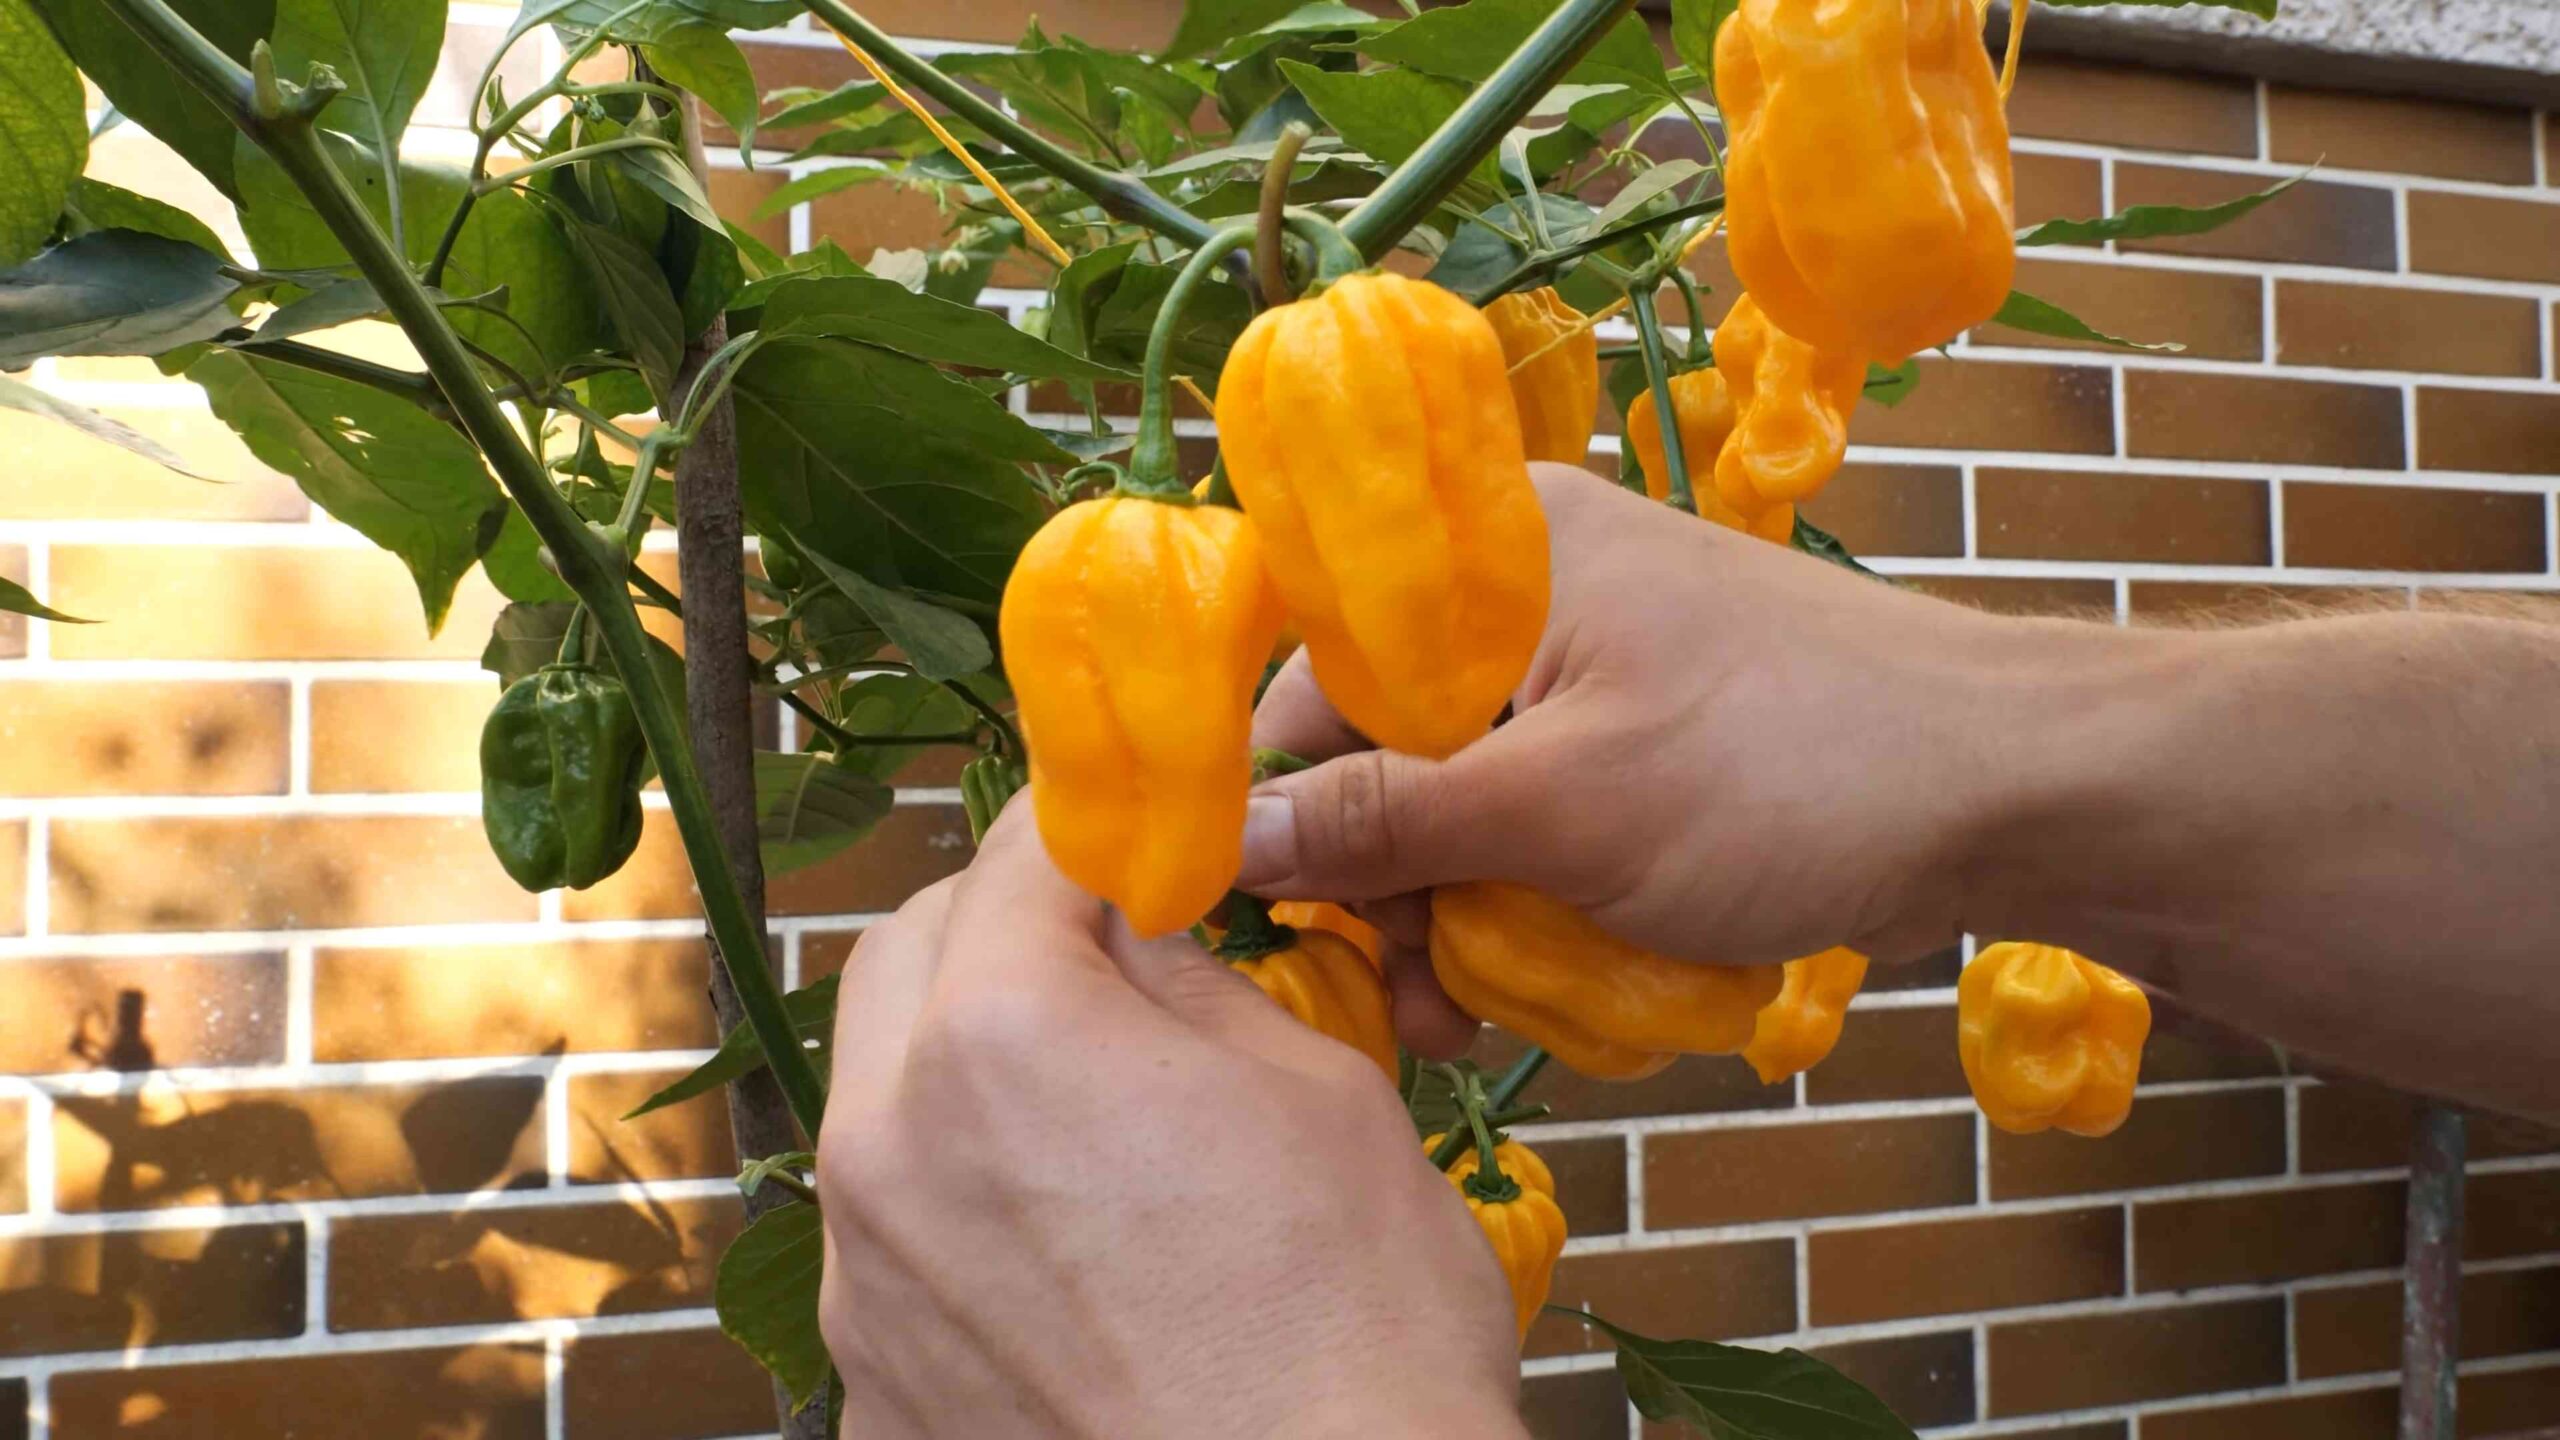
Phase 5: Harvesting Your Habanero Peppers
The moment you’ve been waiting for! Habanero peppers are typically ready to harvest about 80-100 days after transplanting.
1. Look for Color Change: The peppers will start out green and then gradually turn yellow (or orange or red, depending on the variety). They are ready to harvest when they are fully colored and slightly soft to the touch.
2. Use Pruning Shears or Scissors: Use pruning shears or scissors to cut the peppers from the plant. Be careful not to damage the plant.
3. Handle with Care: Habanero peppers are very hot, so handle them with care. Wear gloves when harvesting and avoid touching your
Conclusion
So, there you have it! Growing your own yellow habanero peppers isn’t just a gardening project; it’s an adventure in flavor, a testament to self-sufficiency, and a vibrant addition to your culinary life. We’ve walked through the steps, from selecting the perfect seeds to nurturing your plants and finally harvesting those fiery jewels. But why is this DIY trick a must-try?
Firstly, the taste. Commercially grown habaneros, while readily available, often lack the nuanced flavor and intense heat that homegrown peppers possess. When you cultivate your own, you control the environment, the nutrients, and ultimately, the taste. You’ll experience a level of freshness and potency that simply can’t be matched by store-bought varieties. Imagine the satisfaction of adding a pinch of your own homegrown yellow habanero to your salsa, knowing that you nurtured that flavor from seed to table.
Secondly, it’s incredibly rewarding. There’s something deeply satisfying about watching a tiny seed sprout and transform into a thriving plant, laden with vibrant peppers. It’s a connection to nature, a lesson in patience, and a tangible accomplishment that you can literally taste.
Thirdly, it’s cost-effective. While there’s an initial investment in seeds, soil, and perhaps a few supplies, growing your own peppers can save you money in the long run, especially if you’re a frequent consumer of these spicy delights. Plus, you can save seeds from your best peppers to continue the cycle year after year.
But the benefits don’t stop there. Growing your own yellow habanero peppers allows for endless experimentation. Want to try a different growing medium? Go for it! Curious about hydroponics? Now’s your chance! You can even experiment with different fertilizers to see how they affect the flavor and heat of your peppers.
Speaking of variations, consider these ideas to personalize your yellow habanero growing experience:
* **Container Gardening:** If you’re short on space, yellow habaneros thrive in containers. Choose a pot that’s at least 5 gallons in size and ensure it has good drainage.
* **Hydroponics:** For a more advanced approach, try growing your peppers hydroponically. This method can result in faster growth and higher yields.
* **Different Varieties:** While we’ve focused on yellow habaneros, there are many other habanero varieties to explore, each with its own unique flavor profile and heat level. Why not try growing red, orange, or even chocolate habaneros alongside your yellow ones?
* **Fermented Hot Sauce:** Once you’ve harvested your peppers, consider turning them into a delicious fermented hot sauce. Fermentation adds depth of flavor and complexity to the peppers.
* **Pepper Powder:** Dehydrate your peppers and grind them into a powder for a convenient way to add heat to your dishes.
Ultimately, the best way to discover the joys of growing yellow habanero peppers is to simply dive in and try it. Don’t be afraid to experiment, make mistakes, and learn along the way. Gardening is a journey, not a destination.
We encourage you to embark on this spicy adventure and share your experiences with us. What challenges did you face? What successes did you celebrate? What unique variations did you try? Share your tips, tricks, and photos in the comments below. Let’s build a community of passionate pepper growers and spread the joy of homegrown flavor! We are confident that with a little patience and care, you’ll be enjoying the fruits (or rather, the peppers) of your labor in no time. So, grab your seeds, get your hands dirty, and get ready to experience the fiery delight of growing your own yellow habanero peppers!
Frequently Asked Questions (FAQ)
Q: How long does it take to grow yellow habanero peppers from seed?
A: Growing yellow habanero peppers from seed to harvest typically takes around 90-120 days. This timeframe can vary depending on factors such as climate, growing conditions, and the specific variety of habanero. Starting your seeds indoors 6-8 weeks before the last expected frost can help shorten the overall growing time.
Q: What is the ideal temperature for growing yellow habanero peppers?
A: Yellow habanero peppers thrive in warm temperatures, ideally between 70°F and 85°F (21°C and 29°C). They are sensitive to frost and cold temperatures, so it’s crucial to protect them from freezing conditions. If you live in an area with cooler temperatures, consider growing them in containers that can be moved indoors during cold snaps.
Q: How much sunlight do yellow habanero peppers need?
A: Yellow habanero peppers require at least 6-8 hours of direct sunlight per day to thrive. Insufficient sunlight can result in leggy plants, reduced pepper production, and less intense flavor. Choose a sunny location in your garden or use grow lights if growing indoors.
Q: What type of soil is best for growing yellow habanero peppers?
A: Yellow habanero peppers prefer well-draining, fertile soil with a slightly acidic to neutral pH (around 6.0 to 7.0). Amend your soil with compost or other organic matter to improve drainage and fertility. Avoid heavy clay soils, as they can retain too much moisture and lead to root rot.
Q: How often should I water my yellow habanero pepper plants?
A: Water your yellow habanero pepper plants regularly, especially during hot and dry weather. The soil should be kept consistently moist but not waterlogged. Water deeply when the top inch of soil feels dry to the touch. Avoid overhead watering, as it can promote fungal diseases.
Q: What are some common pests and diseases that affect yellow habanero peppers?
A: Common pests that can affect yellow habanero peppers include aphids, spider mites, whiteflies, and pepper weevils. Diseases include fungal diseases like powdery mildew, blossom end rot, and bacterial leaf spot. Regularly inspect your plants for signs of pests or diseases and take appropriate action, such as using insecticidal soap or fungicide.
Q: How do I prevent blossom end rot in my yellow habanero peppers?
A: Blossom end rot is a common problem in peppers caused by calcium deficiency. To prevent it, ensure your soil has adequate calcium levels and maintain consistent watering. You can also add calcium supplements to the soil or use a foliar spray containing calcium.
Q: When should I harvest my yellow habanero peppers?
A: Yellow habanero peppers are typically ready to harvest when they turn a vibrant yellow color and are firm to the touch. The exact timing will depend on the variety and growing conditions. You can also harvest them when they are still green, but they will be less spicy and flavorful.
Q: How do I store yellow habanero peppers?
A: Freshly harvested yellow habanero peppers can be stored in the refrigerator for up to a week. For longer storage, you can dry them, freeze them, or pickle them. Drying can be done using a dehydrator or by hanging them in a well-ventilated area. Freezing is a simple way to preserve their flavor and heat.
Q: Can I grow yellow habanero peppers indoors?
A: Yes, you can grow yellow habanero peppers indoors, especially if you live in an area with a short growing season. Provide them with plenty of light, either from a sunny window or grow lights. Ensure they have adequate ventilation and maintain a consistent temperature.
Q: Are yellow habanero peppers hotter than other types of peppers?
A: Yellow habanero peppers are considered to be very hot, with a Scoville heat unit (SHU) rating of 100,000-350,000. This is significantly hotter than jalapeños, which typically range from 2,500 to 8,000 SHU. However, the heat level can vary depending on the growing conditions and the specific variety of habanero.
Q: How can I reduce the heat of yellow habanero peppers?
A: The heat of yellow habanero peppers is concentrated in the seeds and membranes. Removing these parts before cooking can help reduce the heat. You can also soak the peppers in vinegar or lemon juice to help neutralize the capsaicin, the compound that causes the heat.
Q: What are some ways to use yellow habanero peppers in cooking?
A: Yellow habanero peppers can be used to add heat and flavor to a wide variety of dishes, including salsas, sauces, stews, chili, and marinades. Use them sparingly at first, as they are very hot. You can also use them to make hot sauce, pepper powder, or infused oils.
Q: Can I save seeds from my yellow habanero peppers to grow next year?
A: Yes, you can save seeds from your yellow habanero peppers to grow next year. Choose peppers that are fully ripe and healthy. Remove the seeds and dry them thoroughly before storing them in an airtight container in a cool, dark place.
Leave a Comment