

Growing Carrots in Containers might sound like a challenge, especially if you’re short on garden space, but trust me, it’s totally doable and incredibly rewarding! Have you ever dreamt of plucking vibrant, sweet carrots straight from your patio or balcony? Well, stop dreaming and start planting! For centuries, carrots have been a staple in diets worldwide, dating back to ancient times where they were initially cultivated for their aromatic leaves and seeds rather than their roots. Today, we cherish them for their crunchy texture and nutritional benefits, and thankfully, we don’t need acres of land to enjoy them.
In this article, I’m going to share some simple yet effective DIY tricks and hacks that will transform you into a container carrot-growing pro. Whether you’re a seasoned gardener or just starting out, these tips will help you overcome common challenges like poor soil, overcrowding, and pest control. Imagine the satisfaction of harvesting your own homegrown carrots, knowing exactly where they came from and what went into them. Plus, growing carrots in containers is a fantastic way to add a touch of green to your urban living space and enjoy fresh, healthy produce right at your fingertips. So, grab your gardening gloves, and let’s get started!
Growing Carrots in Containers: A Bumper Crop on Your Balcony!
Okay, so you’re dreaming of fresh, crunchy carrots straight from your garden, but you don’t have a garden? No problem! Growing carrots in containers is totally doable, and I’m here to walk you through it. It’s easier than you think, and the reward of pulling up your own homegrown carrots is seriously satisfying. Let’s get started!
Choosing the Right Container and Carrot Variety
First things first, we need to talk about containers and carrot types. Not all carrots are created equal, and not all containers are suitable for carrots.
* Container Depth is Key: Carrots need room to grow downwards. Aim for a container that’s at least 12 inches deep, but 18-24 inches is even better, especially if you want to grow longer carrot varieties. Trust me, you don’t want to end up with stunted, sad-looking carrots.
* Material Matters (Less): Plastic, terracotta, fabric pots – they all work! Just make sure your container has drainage holes. Soggy carrots are unhappy carrots. I personally love using fabric pots because they allow for better aeration and drainage, but any well-draining container will do.
* Size it Up: The width of your container depends on how many carrots you want to grow. A good rule of thumb is to allow about 2-3 inches of space between each carrot. So, a 12-inch wide container could comfortably house 4-6 carrots.
* Carrot Varieties: This is where it gets fun! Shorter, rounder varieties like ‘Parisian’ or ‘Thumbelina’ are perfect for containers. ‘Nantes’ types are also a good choice as they tend to be shorter and more cylindrical. Avoid long, thin varieties like ‘Imperator’ unless you have a really deep container. I’ve had great success with ‘Nantes’ and ‘Little Finger’ carrots in my containers.
Preparing Your Potting Mix
Carrots need loose, well-draining soil to thrive. Heavy, compacted soil will result in misshapen or stunted roots. Here’s my go-to potting mix recipe:
* Base Mix: Start with a high-quality, soilless potting mix. This provides good drainage and aeration.
* Amendments: Add perlite or vermiculite to further improve drainage. About 20-30% of the total volume should be perlite or vermiculite.
* Organic Matter: Incorporate some compost or well-rotted manure for added nutrients. Aim for about 10-20% compost.
* Optional: A little bit of sand can also help with drainage, especially if you live in a humid area.
Important Note: Avoid using garden soil in your containers. Garden soil tends to compact and doesn’t drain well, which can lead to problems for your carrots.
Planting Your Carrot Seeds
Now for the exciting part – planting!
1. Fill Your Container: Fill your container with your prepared potting mix, leaving about an inch or two of space at the top.
2. Water the Soil: Gently water the soil until it’s evenly moist but not soggy.
3. Sow the Seeds: Carrot seeds are tiny, so it’s easy to over-sow. Sprinkle the seeds thinly over the surface of the soil. Aim for about 1/4 inch spacing between seeds.
4. Cover the Seeds: Lightly cover the seeds with a thin layer of potting mix or vermiculite. About 1/4 inch is perfect.
5. Gently Water Again: Water the surface gently to avoid disturbing the seeds. A spray bottle works well for this.
6. Keep it Moist: Carrot seeds need consistent moisture to germinate. Cover the container with plastic wrap or a humidity dome to help retain moisture.
7. Find a Sunny Spot: Place your container in a sunny location. Carrots need at least 6 hours of sunlight per day.
Caring for Your Carrot Seedlings
Once your seedlings emerge (usually in 7-21 days), it’s time to start thinning them out.
1. Remove the Cover: Once the seedlings start to sprout, remove the plastic wrap or humidity dome.
2. Thinning: This is crucial! Thin the seedlings to about 2-3 inches apart. Use small scissors to snip off the weaker seedlings at the soil level. Don’t pull them out, as this can disturb the roots of the remaining seedlings.
3. Watering: Water regularly, keeping the soil consistently moist but not waterlogged. Check the soil moisture by sticking your finger into the soil. If the top inch feels dry, it’s time to water.
4. Fertilizing: Carrots are not heavy feeders, but they do benefit from occasional fertilization. Use a balanced, organic fertilizer diluted to half strength. Fertilize every 2-3 weeks. I like to use a liquid seaweed fertilizer.
5. Weed Control: Keep your container free of weeds. Weeds compete with your carrots for nutrients and water.
6. Sunlight: Ensure your carrots are getting at least 6 hours of sunlight per day. If you don’t have enough sunlight, you can supplement with grow lights.
7. Monitor for Pests: Keep an eye out for pests like aphids or carrot rust flies. If you spot any pests, treat them with an organic insecticide like neem oil.
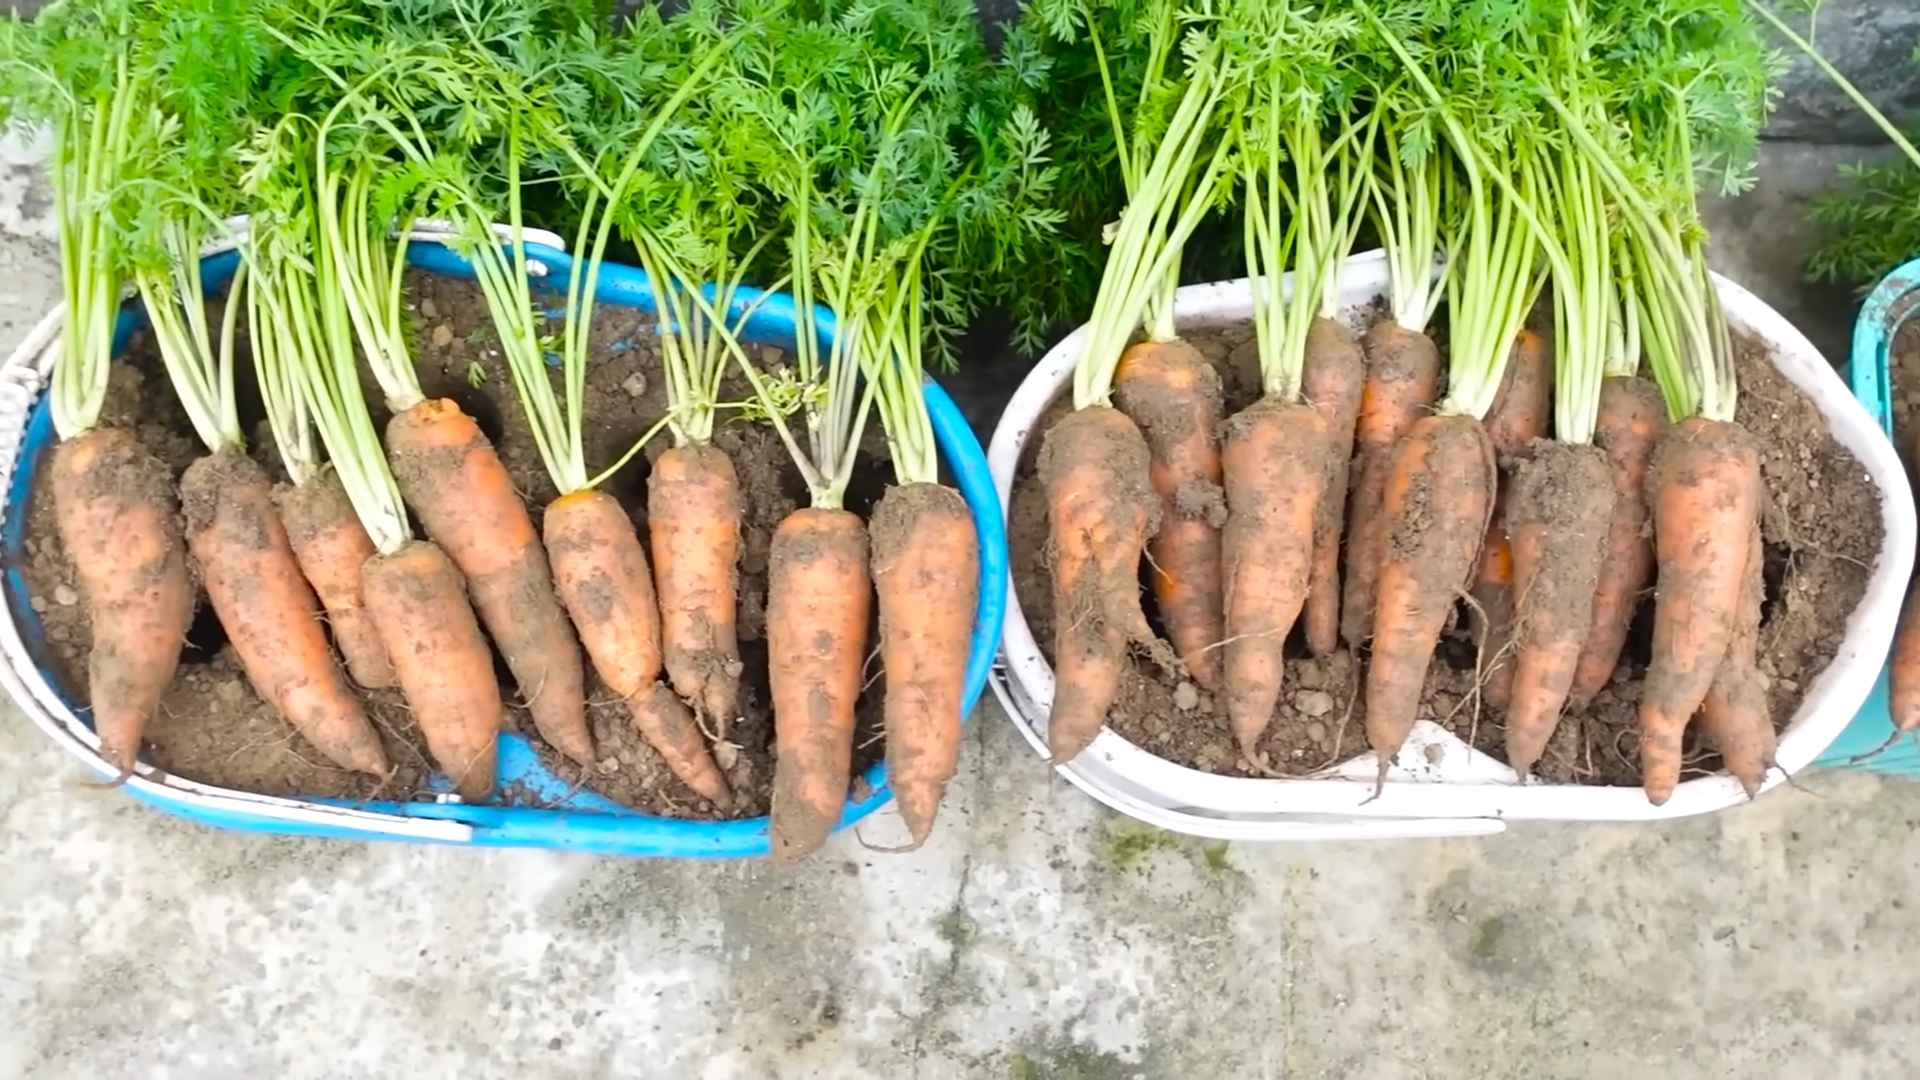
Harvesting Your Carrots
The moment you’ve been waiting for!
1. Check Maturity: Carrots are typically ready to harvest 60-80 days after planting, depending on the variety. Check the seed packet for specific maturity dates.
2. Signs of Readiness: Look for the tops of the carrots to be visible above the soil. You can also gently brush away some of the soil to check the size of the carrots.
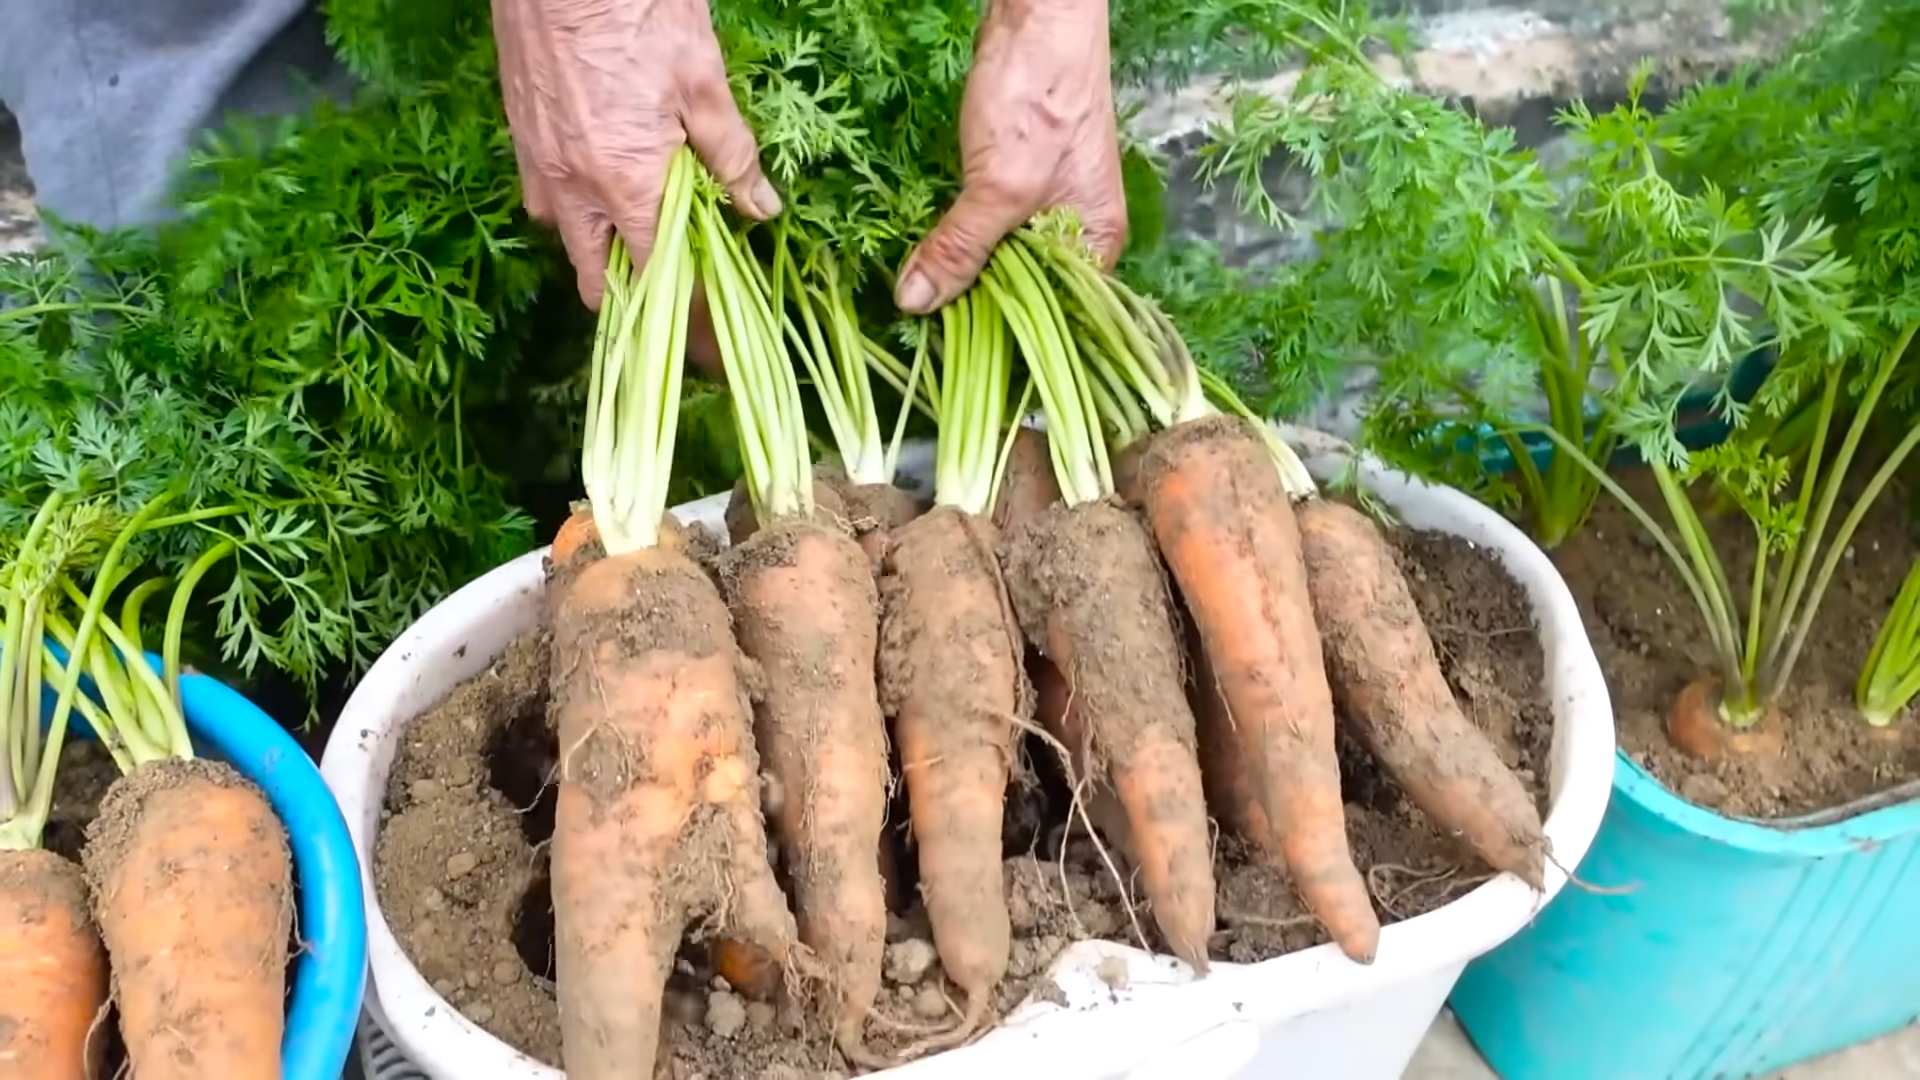
3. Harvesting: Gently loosen the soil around the carrots with a trowel or fork. Then, grasp the carrot tops firmly and pull straight up. If the carrots are difficult to pull, water the soil thoroughly before harvesting.
4. Enjoy! Wash your freshly harvested carrots and enjoy them raw, roasted, or in your favorite recipes.
Troubleshooting Common Problems
Even with the best care, you might encounter some problems. Here are a few common issues and how to address them:
* Forked or Misshapen Carrots: This is usually caused by rocks or compacted soil. Make sure your potting mix is loose and free of debris.
* Stunted Growth: This could be due to insufficient sunlight, lack of nutrients, or overcrowding. Ensure your carrots are getting enough sunlight, fertilize regularly, and thin out the seedlings properly.
* Pests: Aphids, carrot rust flies, and other pests can damage your carrots. Inspect your plants regularly and treat any infestations with an organic insecticide.
* Bolting: Bolting (premature flowering) can occur if the carrots are stressed by heat or lack of water. Keep the soil consistently moist and provide shade during the hottest part of the day.
Extra Tips for Carrot-Growing Success
Here are a few extra tips to help you grow the best carrots possible:
* Succession Planting: Plant a new batch of carrot seeds every few weeks to ensure a continuous harvest throughout the growing season.
* Companion Planting: Plant carrots alongside other vegetables like onions, garlic, or rosemary. These plants can help deter pests.
* Watering Deeply: Water deeply and less frequently, rather than shallowly and more often. This encourages the roots to grow deeper.
* Rotate Your Crops: If you’re growing carrots in the same container year after year, rotate your crops to prevent soilborne diseases.
Growing carrots in containers is a rewarding experience. With a little bit of planning and care, you can enjoy fresh, homegrown carrots even if you don’t have a traditional garden. Happy gardening!
Conclusion
So, there you have it! Growing carrots in containers isn’t just a whimsical gardening experiment; it’s a genuinely rewarding and practical way to enjoy fresh, homegrown carrots, even if you’re short on space. We’ve walked through the steps, from selecting the right container and soil to nurturing your tiny seedlings into vibrant, orange treasures.
Why is this DIY trick a must-try? Because it democratizes gardening. It removes the barriers of large plots and specialized equipment, putting the power of fresh produce directly into your hands. Imagine the satisfaction of harvesting your own sweet, crisp carrots, knowing exactly where they came from and what went into growing them. No more bland, store-bought carrots – just pure, unadulterated flavor straight from your balcony or patio.
Beyond the convenience and taste, container gardening offers unparalleled control. You dictate the soil composition, the watering schedule, and the sun exposure, creating the perfect microclimate for your carrots to thrive. This level of control often translates to healthier, more robust plants and a more bountiful harvest. Plus, it’s incredibly therapeutic! There’s something deeply calming about tending to your little green friends and watching them grow.
But the beauty of this method lies in its adaptability. Feel free to experiment with different carrot varieties. Nantes carrots are a classic choice for containers due to their shorter length, but you could also try round varieties like Parisian carrots or even colorful heirloom varieties for a visual treat. Consider companion planting! Plant basil or marigolds alongside your carrots to deter pests and enhance their growth. You can also try different container materials – terracotta pots, plastic tubs, even repurposed buckets can work, as long as they provide adequate drainage.
Don’t be afraid to get creative and personalize your carrot-growing experience.
And speaking of personalization, consider the soil amendments you use. While a well-draining potting mix is essential, adding compost or aged manure can provide an extra boost of nutrients. Just be sure to avoid using fresh manure, as it can burn the delicate roots of your carrots.
The key to successful growing carrots in containers is consistent care. Regular watering is crucial, especially during hot weather. Check the soil moisture daily and water deeply whenever the top inch feels dry. Avoid overwatering, as this can lead to root rot. Fertilize your carrots every few weeks with a balanced liquid fertilizer to ensure they have the nutrients they need to grow.
Now, it’s your turn! We wholeheartedly encourage you to give this DIY trick a try. It’s easier than you think, and the rewards are well worth the effort. Start small, experiment with different techniques, and most importantly, have fun!
Once you’ve harvested your first batch of homegrown carrots, we’d love to hear about your experience. Share your photos, tips, and challenges in the comments below. Let’s create a community of container carrot growers and learn from each other’s successes and failures. Together, we can unlock the secrets to growing the most delicious and nutritious carrots imaginable, right in our own backyards (or balconies!). So, grab your containers, soil, and seeds, and let’s get growing!
Frequently Asked Questions (FAQ)
What is the best size container for growing carrots?
The ideal container size depends on the carrot variety you choose. For shorter varieties like Nantes or Parisian carrots, a container that is at least 8-10 inches deep and 6-8 inches wide is sufficient. For longer varieties, you’ll need a container that is at least 12 inches deep. The wider the container, the more carrots you can grow in it. A good rule of thumb is to allow at least 2-3 inches of space between each carrot plant. Remember, adequate space allows for proper root development, leading to healthier and larger carrots.
What type of soil is best for growing carrots in containers?
Carrots need loose, well-draining soil to thrive. Heavy, compacted soil can hinder root growth and result in misshapen carrots. The best option is a high-quality potting mix specifically formulated for containers. Avoid using garden soil, as it tends to be too heavy and may contain pests or diseases. You can amend your potting mix with perlite or vermiculite to improve drainage and aeration. Adding compost or aged manure will provide essential nutrients. The ideal soil pH for carrots is between 6.0 and 6.8.
How often should I water my container carrots?
Watering frequency depends on several factors, including the weather, the type of container, and the soil composition. Generally, you should water your carrots whenever the top inch of soil feels dry to the touch. Water deeply, ensuring that the entire root zone is moistened. Avoid overwatering, as this can lead to root rot. During hot, dry weather, you may need to water your carrots daily. In cooler weather, you can water less frequently. A good way to check soil moisture is to stick your finger into the soil. If it feels dry an inch down, it’s time to water.
How much sunlight do carrots need?
Carrots need at least 6 hours of sunlight per day to grow properly. Choose a location for your container that receives full sun. If you live in a hot climate, you may need to provide some afternoon shade to prevent the soil from drying out too quickly. If you don’t have a sunny location, you can supplement with grow lights. Rotate your container regularly to ensure that all sides of the plants receive adequate sunlight.
When should I fertilize my container carrots?
Carrots are heavy feeders and benefit from regular fertilization. Start fertilizing your carrots about 2-3 weeks after they emerge from the soil. Use a balanced liquid fertilizer, diluted to half strength. Fertilize every 2-3 weeks throughout the growing season. Avoid using fertilizers that are high in nitrogen, as this can promote leafy growth at the expense of root development. Look for a fertilizer that is higher in phosphorus and potassium, which are essential for root growth.
How long does it take for carrots to mature in containers?
The time it takes for carrots to mature depends on the variety and the growing conditions. Generally, carrots take between 60 and 80 days to mature. You can start harvesting your carrots when they reach the desired size. To check if your carrots are ready, gently brush away some of the soil around the top of the carrot to expose the root. If the carrot is the size you want, you can harvest it.
What are some common pests and diseases that affect container carrots?
Common pests that affect container carrots include aphids, carrot rust flies, and nematodes. Aphids can be controlled with insecticidal soap or neem oil. Carrot rust flies can be prevented by covering your container with a fine mesh netting. Nematodes can be controlled by using nematode-resistant carrot varieties and by practicing crop rotation. Common diseases that affect container carrots include leaf blight and root rot. Leaf blight can be prevented by providing good air circulation and avoiding overhead watering. Root rot can be prevented by ensuring that your soil is well-draining and by avoiding overwatering.
Can I grow carrots in containers indoors?
Yes, you can grow carrots in containers indoors, but you’ll need to provide them with adequate light. A sunny windowsill that receives at least 6 hours of direct sunlight per day is ideal. If you don’t have a sunny windowsill, you can use grow lights. You’ll also need to ensure that your carrots have good air circulation and that the temperature is between 60 and 70 degrees Fahrenheit.
How do I prevent my carrots from splitting or cracking?
Splitting or cracking carrots is often caused by inconsistent watering. To prevent this, water your carrots regularly and deeply, especially during dry periods. Avoid letting the soil dry out completely between waterings. You can also mulch around your carrots to help retain moisture in the soil.
Can I reuse the soil from my container carrots for other plants?
Yes, you can reuse the soil from your container carrots for other plants, but it’s a good idea to amend it first. Carrots can deplete the soil of nutrients, so adding compost or aged manure will help replenish them. You should also check the soil for pests or diseases before reusing it. If you find any, you may need to sterilize the soil before using it for other plants.
Leave a Comment