

Growing Ginger at Home might seem daunting, but trust me, it’s easier than you think! Have you ever imagined harvesting your own fresh, zesty ginger right from your backyard or even your windowsill? It’s not just a dream; it’s a deliciously achievable reality. For centuries, ginger has been revered not only for its culinary prowess but also for its medicinal properties, playing a vital role in traditional medicine across various cultures. From soothing upset stomachs to adding a spicy kick to your favorite dishes, ginger is a true powerhouse.
But why should you bother with growing ginger at home when you can simply buy it at the store? Well, for starters, the flavor of homegrown ginger is unparalleled – it’s fresher, more vibrant, and often less fibrous than what you find commercially. Plus, think of the satisfaction of nurturing a plant from rhizome to harvest! In today’s world, where we’re increasingly conscious of where our food comes from and eager to embrace sustainable practices, growing your own ginger is a fantastic way to connect with nature and reduce your carbon footprint. This DIY guide will provide you with simple, step-by-step instructions and clever hacks to ensure your ginger thrives, even if you don’t have a green thumb. Get ready to unlock the secrets to a bountiful ginger harvest!

Growing Ginger at Home: A DIY Guide for the Aspiring Gardener
Hey there, fellow plant enthusiasts! Ever thought about growing your own ginger? It’s surprisingly easy and incredibly rewarding. Imagine having fresh, organic ginger right at your fingertips whenever you need it for cooking, tea, or even just a little health boost. I’ve been growing ginger at home for a few years now, and I’m excited to share my secrets with you. Let’s dive in!
What You’ll Need
Before we get started, let’s gather all the necessary supplies. Trust me, having everything ready beforehand will make the process much smoother.
* Ginger Rhizome: This is the most important ingredient! Look for a plump, healthy-looking ginger rhizome (the “root” part) at your local grocery store or nursery. Ideally, it should have visible “eyes” or buds. Organic ginger is preferable, as it’s less likely to have been treated with growth inhibitors.
* Pot or Container: Choose a pot that’s at least 12 inches deep and wide. Ginger roots grow horizontally, so a wider pot is better than a tall, narrow one. Make sure it has drainage holes!
* Potting Mix: Use a well-draining potting mix. A mix of potting soil, compost, and perlite or vermiculite works wonders. Good drainage is crucial to prevent root rot.
* Watering Can or Hose: For watering your ginger plant.
* Spray Bottle (Optional): For misting the plant to maintain humidity.
* Warm Location: Ginger thrives in warm environments, so choose a spot that gets plenty of indirect sunlight.
* Patience: Growing ginger takes time, so be prepared to wait a few months for your first harvest.
Preparing the Ginger Rhizome
This step is crucial for successful ginger growth. We need to wake up those “eyes” and encourage them to sprout.
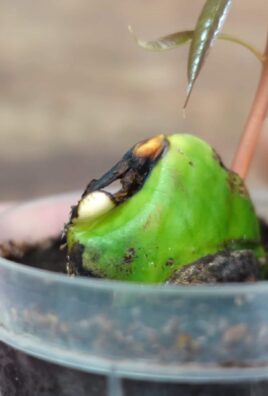
1. Soaking the Rhizome: Soak the ginger rhizome in lukewarm water for 12-24 hours. This helps to rehydrate it and stimulate growth. I usually do this overnight.
2. Cutting the Rhizome (Optional): If your ginger rhizome is large, you can cut it into smaller pieces, ensuring each piece has at least one or two “eyes.” This allows you to grow multiple ginger plants from a single rhizome. Let the cut ends callous over for a day or two before planting to prevent rot.
3. Inspecting for Rot: Before planting, carefully inspect the rhizome for any signs of rot or mold. Discard any rhizomes that look unhealthy.
Planting Your Ginger
Now for the fun part – getting your ginger in the soil!
1. Filling the Pot: Fill your pot with the well-draining potting mix, leaving about an inch or two of space at the top.
2. Planting the Rhizome: Place the ginger rhizome horizontally on top of the soil, with the “eyes” facing upwards.
3. Covering the Rhizome: Cover the rhizome with about 1-2 inches of soil. Gently pat the soil down.
4. Watering: Water the soil thoroughly until water drains out of the drainage holes. This helps to settle the soil and provide moisture to the rhizome.
Caring for Your Ginger Plant
Consistent care is key to a healthy and productive ginger plant.
1. Watering: Keep the soil consistently moist, but not waterlogged. Water when the top inch of soil feels dry to the touch. Overwatering can lead to root rot, so be careful!
2. Humidity: Ginger loves humidity. If you live in a dry climate, mist the plant regularly with a spray bottle or place the pot on a tray filled with pebbles and water. The evaporation will increase the humidity around the plant.
3. Sunlight: Ginger thrives in bright, indirect sunlight. Avoid direct sunlight, which can scorch the leaves. An east-facing window or a spot under a shade cloth is ideal.
4. Temperature: Maintain a warm temperature, ideally between 70-90°F (21-32°C). Ginger doesn’t tolerate frost, so if you live in a colder climate, bring the pot indoors during the winter months.
5. Fertilizing: Feed your ginger plant with a balanced liquid fertilizer every 2-3 weeks during the growing season (spring and summer). Follow the instructions on the fertilizer label.
6. Pest Control: Keep an eye out for pests like aphids or spider mites. If you spot any, treat them with insecticidal soap or neem oil.
7. Weeding: Remove any weeds that may sprout in the pot. Weeds can compete with your ginger plant for nutrients and water.
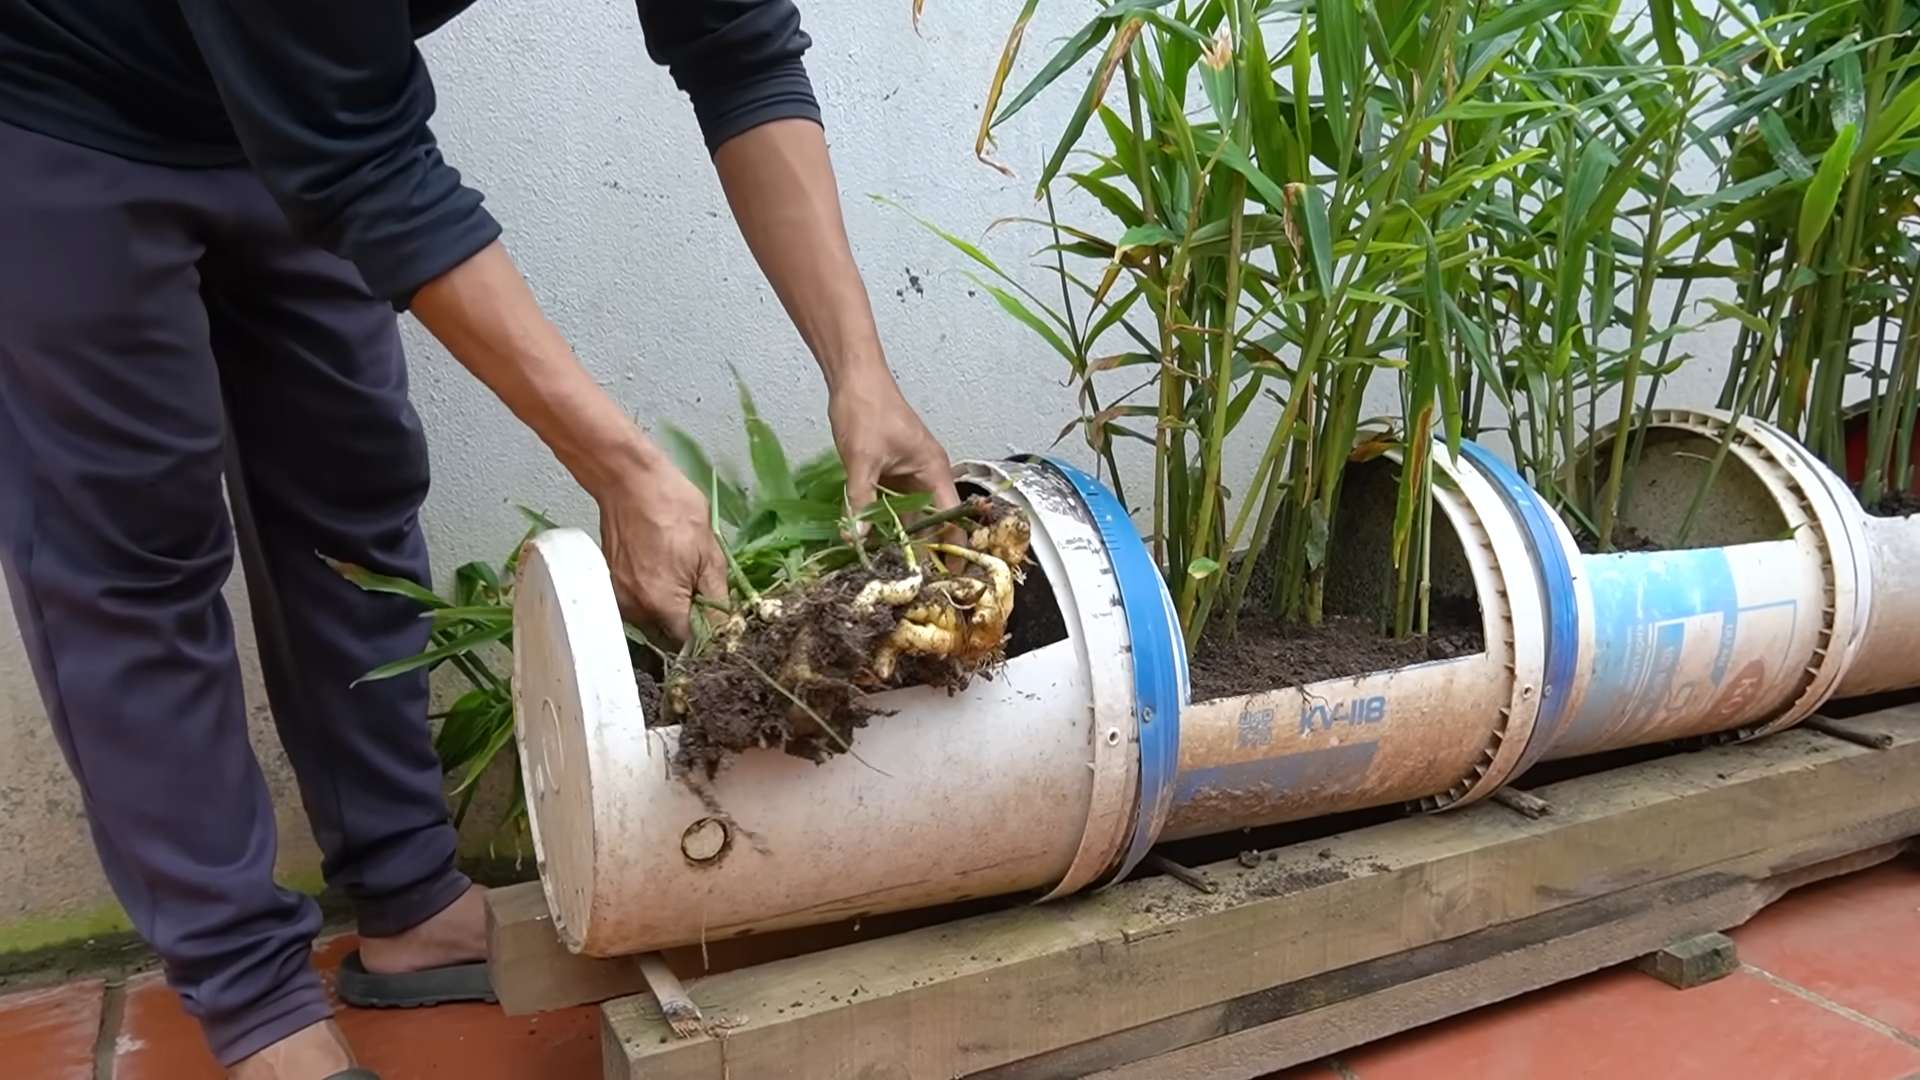
Harvesting Your Ginger
The moment you’ve been waiting for! Harvesting your own homegrown ginger is incredibly satisfying.
1. When to Harvest: You can start harvesting ginger about 3-4 months after planting. The leaves will start to turn yellow and die back, indicating that the rhizomes are mature.
2. Partial Harvest: For a continuous supply of ginger, you can do a partial harvest. Gently dig around the edges of the pot and harvest a few rhizomes, leaving the rest to continue growing.
3. Full Harvest: For a full harvest, carefully dig up the entire plant, being careful not to damage the rhizomes.
4. Cleaning and Storing: Wash the harvested ginger rhizomes thoroughly to remove any soil. You can store them in the refrigerator for several weeks or freeze them for longer storage. To freeze, peel and chop the ginger, then store it in an airtight container or freezer bag.
Troubleshooting Common Issues
Even with the best care, you might encounter a few challenges along the way. Here are some common issues and how to address them:
* Yellowing Leaves: This could be a sign of overwatering, underwatering, or nutrient deficiency. Check the soil moisture and adjust your watering accordingly. Fertilize the plant if necessary.
* Root Rot: This is caused by overwatering and poor drainage. Make sure your pot has drainage holes and use a well-draining potting mix. If you suspect root rot, remove the affected rhizomes and repot the plant in fresh soil.
* Lack of Growth: This could be due to insufficient sunlight, low temperatures, or poor soil. Move the plant to a brighter location, ensure the temperature is warm enough, and fertilize the plant.
* Pests: Aphids and spider mites can infest ginger plants. Treat them with insecticidal soap or neem oil.
Propagating Ginger
Want to expand your ginger empire? Propagating ginger is easy!
1. Dividing the Rhizomes: When you harvest your ginger, you can divide the rhizomes into smaller pieces, ensuring each piece has at least one or two “eyes.”
2. Planting the Divisions: Plant the divisions in separate pots, following the same planting instructions as above.
3. Caring for the New Plants: Care for the new plants as you would your original ginger plant.
Extra Tips for Success
Here are a few extra tips to help you grow the best ginger possible:
* Use a Large Pot: Ginger roots spread horizontally, so a larger pot will give them more room to grow.
* Amend the Soil: Adding compost or other organic matter to the soil will improve its drainage and fertility.
* Mulch the Soil: Mulching the soil with straw or wood chips will help to retain moisture and suppress weeds.
* Rotate Your Crops: If you’re growing ginger in the ground, rotate your crops each year to prevent soilborne diseases.
* Be Patient: Growing ginger takes time, so don’t get discouraged if you don’t see results immediately. With proper care, you’ll be harvesting your own homegrown ginger in no time!
Ginger Varieties to Consider
While common ginger is the most readily available, there are other varieties you might want to explore:
* Galangal: Also known as Thai ginger, it has a citrusy, pine-like flavor.
* Turmeric: Closely related to ginger, turmeric is known for its vibrant color and medicinal properties. You can grow it using the same methods as ginger.
* Zedoary: Also known as white turmeric, it has a camphor-like aroma and a slightly bitter taste.
Using Your Homegrown Ginger
Now that you’ve harvested your own ginger, it’s time to put it to good use! Here are just a few ideas:
* Cooking: Add fresh ginger to stir-fries, soups, curries, and other dishes.
* Tea: Brew a soothing ginger tea by steeping sliced ginger in hot water.
* Smoothies: Add a small piece of ginger to your smoothies for a spicy kick.
* Baking: Use grated ginger in cookies, cakes, and other
Conclusion
So, there you have it! Growing ginger at home isn’t just a fun project; it’s a gateway to fresher, more flavorful meals and a deeper connection with the food you consume. Ditch the store-bought ginger that’s been sitting on shelves for who knows how long and embrace the vibrant, zesty goodness of homegrown ginger.
Why is this DIY trick a must-try? Because it empowers you to control the quality and freshness of your ginger. Imagine the satisfaction of harvesting your own rhizomes, knowing exactly where they came from and how they were grown. Plus, it’s incredibly rewarding to witness the entire life cycle of this amazing plant, from a humble rhizome to a thriving, leafy specimen. You’ll never look at ginger the same way again!
But the benefits don’t stop there. Growing your own ginger allows you to experiment with different varieties. While common ginger is readily available, you can explore other types like galangal or turmeric, each offering unique flavors and culinary applications. Think of the possibilities! Galangal adds a citrusy, piney note to Thai curries, while turmeric boasts a vibrant color and earthy flavor, perfect for golden milk lattes and Indian dishes.
Feeling adventurous? Consider growing your ginger in a container garden alongside other herbs and spices. A small pot of ginger nestled amongst basil, mint, and chili peppers creates a fragrant and visually appealing display. It’s a fantastic way to maximize your space and have a variety of fresh ingredients at your fingertips.
For those living in colder climates, don’t despair! Growing ginger indoors is entirely feasible. Simply provide a warm, sunny location and ensure the soil remains consistently moist. You can even use a grow light to supplement natural sunlight during the winter months. With a little care and attention, you can enjoy homegrown ginger year-round, regardless of your climate.
We encourage you to take the plunge and embark on your own ginger-growing adventure. It’s a simple, satisfying, and ultimately delicious experience. Don’t be afraid to experiment with different techniques, soil types, and growing locations. The beauty of DIY is that there’s no one right way to do things.
And most importantly, we want to hear about your experiences! Share your tips, tricks, and triumphs in the comments below. Let us know what worked for you, what challenges you faced, and what delicious dishes you created with your homegrown ginger. Together, we can build a community of passionate ginger growers and inspire others to embrace the joys of DIY gardening. So, get your hands dirty, nurture your ginger, and savor the flavor of success! Let’s get growing ginger at home!
Frequently Asked Questions (FAQ)
1. What kind of ginger should I plant?
The best type of ginger to plant is fresh ginger root (rhizome) that you can find at most grocery stores or Asian markets. Look for rhizomes that are plump, firm, and have visible “eyes” or buds. Organic ginger is often recommended as it’s less likely to have been treated with growth inhibitors. You can also explore different varieties of ginger, such as galangal or turmeric, depending on your culinary preferences. Each offers a unique flavor profile.
2. How long does it take to grow ginger?
Ginger typically takes around 8-10 months to mature fully. However, you can start harvesting small pieces of ginger after about 4 months. The longer you let it grow, the larger and more flavorful the rhizomes will become. Be patient, and you’ll be rewarded with a bountiful harvest.
3. What is the best soil for growing ginger?
Ginger thrives in well-draining, nutrient-rich soil. A mixture of potting soil, compost, and perlite is ideal. The compost provides essential nutrients, while the perlite ensures good drainage, preventing the rhizomes from rotting. Avoid heavy clay soils, as they can retain too much moisture.
4. How much sunlight does ginger need?
Ginger prefers partial shade, especially in hot climates. Direct sunlight can scorch the leaves. A location that receives morning sun and afternoon shade is perfect. If growing indoors, place your ginger plant near a bright window, but shield it from intense midday sun.
5. How often should I water my ginger plant?
Keep the soil consistently moist, but not waterlogged. Water thoroughly when the top inch of soil feels dry to the touch. During the growing season (spring and summer), you may need to water more frequently. Reduce watering slightly during the dormant season (fall and winter).
6. What are some common problems when growing ginger?
Some common problems include rhizome rot, leaf spot, and pests like aphids and spider mites. Rhizome rot is usually caused by overwatering or poor drainage. Leaf spot can be prevented by ensuring good air circulation. Pests can be controlled with insecticidal soap or neem oil. Regularly inspect your plants for any signs of trouble and take action promptly.
7. Can I grow ginger in a container?
Yes, ginger grows very well in containers. Choose a pot that is at least 12 inches deep and wide to allow the rhizomes to spread. Make sure the pot has drainage holes to prevent waterlogging. Container gardening is a great option for those with limited space or those living in colder climates.
8. How do I harvest ginger?
To harvest ginger, gently dig around the plant and lift the rhizomes from the soil. You can harvest the entire plant or just take a few pieces as needed. If you only harvest a portion, be sure to leave some rhizomes in the ground to continue growing. Wash the harvested ginger thoroughly and store it in the refrigerator or freezer.
9. Can I eat the ginger leaves?
Yes, ginger leaves are edible and have a mild ginger flavor. They can be used in salads, soups, and stir-fries. The leaves are also a great addition to teas and other beverages.
10. How do I store harvested ginger?
Freshly harvested ginger can be stored in the refrigerator for several weeks. Wrap it in a paper towel and place it in a plastic bag to prevent it from drying out. For longer storage, you can freeze ginger. Peel and chop the ginger into smaller pieces, then freeze them in a single layer on a baking sheet. Once frozen, transfer the pieces to a freezer bag or container. You can also grate the ginger before freezing it.
11. Is growing ginger at home organic?
Whether your ginger is organic depends on the methods you use. If you use organic soil, organic fertilizer, and avoid synthetic pesticides and herbicides, then your ginger will be considered organic. Always check the labels of your soil and fertilizers to ensure they are certified organic.
12. What fertilizer should I use for growing ginger?
Ginger benefits from regular feeding with a balanced organic fertilizer. Look for a fertilizer that is rich in nitrogen, phosphorus, and potassium. You can also use compost tea or fish emulsion to provide essential nutrients. Fertilize your ginger plant every 2-3 weeks during the growing season.

Leave a Comment