

Growing Shallots at Home can feel like unlocking a secret garden superpower! Have you ever dreamt of snipping fresh, flavorful shallots right from your backyard, adding that gourmet touch to your dishes without a trip to the grocery store? Well, dream no more! This DIY guide is your key to transforming your garden (or even a sunny windowsill!) into a shallot haven.
Shallots, with their delicate onion-garlic flavor, have been prized for centuries. Originating in Central or Southeast Asia, they’ve journeyed across continents, becoming a staple in cuisines worldwide. From French sauces to Asian stir-fries, shallots add a depth of flavor that’s simply irresistible. I think that’s why I love them so much!
But why bother growing them yourself? In today’s world, where we’re all striving for healthier, more sustainable lifestyles, growing shallots at home offers a fantastic way to connect with nature and control the quality of your food. Plus, store-bought shallots can sometimes be pricey and lack that fresh-from-the-earth vibrancy. This DIY trick not only saves you money but also guarantees you’ll always have a supply of these culinary gems at your fingertips. So, let’s dive in and discover how easy it is to cultivate your own shallot bounty!
Growing Shallots at Home: A Beginner’s Guide
Hey there, fellow gardening enthusiasts! I’m so excited to share my experience with growing shallots at home. Shallots are like the sophisticated cousins of onions and garlic, adding a delicate, slightly sweet flavor to your dishes. And the best part? They’re relatively easy to grow, even if you’re a beginner like I was! This guide will walk you through everything you need to know, from choosing the right shallots to harvesting your bountiful crop.
Choosing Your Shallots
Before we dive into the planting process, let’s talk about selecting the right shallots. You have two main options:
* Sets (Bulbs): These are small, immature shallots that are ready to be planted directly into the ground. They’re the easiest option for beginners, and what I recommend starting with. Look for firm, healthy bulbs without any signs of mold or rot.
* Seeds: While it’s possible to grow shallots from seed, it takes longer and requires more patience. I haven’t tried this method myself yet, but I’ve heard it can be rewarding. If you’re feeling adventurous, go for it!
When choosing sets, consider the variety. Some popular options include:
* French Red Shallots: Known for their mild, sweet flavor and beautiful reddish-purple skin.
* Dutch Yellow Shallots: A classic choice with a slightly stronger flavor and golden-brown skin.
* Gray Shallots (Griselle): These have a more pungent, almost garlicky flavor and are prized by chefs.
I usually opt for French Red or Dutch Yellow because they’re readily available at my local garden center and offer a great balance of flavor and ease of growth.
Preparing Your Garden Bed
Shallots thrive in well-drained soil that’s rich in organic matter. Here’s how I prepare my garden bed:
* Choose a Sunny Location: Shallots need at least 6 hours of sunlight per day.
* Test Your Soil: A soil test will tell you the pH level and nutrient content of your soil. Shallots prefer a pH between 6.0 and 7.0. You can purchase a soil testing kit at most garden centers or send a sample to your local agricultural extension office.
* Amend the Soil: Based on your soil test results, you may need to amend the soil. If your soil is too acidic, add lime. If it’s too alkaline, add sulfur. To improve drainage and fertility, incorporate plenty of compost or well-rotted manure. I usually add a generous layer of compost to my garden bed before planting.
* Loosen the Soil: Use a garden fork or tiller to loosen the soil to a depth of at least 12 inches. This will allow the shallot roots to penetrate easily.
* Remove Weeds and Rocks: Clear the area of any weeds, rocks, or other debris. Weeds can compete with your shallots for nutrients and water, so it’s important to get rid of them before planting.
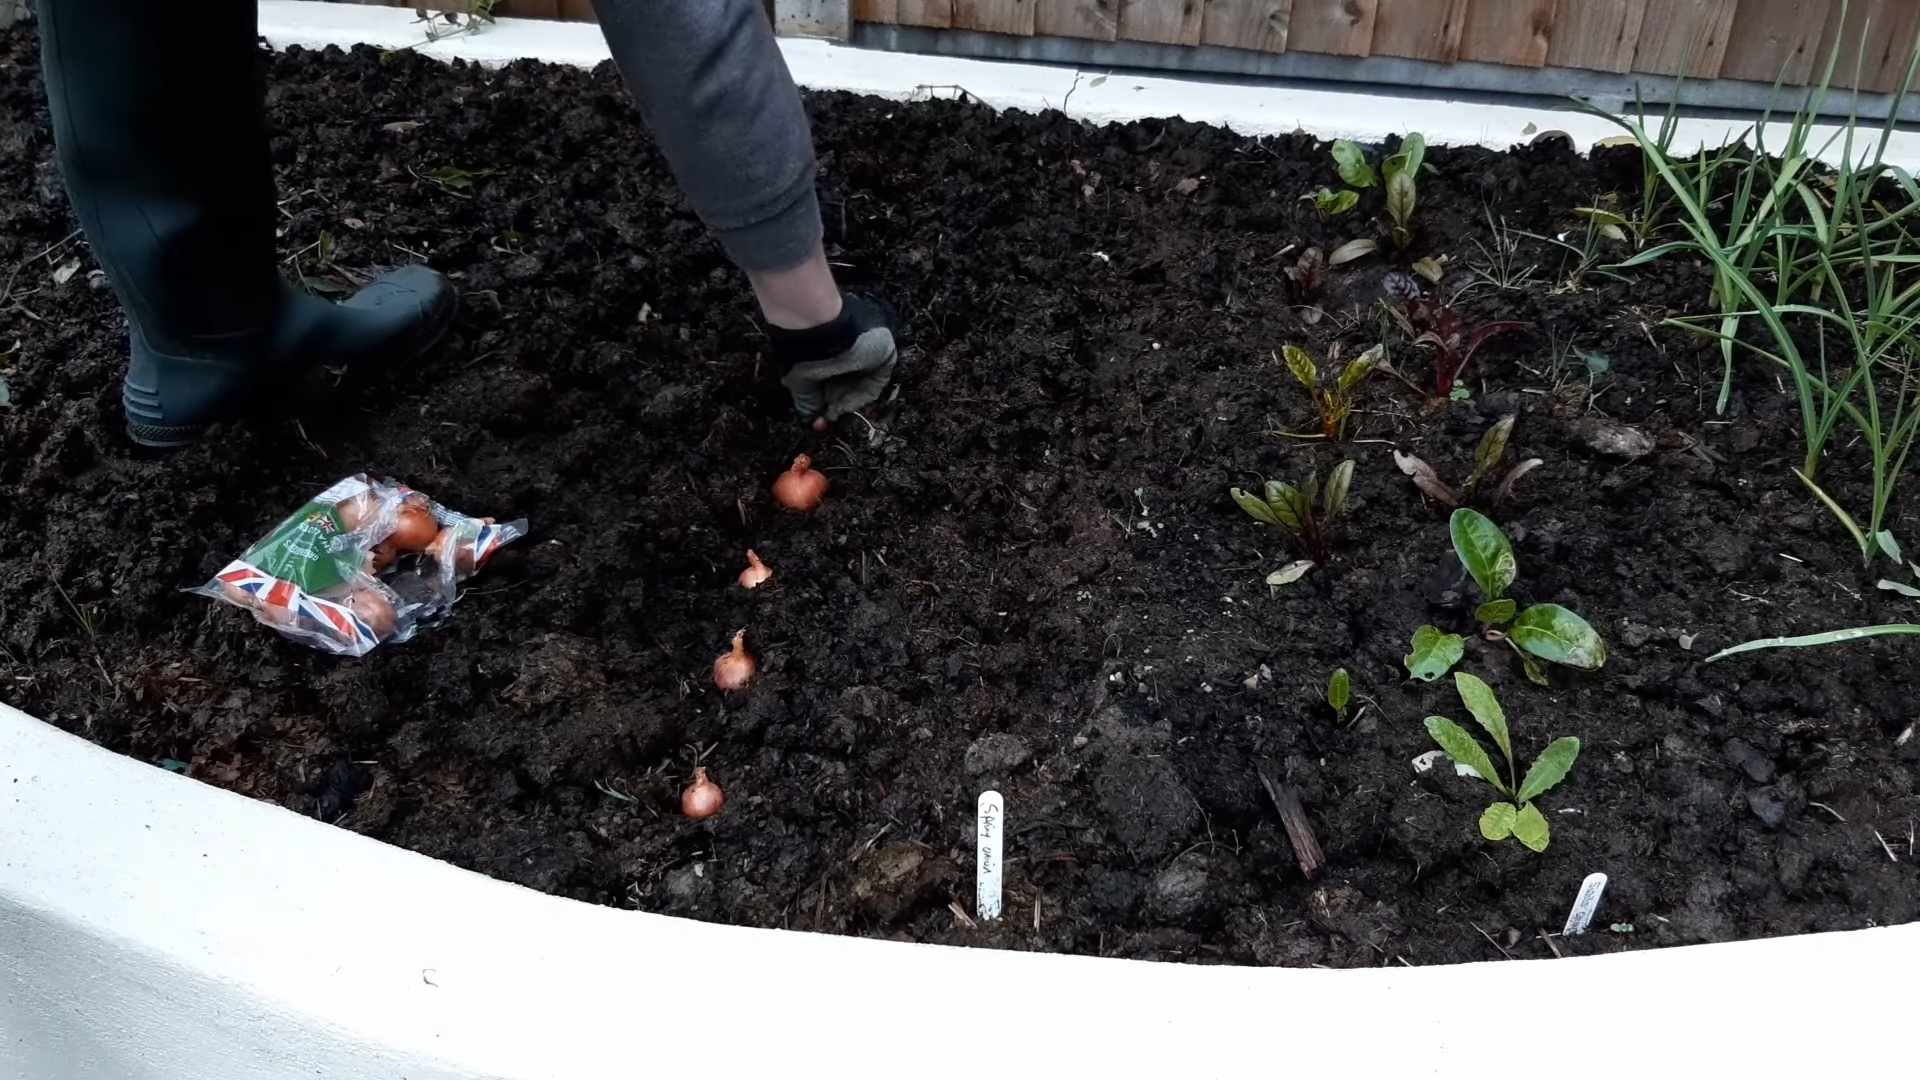
Planting Your Shallots
Now for the fun part – planting! Here’s my step-by-step guide:
1. Timing is Key: The best time to plant shallots is in the fall (September or October) in mild-winter climates, or in early spring (as soon as the ground can be worked) in colder climates. I live in a mild-winter area, so I usually plant mine in October.
2. Spacing: Plant the shallot sets about 6-8 inches apart in rows that are 12-18 inches apart. This gives them enough room to grow and prevents overcrowding.
3. Planting Depth: Plant the sets with the pointed end facing up, just barely covering the top of the bulb with soil. You should only see the very tip of the shallot peeking out.
4. Water Thoroughly: After planting, water the shallots thoroughly to help them settle in.
5. Mulch (Optional): I like to add a layer of mulch around my shallots to help retain moisture, suppress weeds, and regulate soil temperature. Straw, shredded leaves, or wood chips are all good options.
Caring for Your Shallots
Once your shallots are planted, it’s important to provide them with proper care. Here’s what I do:
* Watering: Water regularly, especially during dry periods. Shallots need consistent moisture to thrive, but avoid overwatering, which can lead to rot. I usually water deeply once or twice a week, depending on the weather.
* Weeding: Keep the area around your shallots free of weeds. Hand-pulling is the best method, as it avoids damaging the shallot roots.
* Fertilizing: Shallots are not heavy feeders, but they benefit from a light feeding of fertilizer. I usually apply a balanced organic fertilizer (like a 5-5-5) a few weeks after planting and again in the spring. Follow the instructions on the fertilizer package.
* Pest and Disease Control: Shallots are generally resistant to pests and diseases, but they can be susceptible to onion maggots, thrips, and fungal diseases. Inspect your plants regularly for any signs of problems. If you notice any pests, you can try using insecticidal soap or neem oil. For fungal diseases, ensure good air circulation and avoid overwatering. I haven’t had too many problems with pests or diseases, thankfully!
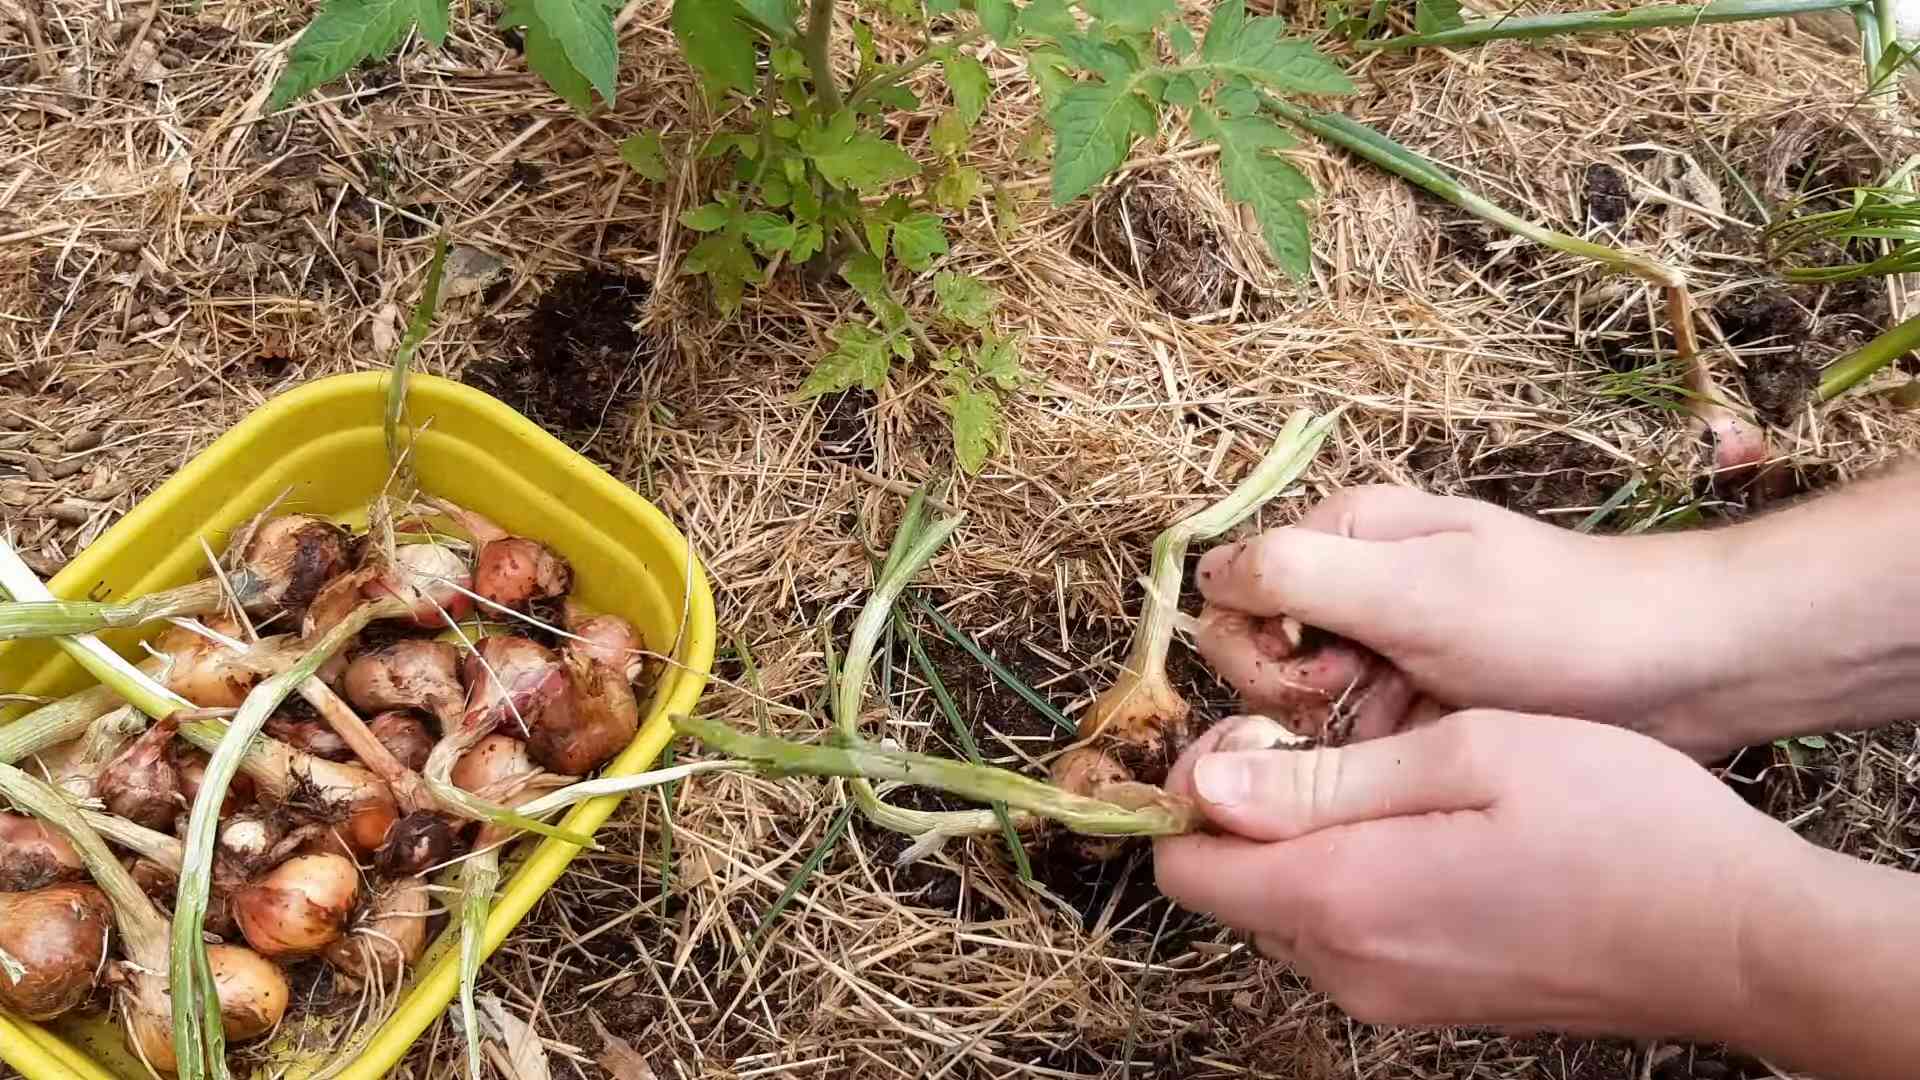
Harvesting Your Shallots
The moment we’ve all been waiting for – harvesting! Here’s how I know when my shallots are ready:
* Timing: Shallots are typically ready to harvest in the summer, about 90-120 days after planting.
* Signs of Maturity: The leaves will start to turn yellow and brown, and the tops will begin to fall over. This is a sign that the bulbs have stopped growing and are ready to be harvested.
* Harvesting Technique: Gently loosen the soil around the shallots with a garden fork and carefully lift them out of the ground. Be careful not to damage the bulbs.
* Curing: After harvesting, cure the shallots in a warm, dry, well-ventilated place for 2-3 weeks. This allows the outer skins to dry and toughen, which helps to prevent rot during storage. I usually cure mine in my garage, spreading them out on a screen or in shallow boxes.
* Storage: Once the shallots are cured, store them in a cool, dry, dark place. They should last for several months. I store mine in a mesh bag in my pantry.
Troubleshooting
Even with the best care, you might encounter some problems while growing shallots. Here are a few common issues and how to address them:
* Shallots Not Bulbing: This can be caused by several factors, including poor soil, insufficient sunlight, or planting too late. Make sure your soil is well-drained and rich in organic matter, and that your shallots are getting at least 6 hours of sunlight per day. If you planted too late, try planting earlier next year.
* Yellowing Leaves: Yellowing leaves can be a sign of overwatering, underwatering, or nutrient deficiency. Check the soil moisture and adjust your watering accordingly. If you suspect a nutrient deficiency, apply a balanced fertilizer.
* Rotting Bulbs: Rotting bulbs are usually caused by overwatering or poor drainage. Make sure your soil is well-drained and avoid overwatering. You can also try adding some sand or perlite to the soil to improve drainage.
* Pest Infestations: As mentioned earlier, shallots can be susceptible to onion maggots, thrips, and other pests. Inspect your plants regularly and take action if you notice any problems.
Enjoying Your Harvest
Now that you’ve harvested your shallots, it’s time to enjoy the fruits (or rather, bulbs!) of your labor. Shallots can be used in a variety of dishes, from soups and stews to sauces and salads. They add a delicate, slightly sweet flavor that’s hard to resist.
Here are a few of my favorite ways to use shallots:
* Shallot Vinaigrette: This is a classic dressing that’s perfect for salads. Simply whisk together minced shallots, olive oil, vinegar, Dijon mustard, and a pinch of salt and pepper.
* Caramelized Shallots: These are delicious served as a topping for burgers, sandwiches, or grilled meats. Simply slice the shallots thinly and cook them slowly in butter or olive oil until they’re soft and caramelized.
* Shallot and Herb Butter: This is a flavorful compound butter that’s perfect for spreading on bread or melting over vegetables. Simply mix softened butter with minced shallots, fresh herbs (like parsley, thyme, or chives), and a pinch of salt and pepper.
* French Onion Soup: Shallots add a depth of flavor to this classic soup.
Growing shallots at home is a rewarding experience that anyone can
Conclusion
So, there you have it! Growing shallots at home, while it might seem daunting at first, is surprisingly accessible and incredibly rewarding. We’ve covered everything from selecting the right shallot sets to harvesting your flavorful bounty. But why should you bother with this DIY project when you can simply buy shallots at the grocery store? The answer lies in the unparalleled freshness, the superior flavor, and the sheer satisfaction of nurturing something from the earth to your table.
Think about it: commercially grown shallots often travel long distances, losing precious flavor and nutrients along the way. By growing your own, you’re guaranteeing the freshest possible product, bursting with the pungent, slightly sweet taste that makes shallots so unique. Plus, you have complete control over the growing process, ensuring that your shallots are grown organically and free from harmful pesticides.
But the benefits don’t stop there. Growing shallots at home is also a fantastic way to connect with nature, reduce your carbon footprint, and save money in the long run. Imagine the pride you’ll feel when you use your own homegrown shallots in your favorite recipes, knowing that you played a direct role in creating that delicious meal.
And don’t be afraid to experiment! Try different varieties of shallots to discover your personal favorite. Some gardeners prefer the milder flavor of French Grey shallots, while others swear by the robust taste of Dutch Yellow shallots. You can also explore different planting methods, such as growing shallots in raised beds or containers, to suit your specific space and needs.
Consider companion planting your shallots with carrots or chamomile to deter pests and improve their growth. You could even try pickling some of your harvest for a tangy treat that will last throughout the winter months. The possibilities are endless!
Ultimately, the best way to discover the joys of growing shallots at home is to simply give it a try. Don’t be intimidated by the learning curve. Start small, be patient, and learn from your mistakes. With a little bit of effort and attention, you’ll be rewarded with a bountiful harvest of delicious, homegrown shallots that will elevate your cooking to a whole new level.
We encourage you to embark on this exciting gardening adventure and share your experiences with us! Let us know what varieties you’re growing, what challenges you’ve faced, and what successes you’ve achieved. Your insights will help other aspiring gardeners discover the joys of growing shallots at home. So, grab your gardening gloves, get your hands dirty, and start growing your own shallots today! You won’t regret it.
Frequently Asked Questions (FAQ)
What is the best time of year to plant shallots?
The ideal time to plant shallots depends on your climate. In regions with mild winters, you can plant shallots in the fall (September-November) for a summer harvest. In colder climates, it’s best to plant shallots in the early spring (March-April) as soon as the ground is workable. Planting in the fall allows the shallots to establish roots before winter, resulting in a larger bulb size the following summer. Spring planting is still effective, but the bulbs may not reach the same size as fall-planted shallots. Consider your local climate and growing season when determining the best planting time.
How much space do shallots need to grow?
Shallots require adequate spacing to allow for proper bulb development. A general guideline is to space shallot sets about 6-8 inches apart in rows that are 12-18 inches apart. This spacing provides enough room for the bulbs to expand without overcrowding. If you’re growing shallots in containers, make sure the container is large enough to accommodate the number of shallots you plan to plant. A good rule of thumb is to allow at least 4-6 inches of space between each shallot in a container. Proper spacing is crucial for maximizing your shallot yield and preventing disease.
What kind of soil is best for growing shallots?
Shallots thrive in well-drained, fertile soil that is rich in organic matter. The ideal soil pH for shallots is between 6.0 and 7.0. Before planting, amend the soil with compost or well-rotted manure to improve its fertility and drainage. Avoid heavy clay soils, as they can retain too much moisture and lead to bulb rot. If you have clay soil, consider growing shallots in raised beds or containers with a well-draining potting mix. Regular soil testing can help you determine if your soil needs any amendments to meet the specific needs of shallots.
How often should I water my shallots?
Shallots need consistent moisture, especially during bulb formation. Water deeply whenever the top inch of soil feels dry to the touch. Avoid overwatering, as this can lead to bulb rot. During periods of heavy rainfall, you may need to reduce watering frequency. Mulching around the shallots can help retain moisture and suppress weeds. Monitor the soil moisture regularly and adjust your watering schedule accordingly.
How do I know when my shallots are ready to harvest?
Shallots are typically ready to harvest when the tops begin to turn yellow and fall over. This usually occurs in mid-summer. Once the tops have fallen over, stop watering the shallots to allow the bulbs to cure. After a week or two, carefully dig up the shallots and allow them to dry in a well-ventilated area for several days. Once the outer skins are dry and papery, the shallots are ready to be stored.
Can I grow shallots from seed?
While it is possible to grow shallots from seed, it is a much slower and more challenging process than growing them from sets. Shallots grown from seed typically take longer to mature and may not produce bulbs as large as those grown from sets. If you choose to grow shallots from seed, start them indoors several weeks before the last expected frost. Transplant the seedlings outdoors once the weather has warmed up and the risk of frost has passed. Be prepared to be patient, as it may take a full growing season or longer for the shallots to reach maturity.
How do I store shallots properly?
Proper storage is essential for preserving the quality of your shallots. After harvesting and curing, store shallots in a cool, dry, and well-ventilated place. A temperature between 32°F and 40°F (0°C and 4°C) is ideal. Avoid storing shallots in the refrigerator, as the humidity can cause them to sprout or rot. You can store shallots in mesh bags or loosely woven baskets to allow for good air circulation. Properly stored shallots can last for several months.
What are some common pests and diseases that affect shallots?
Shallots can be susceptible to various pests and diseases, including onion maggots, thrips, and fungal diseases such as downy mildew and white rot. To prevent pest and disease problems, practice good garden hygiene, such as removing plant debris and weeds. Rotate your crops regularly to avoid building up pest and disease populations in the soil. Use organic pest control methods, such as insecticidal soap or neem oil, to control pests. Ensure good air circulation around the plants to prevent fungal diseases. If you notice any signs of pests or diseases, take action promptly to prevent them from spreading.
Can I grow shallots in containers?
Yes, shallots can be successfully grown in containers, making them a great option for gardeners with limited space. Choose a container that is at least 8-10 inches deep and has good drainage holes. Use a well-draining potting mix and amend it with compost or other organic matter. Space the shallot sets about 4-6 inches apart in the container. Water regularly and fertilize every few weeks with a balanced fertilizer. Place the container in a sunny location that receives at least 6 hours of sunlight per day.
What are some good companion plants for shallots?
Companion planting can be beneficial for shallots, as certain plants can help deter pests, improve growth, or enhance flavor. Some good companion plants for shallots include carrots, chamomile, rosemary, and thyme. Carrots can help deter onion maggots, while chamomile can attract beneficial insects and improve the overall health of the plants. Rosemary and thyme can help repel pests and enhance the flavor of the shallots. Avoid planting shallots near beans or peas, as they can inhibit their growth.

Leave a Comment