

Growing Tomatoes at Home can feel like a daunting task, especially if you’re new to gardening. But trust me, the reward of biting into a sun-ripened, juicy tomato that you’ve nurtured yourself is absolutely worth the effort! Imagine transforming your balcony, patio, or even a sunny windowsill into a miniature tomato farm. This isn’t just about saving money at the grocery store; it’s about connecting with nature, enjoying the therapeutic benefits of gardening, and savoring the unmatched flavor of homegrown produce.
Tomatoes have a rich history, originating in South America and gradually making their way into cuisines worldwide. From the vibrant sauces of Italy to the refreshing salads of the Mediterranean, tomatoes have become a culinary staple. But did you know that for a long time, Europeans were wary of tomatoes, believing them to be poisonous? Thankfully, that myth has long been debunked, and today, tomatoes are celebrated for their delicious taste and nutritional value.
So, why should you try growing tomatoes at home? Well, store-bought tomatoes often lack the intense flavor and sweetness of homegrown varieties. Plus, you have complete control over the growing process, ensuring that your tomatoes are free from harmful pesticides and chemicals. In this article, I’m going to share some simple yet effective DIY tricks and hacks that will help you cultivate a thriving tomato garden, even if you have limited space or experience. Get ready to roll up your sleeves and discover the joy of harvesting your very own delicious tomatoes!
Growing Tomatoes at Home: A Beginner’s Guide to Juicy Success
Okay, tomato lovers, let’s get our hands dirty! I’m going to walk you through everything you need to know to grow delicious, sun-ripened tomatoes right in your own backyard (or even on your balcony!). Trust me, there’s nothing quite like the taste of a homegrown tomato, and it’s way easier than you might think.
Choosing the Right Tomato Variety
First things first, you need to decide what kind of tomatoes you want to grow. There are literally hundreds of varieties, so it can be a little overwhelming. Here’s a quick rundown to help you choose:
* **Determinate vs. Indeterminate:** This is a big one! Determinate tomatoes grow to a certain size and then produce all their fruit at once, making them great for canning. Indeterminate tomatoes keep growing and producing fruit throughout the season. I personally prefer indeterminate because I love having fresh tomatoes all summer long.
* **Cherry Tomatoes:** Small, sweet, and perfect for snacking. They’re also generally pretty easy to grow.
* **Roma Tomatoes:** These are the classic paste tomatoes, ideal for making sauces and salsas.
* **Beefsteak Tomatoes:** Big, juicy, and perfect for slicing on sandwiches.
* **Heirloom Tomatoes:** These are older varieties that often have unique flavors and colors. They can be a bit more finicky to grow, but the taste is worth it!
Consider your space and what you plan to use the tomatoes for when making your decision.
Getting Started: Seeds vs. Seedlings
You have two options here: starting from seeds or buying seedlings (also called transplants) from a nursery.
* **Starting from Seeds:** This is the more economical option, and it gives you a wider variety to choose from. However, it requires a bit more time and effort. You’ll need to start your seeds indoors about 6-8 weeks before the last expected frost in your area.
* **Buying Seedlings:** This is the easier option, especially for beginners. You can find seedlings at most garden centers in the spring. Just make sure to choose healthy-looking plants with no signs of disease or pests.
I’ve done both, and honestly, if you’re short on time or just starting out, seedlings are the way to go. But if you’re feeling adventurous, give seeds a try!
Starting Seeds Indoors (If You Choose That Route)
Okay, so you’re going the seed route? Awesome! Here’s what you’ll need:
* **Seed Starting Trays or Pots:** You can use plastic seed starting trays, peat pots, or even recycled yogurt containers (just make sure to poke drainage holes in the bottom!).
* **Seed Starting Mix:** This is a special soil mix that’s designed for starting seeds. It’s lighter and more sterile than regular potting soil.
* **Tomato Seeds:** Obviously!
* **Grow Lights:** These are essential for providing enough light to your seedlings. A simple fluorescent shop light will do the trick.
* **Heat Mat (Optional):** This can help speed up germination.
Now, let’s get planting!
1. **Fill your seed starting trays or pots with seed starting mix.** Gently press down on the soil to remove any air pockets.
2. **Sow the seeds.** Plant 2-3 seeds per cell or pot, about 1/4 inch deep.
3. **Water gently.** Use a spray bottle to moisten the soil.
4. **Cover the trays or pots with a clear plastic dome or plastic wrap.** This will help to create a humid environment.
5. **Place the trays or pots on a heat mat (if using) and under the grow lights.** Keep the lights on for 14-16 hours per day.
6. **Once the seeds germinate (usually within 7-14 days), remove the plastic dome or wrap.**
7. **Thin the seedlings.** Once the seedlings have their first true leaves (the second set of leaves), thin them to one plant per cell or pot. Choose the strongest-looking seedling and snip off the others at the soil line.
8. **Water regularly.** Keep the soil moist but not soggy.
9. **Fertilize.** Start fertilizing the seedlings with a diluted liquid fertilizer (like fish emulsion) once they have their second set of true leaves.
Preparing Your Garden Bed or Containers
Whether you’re using seedlings or starting from seeds, you’ll need to prepare your garden bed or containers before planting.
* **Sunlight:** Tomatoes need at least 6-8 hours of sunlight per day. Choose a location that gets plenty of sun.
* **Soil:** Tomatoes prefer well-drained soil that’s rich in organic matter. If your soil is heavy clay or sandy, amend it with compost or other organic matter.
* **Containers:** If you’re growing tomatoes in containers, choose pots that are at least 18 inches in diameter. Make sure the pots have drainage holes.
Here’s how I prepare my garden bed:
1. **Clear the area of any weeds or debris.**
2. **Dig in plenty of compost or other organic matter.** I usually add a few inches of compost to the topsoil and mix it in well.
3. **Test the soil pH.** Tomatoes prefer a slightly acidic soil pH of around 6.0-6.8. You can buy a soil testing kit at most garden centers. If your soil is too alkaline, you can add sulfur to lower the pH.
4. **Add fertilizer.** I like to add a slow-release fertilizer to the soil before planting. This will provide the tomatoes with a steady supply of nutrients throughout the season.
Transplanting Seedlings (Whether You Grew Them or Bought Them)
Okay, your seedlings are ready to go outside! Here’s how to transplant them:
1. **Harden off the seedlings.** This means gradually exposing them to outdoor conditions over a period of about a week. Start by placing them outside in a sheltered location for a few hours each day, gradually increasing the amount of time they spend outdoors.
2. **Choose a cloudy day to transplant.** This will help to prevent the seedlings from getting stressed.
3. **Dig a hole that’s slightly larger than the root ball of the seedling.**
4. **Gently remove the seedling from its pot.** If the roots are circling around the bottom of the pot, gently loosen them.
5. **Place the seedling in the hole.** Plant the seedling deep, burying the stem up to the first set of leaves. This will encourage the plant to develop more roots.
6. **Fill the hole with soil and gently firm it around the plant.**
7. **Water thoroughly.**
8. **Add a stake or cage.** Tomatoes can get quite tall and heavy, so it’s important to provide them with support. I prefer using tomato cages, but you can also use stakes.
Caring for Your Tomato Plants
Now that your tomatoes are planted, it’s time to take care of them!
* **Watering:** Tomatoes need consistent watering, especially during hot, dry weather. Water deeply and regularly, aiming to keep the soil moist but not soggy. I usually water my tomatoes every other day, or more often if it’s really hot.
* **Fertilizing:** Continue to fertilize your tomatoes every few weeks with a balanced fertilizer.
* **Pruning:** Pruning can help to improve air circulation and prevent diseases. For indeterminate tomatoes, I usually prune off the suckers (the small shoots that grow between the main stem and the branches).
* **Pest Control:** Keep an eye out for pests like aphids, tomato hornworms, and whiteflies. You can control these pests with insecticidal soap or other organic pest control methods.
* **Disease Control:** Tomatoes are susceptible to several diseases, including early blight, late blight, and blossom end rot. To prevent diseases, make sure to provide good air circulation, water properly, and avoid overhead watering. If you do notice signs of disease, treat the plants with a fungicide.
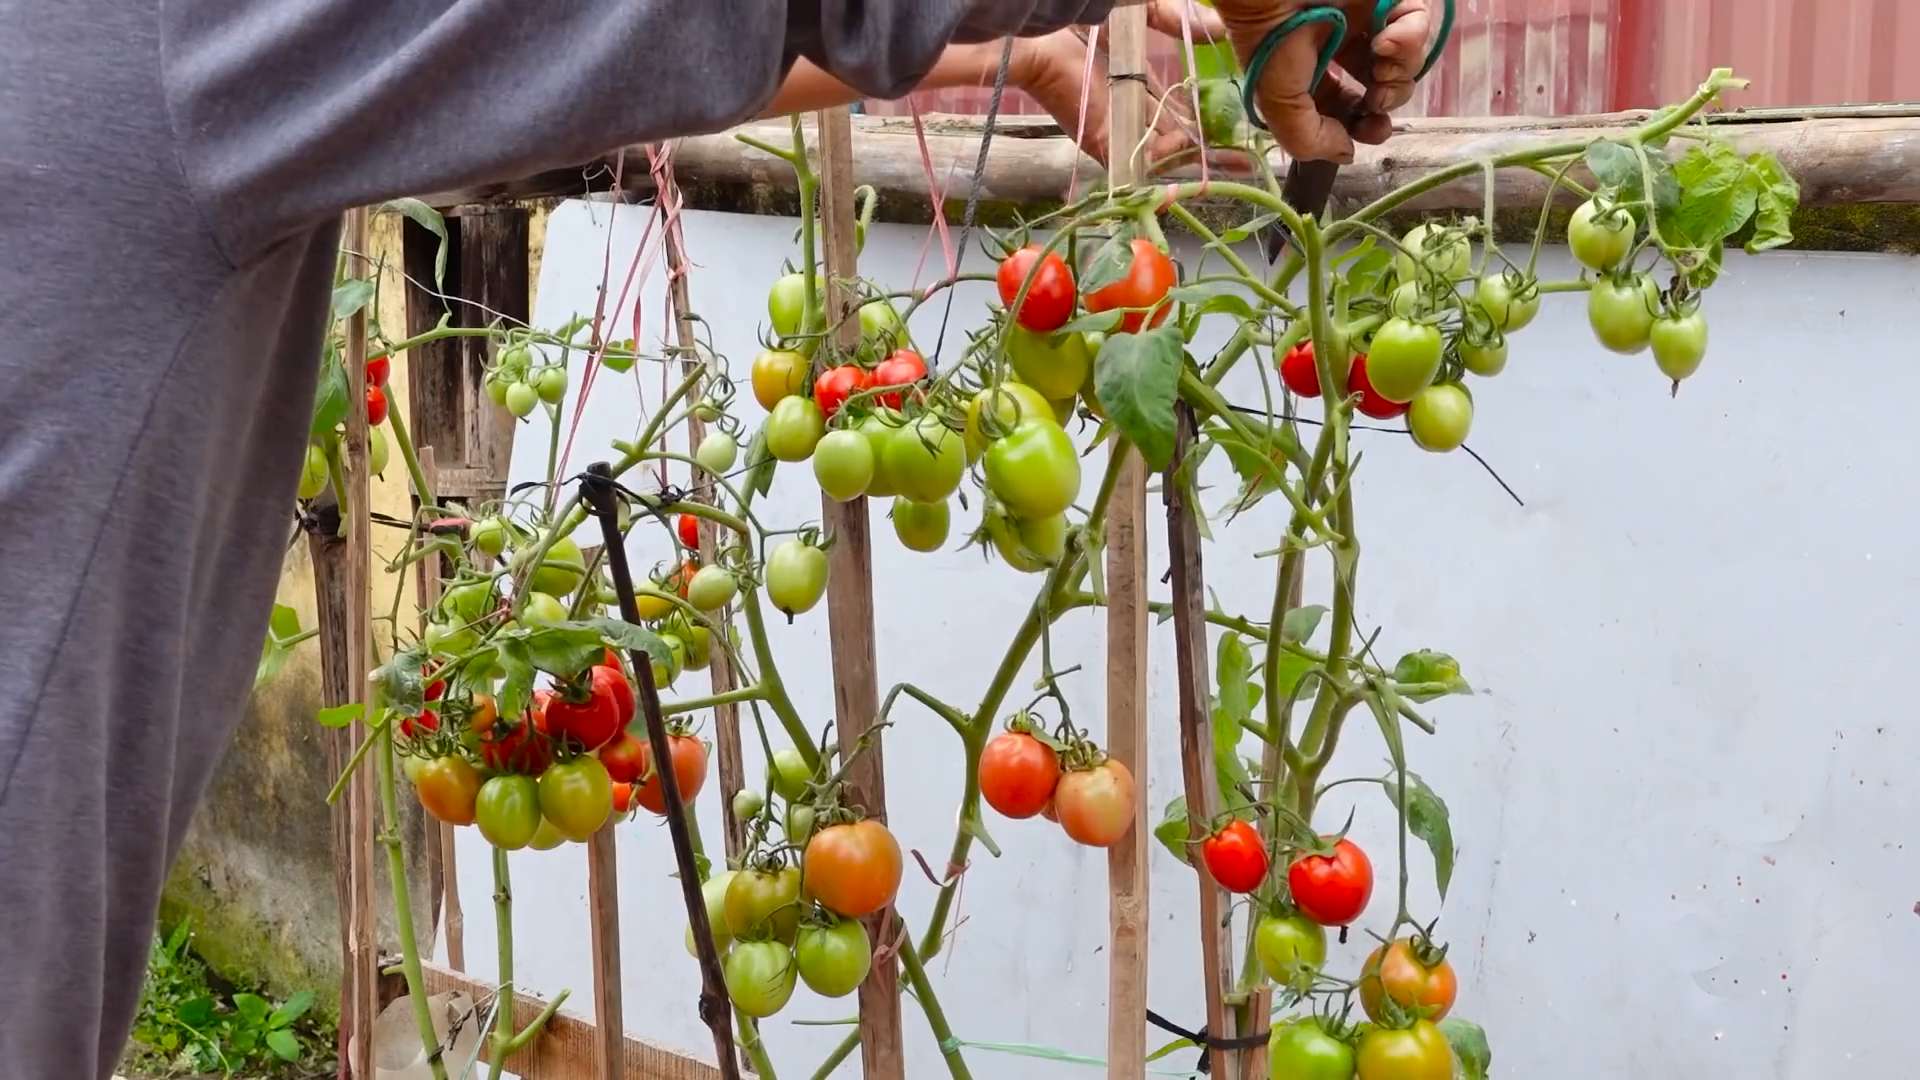
Harvesting Your Tomatoes
The best part! You’ll know your tomatoes are ripe when they’re fully colored and slightly soft to the touch. Gently twist the tomato off the vine.
Don’t refrigerate your tomatoes! This will ruin their flavor. Store them at room temperature.
Troubleshooting Common Tomato Problems
* **Blossom End Rot:** This is caused by a calcium deficiency. To prevent blossom end rot, make sure to provide your tomatoes with consistent watering and add calcium to the soil.
* **Cracking:** This is caused by inconsistent watering. To prevent cracking, water your tomatoes regularly and avoid letting the soil dry out completely.
* **Sunscald:** This is caused by too much sun exposure. To prevent sunscald, provide your tomatoes with some shade during the hottest part of the day.
Enjoying Your Homegrown Tomatoes
Congratulations! You’ve successfully grown your own tomatoes. Now it’s time to enjoy the fruits (or vegetables!) of your labor. Use them in salads, sandwiches, sauces, or just eat

Conclusion
So, there you have it! Growing tomatoes at home, while it might seem daunting at first, is an incredibly rewarding experience. From the vibrant colors to the unmatched flavor of a sun-ripened tomato plucked straight from your own vine, the benefits far outweigh the effort. We’ve covered everything from seed starting and transplanting to essential care tips and troubleshooting common problems. But the real magic happens when you put these techniques into practice and witness the transformation of a tiny seed into a bountiful harvest.
This isn’t just about saving money at the grocery store; it’s about connecting with nature, understanding the food you eat, and experiencing the satisfaction of nurturing something from start to finish. Imagine the pride you’ll feel serving a Caprese salad made with tomatoes you grew yourself, or the joy of sharing your homegrown bounty with friends and family.
Don’t be afraid to experiment! Try different varieties of tomatoes to discover your favorites. Cherry tomatoes are perfect for snacking, while Roma tomatoes are ideal for making sauces. Heirloom varieties offer unique flavors and colors that you won’t find in commercially grown tomatoes. Consider companion planting basil or marigolds near your tomato plants to deter pests and improve growth. You can also explore different growing methods, such as container gardening or raised beds, depending on your space and resources.
Growing tomatoes at home is a journey, not a destination. There will be challenges along the way, but don’t let them discourage you. Learn from your mistakes, adapt your techniques, and most importantly, have fun! The taste of a homegrown tomato is unlike anything you’ve ever experienced, and it’s well worth the effort.
We encourage you to take the plunge and start your own tomato garden today. Share your experiences with us in the comments below! We’d love to hear about your successes, your challenges, and any tips you’ve learned along the way. Let’s build a community of tomato-growing enthusiasts and help each other cultivate the most delicious and rewarding gardens possible. Happy gardening!
Frequently Asked Questions (FAQs)
Q: What is the best time to start growing tomatoes from seed?
A: The ideal time to start tomato seeds indoors is typically 6-8 weeks before the last expected frost in your area. This allows the seedlings to develop a strong root system before being transplanted outdoors. To determine the last frost date for your region, consult your local weather service or agricultural extension office. Starting too early can result in leggy, weak seedlings that struggle to thrive once transplanted. Starting too late will shorten your growing season and potentially reduce your harvest.
Q: What kind of soil is best for growing tomatoes?
A: Tomatoes thrive in well-draining, fertile soil that is rich in organic matter. The ideal soil pH for tomatoes is between 6.0 and 6.8. Before planting, amend your soil with compost, aged manure, or other organic materials to improve its structure, drainage, and nutrient content. Avoid heavy clay soils, as they can become waterlogged and inhibit root growth. If you have clay soil, consider growing your tomatoes in raised beds or containers with a well-draining potting mix. You can also perform a soil test to determine the pH and nutrient levels of your soil and make necessary adjustments.
Q: How often should I water my tomato plants?
A: Tomato plants need consistent watering, especially during hot, dry weather. Water deeply and regularly, aiming to keep the soil consistently moist but not waterlogged. The frequency of watering will depend on factors such as the weather, soil type, and size of the plant. As a general rule, water deeply once or twice a week, providing enough water to reach the roots. Avoid overhead watering, as this can promote fungal diseases. Instead, water at the base of the plant using a soaker hose or drip irrigation system. Mulching around the base of the plants can also help retain moisture and suppress weeds.
Q: What are some common tomato plant problems and how can I fix them?
A: Tomato plants are susceptible to a variety of pests and diseases. Some common problems include:
* **Blossom End Rot:** This is caused by a calcium deficiency and results in a dark, leathery spot on the bottom of the tomato. To prevent blossom end rot, ensure your soil has adequate calcium and water consistently. You can also add calcium supplements to the soil.
* **Early Blight:** This fungal disease causes dark spots on the leaves and can eventually kill the plant. To prevent early blight, space your plants properly to allow for good air circulation, avoid overhead watering, and remove any infected leaves. You can also use a fungicide if necessary.
* **Tomato Hornworms:** These large green caterpillars can quickly defoliate tomato plants. Handpick them off the plants and drop them into a bucket of soapy water. You can also use Bacillus thuringiensis (Bt), a natural insecticide, to control hornworms.
* **Aphids:** These small, sap-sucking insects can weaken tomato plants. Spray them off with a strong stream of water or use insecticidal soap.
Regularly inspect your tomato plants for signs of pests or diseases and take action promptly to prevent them from spreading.
Q: Can I grow tomatoes in containers?
A: Yes, tomatoes can be successfully grown in containers, making them a great option for gardeners with limited space. Choose a large container (at least 20 gallons) with drainage holes. Use a high-quality potting mix that is specifically formulated for containers. Select determinate tomato varieties, which are more compact and well-suited for container growing. Provide adequate sunlight (at least 6-8 hours per day) and water regularly. Fertilize your container tomatoes every 2-3 weeks with a balanced fertilizer.
Q: How do I know when my tomatoes are ripe?
A: The color of the tomato will change from green to its mature color (red, yellow, orange, etc.). The tomato should also feel slightly soft to the touch. Gently squeeze the tomato; it should give slightly but not be mushy. The aroma of a ripe tomato is also a good indicator of ripeness. It should have a sweet, tomatoey smell. The best way to determine ripeness is to taste a tomato from your plant. Once you’ve tasted a perfectly ripe, homegrown tomato, you’ll know exactly what to look for!
Q: What are some good companion plants for tomatoes?
A: Companion planting can benefit tomato plants by deterring pests, attracting beneficial insects, and improving growth. Some good companion plants for tomatoes include:
* **Basil:** Repels tomato hornworms and whiteflies.
* **Marigolds:** Repel nematodes and other soil pests.
* **Garlic:** Repels aphids and other pests.
* **Onions:** Repel aphids and other pests.
* **Carrots:** Improve soil aeration and drainage.
* **Beans:** Fix nitrogen in the soil, which benefits tomato plants.
Avoid planting tomatoes near brassicas (cabbage, broccoli, cauliflower), as they can compete for nutrients.
Q: How do I prune my tomato plants?
A: Pruning tomato plants can improve air circulation, promote fruit production, and prevent diseases. The most common pruning technique is to remove suckers, which are small shoots that grow in the junction between the main stem and the branches. Removing suckers directs the plant’s energy towards fruit production. Prune your tomato plants regularly, especially during the early stages of growth. Use clean, sharp pruning shears to avoid spreading diseases.
Q: How can I save seeds from my tomato plants?
A: Saving seeds from your tomato plants is a great way to preserve your favorite varieties and save money. Choose ripe, healthy tomatoes from disease-free plants. Squeeze the seeds and pulp into a jar and add a little water. Let the mixture ferment for 3-4 days, stirring occasionally. This process will remove the gelatinous coating around the seeds. Rinse the seeds thoroughly and spread them out on a paper towel to dry completely. Store the dried seeds in an airtight container in a cool, dark place.

Leave a Comment