

Pee Stain Removal Products: Let’s face it, accidents happen! Whether you’re dealing with a mischievous pet, a toddler in training, or even just an unfortunate spill, pee stains are a common household woe. But before you resign yourself to living with lingering odors and unsightly marks, I’m here to tell you that you *can* conquer those stains with the right approach and, yes, the right pee stain removal products.
For centuries, people have been battling the challenges of keeping their homes clean and fresh. While modern cleaning solutions offer convenience, the struggle against stains, especially those caused by urine, is a timeless one. Think about it – our ancestors used natural remedies like vinegar and baking soda, proving that the desire for a clean, odor-free home is deeply ingrained in us.
But why is it so important to tackle these stains head-on? Beyond the obvious aesthetic reasons, lingering pee stains can attract pests, encourage repeat offenses from pets, and even impact your home’s air quality. Plus, let’s be honest, nobody wants their home to smell like, well, pee! That’s why I’ve compiled this guide to help you navigate the world of pee stain removal products and DIY solutions. I’ll share my favorite tips, tricks, and product recommendations to help you banish those stains for good and restore your home to its fresh, clean glory. Get ready to say goodbye to embarrassing odors and hello to a stain-free sanctuary!
DIY Pee Stain & Odor Removal: A Comprehensive Guide
Okay, let’s face it, accidents happen! Whether it’s a pet mishap, a little one’s oopsie, or even your own clumsy moment (no judgment!), pee stains and their lingering odor can be a real pain. But don’t despair! Before you reach for those expensive, chemical-laden cleaners, I’m going to walk you through some super effective DIY methods that use ingredients you probably already have in your pantry. These methods are not only budget-friendly but also much gentler on your carpets, upholstery, and your health.
Understanding the Enemy: Why Pee Stains are So Stubborn
Before we dive into the solutions, let’s understand why pee stains are so persistent. Urine contains uric acid, which is what gives it that distinctive, pungent smell. This acid binds tightly to fibers, making it difficult to remove with just water and soap. Plus, if left untreated, the uric acid can crystallize, making the stain and odor even more stubborn over time. That’s why acting quickly is key!
The Golden Rule: Act Fast!
The sooner you tackle a pee stain, the easier it will be to remove. Fresh stains are much more manageable than old, set-in ones. So, as soon as you notice an accident, jump into action!
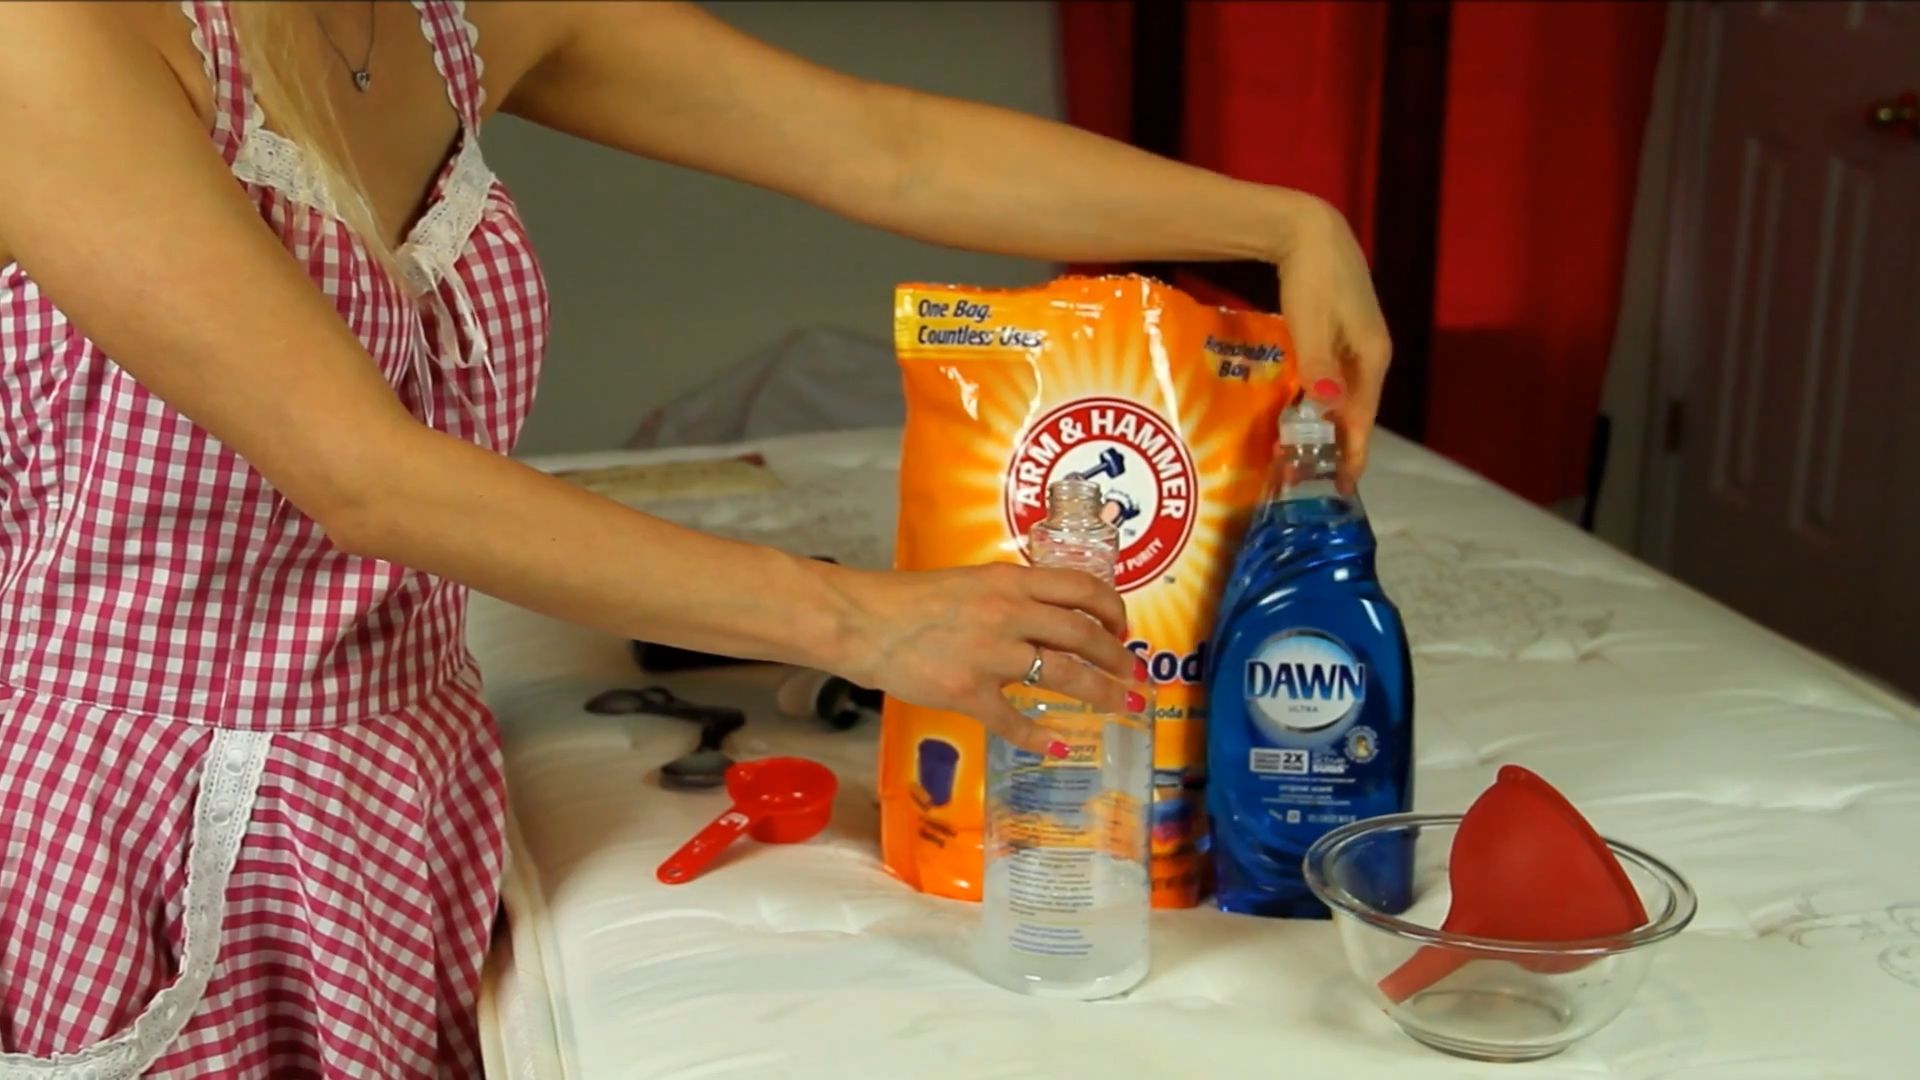
Method 1: The Baking Soda & Vinegar Power Couple
This is my go-to method for fresh pee stains, and it works wonders! Baking soda is a natural odor absorber, while vinegar is a mild acid that helps break down the uric acid crystals.
Materials You’ll Need:
* Baking soda
* White vinegar
* Clean cloths or paper towels
* Spray bottle (optional)
* Vacuum cleaner
Step-by-Step Instructions:
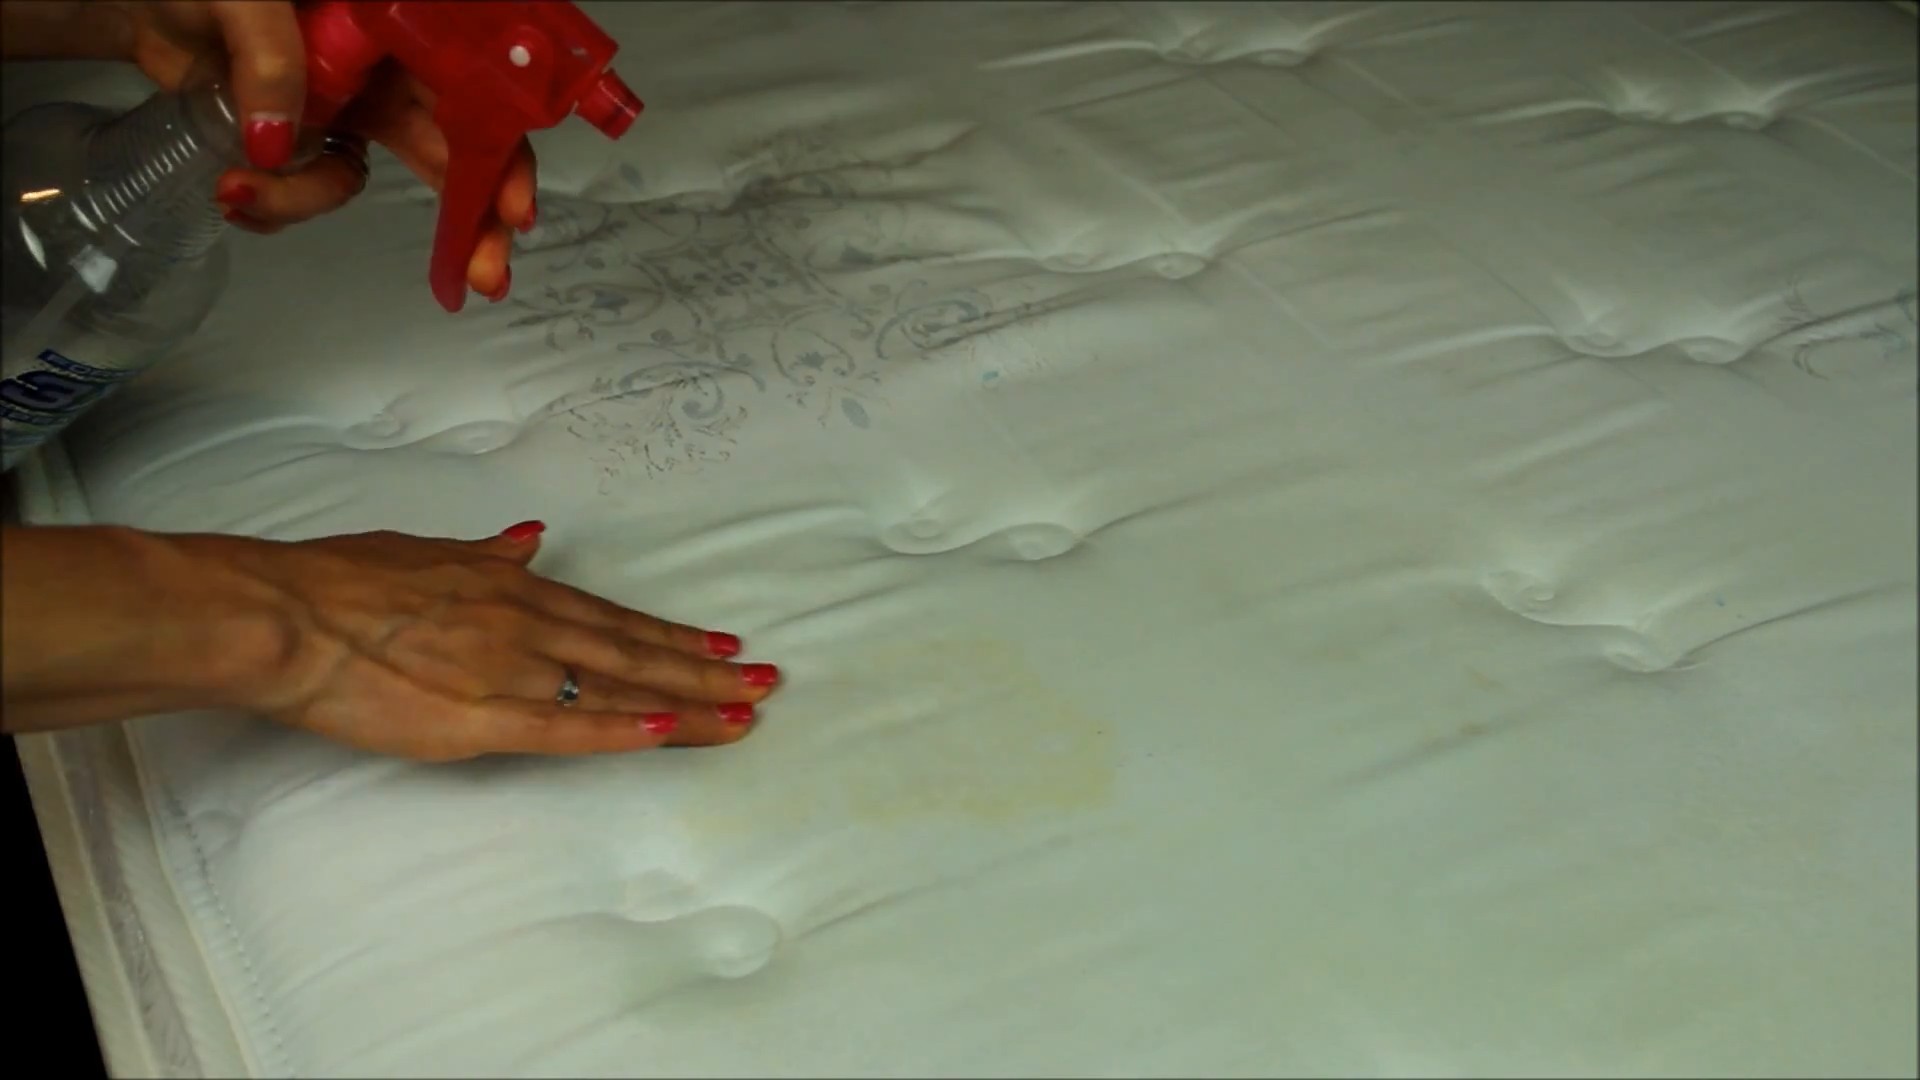
1. Blot, Blot, Blot! The first thing you need to do is soak up as much of the urine as possible. Use clean cloths or paper towels and press down firmly on the affected area. Keep blotting until the cloth comes up mostly dry. Don’t rub, as this will only spread the stain and push it deeper into the fibers.
2. Baking Soda to the Rescue: Once you’ve blotted up the excess urine, generously sprinkle baking soda over the entire stain. Make sure you cover it completely. The baking soda will absorb the remaining moisture and help neutralize the odor.
3. Vinegar Time: Now, it’s time for the vinegar. You have two options here: You can either pour a small amount of white vinegar directly onto the baking soda or use a spray bottle to lightly mist the area. If you’re pouring, be careful not to saturate the carpet or upholstery. You just want to dampen the baking soda.
4. The Fizzing Fun: As the vinegar reacts with the baking soda, you’ll see some fizzing. This is a good thing! It means the vinegar is working its magic, breaking down the uric acid. Let the mixture sit for at least 3-5 hours, or even overnight for stubborn stains. The longer it sits, the better it will work.
5. Vacuum it Up: Once the baking soda is completely dry, vacuum it up thoroughly. Make sure you get all the residue. If you still detect a slight odor, repeat the process.
6. Air it Out: After vacuuming, open windows and doors to air out the room. This will help remove any lingering odors and ensure the area dries completely.
Method 2: Enzyme Cleaner Power
Enzyme cleaners are specifically designed to break down organic matter, like urine. They contain enzymes that digest the uric acid crystals, effectively eliminating both the stain and the odor. You can find enzyme cleaners at most pet supply stores or online.
Materials You’ll Need:
* Enzyme cleaner (specifically formulated for pet urine)
* Clean cloths or paper towels
* Spray bottle (if the enzyme cleaner doesn’t come in one)
Step-by-Step Instructions:
1. Blot, Blot, Blot! Just like with the baking soda and vinegar method, start by blotting up as much of the urine as possible with clean cloths or paper towels.
2. Saturate the Stain: Follow the instructions on your enzyme cleaner bottle. Generally, you’ll need to saturate the stain with the cleaner. Don’t be afraid to use a generous amount, as you want the enzymes to reach all the affected fibers.
3. Let it Work its Magic: This is the most important step! Enzyme cleaners need time to work. The instructions will usually specify how long to let the cleaner sit, but it’s typically several hours or even overnight. Resist the urge to wipe it up too soon!
4. Blot Again: After the recommended time, blot up any excess cleaner with a clean cloth or paper towel.
5. Air Dry: Allow the area to air dry completely. Avoid using a fan or hairdryer, as this can set the stain.
6. Repeat if Necessary: If the stain or odor persists, repeat the process. Sometimes, it takes a couple of applications to completely eliminate stubborn stains.
Method 3: Hydrogen Peroxide for Light-Colored Fabrics
Hydrogen peroxide is a mild bleaching agent that can be effective for removing pee stains, especially on light-colored fabrics. However, it’s important to test it in an inconspicuous area first to make sure it doesn’t cause any discoloration.
Materials You’ll Need:
* 3% hydrogen peroxide
* Clean cloths or paper towels
* Spray bottle (optional)
* Baking soda (optional, for odor absorption)
Step-by-Step Instructions:
1. Test it First! Before applying hydrogen peroxide to the entire stain, test it in a hidden area, like under a sofa cushion or in a corner of the carpet. Apply a small amount of hydrogen peroxide to the area and let it sit for a few minutes. If there’s no discoloration, you can proceed.
2. Blot, Blot, Blot! As always, start by blotting up as much of the urine as possible with clean cloths or paper towels.
3. Apply Hydrogen Peroxide: You can either pour a small amount of hydrogen peroxide directly onto the stain or use a spray bottle to lightly mist the area.
4. Let it Sit: Allow the hydrogen peroxide to sit for 1-2 hours.
5. Blot Again: After the recommended time, blot up any excess hydrogen peroxide with a clean cloth or paper towel.
6. Baking Soda (Optional): If you’re concerned about lingering odors, sprinkle baking soda over the area after blotting. Let it sit for a few hours, then vacuum it up.
7. Air Dry: Allow the area to air dry completely.
Dealing with Old, Set-In Pee Stains
Old pee stains are definitely more challenging to remove, but don’t give up hope! You may need to repeat the above methods several times or combine them for the best results.
Here are some tips for tackling old stains:
* Pre-Soak: Before applying any cleaning solution, try pre-soaking the stain with warm water. This will help loosen the dried urine and make it easier to remove.
* Enzyme Cleaner is Your Best Friend: For old stains, enzyme cleaners are often the most effective option. Be patient and allow the cleaner to work for the recommended time. You may need to repeat the application several times.
* Steam Cleaning: If you have a steam cleaner, it can be a great way to deep clean the affected area and remove stubborn stains and odors. Just be sure to use a cleaning solution that’s safe for your carpet or upholstery.
* Professional Help: If you’ve tried everything and the stain is still there, it may be time to call in a professional carpet cleaner. They have specialized equipment and cleaning solutions that can often remove even the most stubborn stains.
Preventing Future Accidents
Prevention is always better than cure! Here are some tips to help prevent future pee accidents:
* Potty Training: If you have a pet that’s not fully potty trained, be consistent with your training efforts. Take them outside frequently and reward them when they go in the right place.
* Regular Cleaning: Clean your carpets and upholstery regularly to remove any lingering odors that might attract your pet to pee in the same spot again.
* Waterproof Mattress Protectors: If you have young children, consider using waterproof mattress protectors to prevent pee from soaking into the mattress.
* Address Underlying Medical Issues: If your pet is suddenly having accidents, it could be a sign of an underlying medical issue. Take them to the vet for a checkup.
Important Considerations:
* Always test any cleaning solution in an inconspicuous area first to ensure it doesn’t damage or discolor the fabric.
* Wear gloves when handling cleaning solutions to protect your skin.
* Keep children and pets away from the area while you’re cleaning.
* If you’re using a
Conclusion
So, there you have it! This DIY pee stain removal trick is more than just a quick fix; it’s a game-changer for pet owners, parents, or anyone who’s ever faced the unpleasant reality of urine stains on their carpets, upholstery, or mattresses. We’ve all been there, frantically searching for expensive, chemical-laden products that promise the world but often fall short. This method, however, utilizes common household ingredients, making it not only incredibly effective but also budget-friendly and environmentally conscious.
Why is this a must-try? Because it works! The combination of baking soda, vinegar, and dish soap creates a powerful cleaning solution that tackles the stain at its source, neutralizing odors and lifting discoloration. Unlike some commercial products that simply mask the smell, this DIY approach eliminates it completely, preventing your furry friends from being tempted to re-mark the same spot. Plus, you avoid exposing your family and pets to harsh chemicals, making it a safer alternative for your home.
But the beauty of this DIY pee stain removal method lies in its adaptability. Feel free to experiment with variations to suit your specific needs and preferences. For instance, if you’re dealing with a particularly stubborn stain, you can pre-treat the area with an enzyme cleaner before applying the baking soda paste. Enzyme cleaners are designed to break down the organic compounds in urine, making it easier to lift the stain. Alternatively, for delicate fabrics, you might want to dilute the vinegar solution slightly to prevent any potential damage. You could also add a few drops of your favorite essential oil, like lavender or eucalyptus, to the vinegar solution for a more pleasant scent, but be sure to test it on an inconspicuous area first to ensure it doesn’t stain.
Another variation involves using hydrogen peroxide instead of vinegar for lighter-colored carpets and upholstery. Hydrogen peroxide has bleaching properties, so it’s crucial to test it in a hidden area first to ensure it doesn’t discolor the fabric. If it’s safe to use, apply it after the baking soda has dried and been vacuumed up.
Remember, the key to success with any stain removal method is to act quickly. The sooner you treat the stain, the easier it will be to remove. Don’t let the stain set in, as this will make it much more difficult to eliminate completely.
We’re confident that this DIY pee stain removal trick will become your go-to solution for tackling those inevitable accidents. It’s simple, effective, and safe for your family and pets. So, ditch the expensive, chemical-filled products and give this method a try.
We’re eager to hear about your experiences! Did this DIY trick work for you? Did you try any variations? Share your results and tips in the comments below. Your feedback will help others who are struggling with the same problem. Let’s create a community of stain-fighting experts! Don’t forget to share this article with your friends and family who might benefit from this valuable information. Together, we can conquer those pesky pee stains and keep our homes clean and fresh.
Frequently Asked Questions (FAQs)
1. Will this DIY pee stain removal method work on all types of surfaces?
This method is generally effective on carpets, upholstery, and mattresses. However, it’s always recommended to test it on an inconspicuous area first, especially on delicate fabrics or surfaces. Different materials react differently to cleaning solutions, so a spot test will help you ensure that the method doesn’t cause any discoloration or damage. For example, some natural fibers like wool or silk might be more sensitive to vinegar or hydrogen peroxide. If you’re unsure, consult a professional cleaner before proceeding.
2. How long should I leave the baking soda on the stain?
Allow the baking soda to sit on the stain for at least a few hours, or preferably overnight. The longer it sits, the more effectively it will absorb the urine and neutralize the odor. For particularly stubborn stains, you can even leave the baking soda on for up to 24 hours. Just make sure to keep pets and children away from the area while the baking soda is in place.
3. What type of vinegar should I use?
White distilled vinegar is the best option for this DIY pee stain removal method. It’s a mild acid that helps to break down the urine and neutralize the odor. Avoid using other types of vinegar, such as apple cider vinegar or balsamic vinegar, as they may contain pigments that could stain the fabric.
4. Can I use a different type of dish soap?
Yes, you can use a different type of dish soap, but it’s important to choose one that is clear and non-bleaching. Avoid using dish soaps that contain dyes or fragrances, as these could potentially stain the fabric. A mild, unscented dish soap is the best option.
5. What if the stain is old and has already set in?
Old, set-in stains can be more difficult to remove, but this DIY method can still be effective. You may need to repeat the process several times to achieve the desired results. Consider pre-treating the stain with an enzyme cleaner specifically designed for pet urine. Enzyme cleaners break down the organic compounds in urine, making it easier to lift the stain. You can also try using a steam cleaner to help loosen the stain before applying the baking soda paste.
6. How do I prevent my pet from re-marking the same spot?
Preventing your pet from re-marking the same spot is crucial for long-term success. After cleaning the stain, thoroughly neutralize the odor. Pets are attracted to the scent of their urine, so if they can still smell it, they’re more likely to re-mark the area. You can use a pet odor neutralizer spray specifically designed for this purpose. Also, consider addressing any underlying behavioral issues that may be contributing to the problem. Consult with a veterinarian or a professional pet trainer for guidance.
7. Is this method safe for pets and children?
This DIY method is generally safe for pets and children, as it uses common household ingredients. However, it’s important to keep them away from the area while you’re cleaning and until the baking soda has been vacuumed up. Vinegar can be irritating to the skin and eyes, so avoid direct contact. If you’re using hydrogen peroxide, be extra cautious, as it can be harmful if ingested. Always store cleaning supplies out of reach of children and pets.
8. What if I don’t have vinegar or baking soda? Are there any alternatives?
While vinegar and baking soda are the key ingredients in this DIY method, there are a few alternatives you can try. For vinegar, you can substitute with lemon juice, which also has acidic properties. For baking soda, you can try using cornstarch, which is also absorbent. However, these alternatives may not be as effective as vinegar and baking soda.
9. How do I know if the hydrogen peroxide is safe to use on my carpet or upholstery?
Before using hydrogen peroxide, test it on an inconspicuous area of your carpet or upholstery. Apply a small amount of hydrogen peroxide to a hidden spot and let it sit for a few minutes. Then, blot it with a clean, white cloth. If the cloth picks up any color from the fabric, or if the fabric appears to be discolored, do not use hydrogen peroxide.
10. Can I use this method on leather furniture?
No, this method is not recommended for leather furniture. Leather is a delicate material that can be easily damaged by vinegar and other cleaning solutions. Consult a professional leather cleaner for advice on how to remove pee stains from leather furniture.
Leave a Comment