

Spring cleaning living and dining areas can feel like a Herculean task, right? I get it! You look around at the accumulated dust bunnies, the scattered magazines, and the lingering crumbs from movie night, and suddenly, a nap sounds way more appealing. But trust me, tackling these spaces doesn’t have to be a dreaded chore. In fact, with a few clever DIY tricks and hacks, you can transform your living and dining areas into sparkling sanctuaries you’ll actually *want* to spend time in.
The concept of spring cleaning itself is steeped in history. Many cultures have traditions of thoroughly cleaning their homes at the start of a new season, symbolizing a fresh start and a clearing away of the old to make way for the new. Think of the Persian tradition of “Khooneh Tekani,” which literally translates to “shaking the house,” or the Jewish tradition of cleaning for Passover. These practices aren’t just about tidiness; they’re about renewal and rejuvenation.
Why do you need these DIY tricks for spring cleaning living and dining spaces? Because let’s face it, life is busy! We all want a clean and organized home, but finding the time and energy can be a challenge. These hacks are designed to be quick, easy, and effective, using items you probably already have around the house. I’m going to share some of my favorite tips and tricks to help you declutter, deep clean, and refresh your living and dining areas without spending a fortune or sacrificing your entire weekend. Get ready to say goodbye to the chaos and hello to a beautifully refreshed home!

DIY Spring Cleaning Hacks for a Sparkling Living & Dining Space
Okay, friends, let’s tackle that living and dining room spring cleaning! I know, I know, it sounds daunting, but trust me, with a few clever DIY hacks, we can get these spaces looking fresh and fabulous without breaking the bank or spending all weekend scrubbing. I’m going to walk you through my favorite tricks, step-by-step, so grab your cleaning supplies and let’s get started!
Decluttering Like a Pro
Before we even think about dusting or mopping, we need to declutter. This is the foundation of any good spring cleaning, and it makes everything else so much easier.
* The One-Year Rule: If you haven’t used it in a year, it’s time to seriously consider letting it go. This applies to everything from decorative items to books to that random gadget you thought you needed.
* The “Maybe” Box: If you’re struggling to decide whether to keep something, put it in a “maybe” box. Seal it up, date it, and if you haven’t needed anything from it in six months, donate the whole box unopened.
* Designated Donation Station: Set up a box or bag specifically for items you’re donating. This makes it easy to toss things in as you go and keeps them from migrating back into your living space.
* Surface Clearing: Focus on clearing all surfaces – coffee tables, side tables, shelves, the dining table. The less clutter you have on these surfaces, the cleaner and more spacious the room will feel.
Dusting Deep Dive
Dust is the enemy! It settles everywhere and makes everything look dull. Let’s get rid of it.
* Top-Down Approach: Always start dusting from the highest points in the room and work your way down. This prevents dust from falling onto areas you’ve already cleaned.
* Microfiber Magic: Microfiber cloths are your best friend for dusting. They trap dust effectively and won’t scratch surfaces.
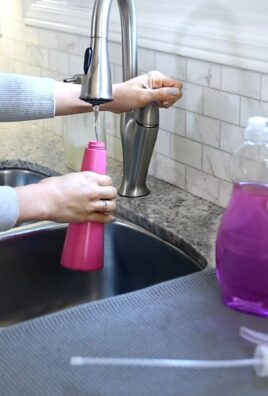
* DIY Dusting Spray: Mix equal parts water and white vinegar in a spray bottle. Add a few drops of your favorite essential oil (lemon or lavender are great choices) for a fresh scent. This is a natural and effective dusting spray that’s safe for most surfaces. Always test in an inconspicuous area first!
* Tackle the Tricky Spots: Don’t forget to dust these often-overlooked areas:
* Light fixtures: Turn off the power and carefully dust light fixtures with a dry cloth or a duster with an extension pole.
* Ceiling fans: Use a pillowcase to dust ceiling fan blades. Slide the pillowcase over each blade, trapping the dust inside.
* Picture frames: Dust picture frames and the glass with a microfiber cloth.
* Baseboards: Wipe down baseboards with a damp cloth or a microfiber mop.
* Electronics: Use a dry microfiber cloth to dust electronics like TVs, stereos, and game consoles. Avoid using liquids on electronics.
Cleaning Upholstery Like a Pro
Upholstery can harbor a lot of dust, dirt, and allergens. Let’s give it a good cleaning.
* Vacuum First: Always vacuum upholstery thoroughly before cleaning it with any liquids. Use the upholstery attachment on your vacuum cleaner to remove loose dirt and debris. Pay special attention to crevices and seams.
* DIY Upholstery Cleaner: For a general upholstery cleaner, mix 1/4 cup of mild dish soap with 1 cup of warm water. Whip the mixture until it forms stiff peaks. Apply the foam to the upholstery with a sponge or cloth, working in small sections. Let it sit for a few minutes, then wipe away with a clean, damp cloth.
* Spot Cleaning Stains:
* For water-based stains: Blot the stain with a clean, damp cloth. Avoid rubbing, as this can spread the stain.
* For oil-based stains: Sprinkle baking soda on the stain and let it sit for 30 minutes to absorb the oil. Then, vacuum up the baking soda.
* For pet stains: Use an enzymatic cleaner specifically designed for pet stains. Follow the instructions on the product label.
* Steam Cleaning (Optional): If you have a steam cleaner, you can use it to deep clean your upholstery. Follow the manufacturer’s instructions carefully.
Window Washing Wonders
Clean windows make a huge difference in the brightness and overall feel of a room.
* DIY Window Cleaner: Mix equal parts water and white vinegar in a spray bottle. This is a simple, effective, and eco-friendly window cleaner.
* The Right Tools: Use a microfiber cloth or a squeegee to clean your windows. Avoid using paper towels, as they can leave streaks.
* The Right Technique: Spray the window with the cleaner and then wipe it down with a microfiber cloth or squeegee. If using a squeegee, overlap each stroke slightly.
* Clean on a Cloudy Day: Avoid cleaning windows in direct sunlight, as the cleaner will dry too quickly and leave streaks.
* Clean the Tracks: Don’t forget to clean the window tracks! Use a small brush or a vacuum cleaner attachment to remove dirt and debris.
Floor Care Frenzy
Whether you have hardwood, tile, or carpet, your floors need some attention.
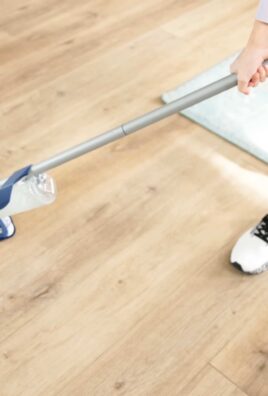
* Hardwood Floors:
1. Sweep or vacuum: Remove loose dirt and debris with a broom or vacuum cleaner.
2. DIY Hardwood Floor Cleaner: Mix 1/4 cup of white vinegar with 1 gallon of warm water.
3. Mop with a damp mop: Dip the mop into the cleaning solution, wring it out well, and mop the floor. Avoid using too much water, as this can damage hardwood floors.
4. Dry the floor: Dry the floor with a clean, dry cloth or towel.
* Tile Floors:
1. Sweep or vacuum: Remove loose dirt and debris with a broom or vacuum cleaner.
2. DIY Tile Floor Cleaner: Mix 1/2 cup of baking soda with 1 gallon of warm water.
3. Mop with a damp mop: Dip the mop into the cleaning solution, wring it out well, and mop the floor.
4. Clean the grout: For stubborn grout stains, make a paste of baking soda and water. Apply the paste to the grout, let it sit for a few minutes, and then scrub with a grout brush.
5. Rinse the floor: Rinse the floor with clean water.
6. Dry the floor: Dry the floor with a clean, dry cloth or towel.
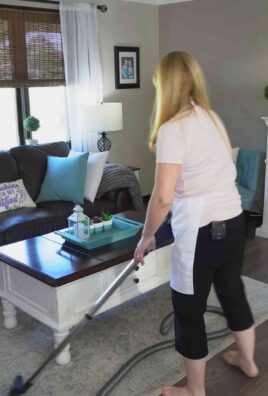
* Carpet Cleaning:
1. Vacuum thoroughly: Vacuum the carpet thoroughly to remove loose dirt and debris.
2. Spot clean stains: Treat any stains with a carpet stain remover. Follow the instructions on the product label.
3. DIY Carpet Refresher: Sprinkle baking soda over the carpet and let it sit for 30 minutes. Then, vacuum up the baking soda. This will help to absorb odors and freshen the carpet.
4. Rent a carpet cleaner (Optional): If your carpets are heavily soiled, you may want to rent a carpet cleaner. Follow the manufacturer’s instructions carefully.
Dining Table Delight
Let’s make that dining table shine!
* Clear the Table: Remove everything from the table – placemats, centerpieces, etc.
* Clean the Surface: Wipe down the table surface with a damp cloth and a mild cleaner. Use a cleaner appropriate for the table’s material (wood, glass, etc.).
* Polish (If Applicable): If your table is wood, consider polishing it with a furniture polish to restore its shine.
* Clean Placemats and Table Runners: Wash or wipe down placemats and table runners according to their care instructions.
* Re-style: Once the table is clean and dry, re-style it with your favorite centerpiece and placemats.
Living Room Refreshments
A few final touches to make your living room feel extra fresh.
* Fluff Pillows and Blankets: Give your throw pillows and blankets a good fluff to restore their shape.
* Wash Throw Blankets: Wash throw blankets according to their care instructions.
* Organize Books and Magazines: Straighten up your bookshelves and magazine racks.
* Add Fresh Flowers or Plants: A vase of fresh flowers or a potted plant can instantly brighten up a room.
* Open the Windows: Let some fresh air in to circulate and freshen the room.
Step-by-Step Instructions: The Ultimate Spring Cleaning Checklist
Okay, let’s put it all together in a step-by-step checklist to make sure we don’t miss anything!

Conclusion
So, there you have it! This simple yet incredibly effective DIY trick for spring cleaning your living and dining spaces is more than just a cleaning hack; it’s a game-changer. It’s about reclaiming your time, saving money, and creating a healthier, more inviting home environment. We’ve shown you how to tackle dust, grime, and lingering odors with minimal effort and maximum impact, all while using ingredients you likely already have in your pantry.
Why is this a must-try? Because it’s efficient, eco-friendly, and surprisingly satisfying. Imagine walking into your living room and being greeted by a fresh, clean scent, knowing that you achieved it without harsh chemicals or expensive cleaning products. Think about the satisfaction of seeing your dining table gleam, ready for family meals and gatherings. This DIY approach empowers you to take control of your cleaning routine and customize it to your specific needs and preferences.
But don’t just take our word for it. We encourage you to experiment with variations to find what works best for you. For instance, if you prefer a stronger scent, add a few extra drops of your favorite essential oil. Lavender, lemon, and eucalyptus are all excellent choices for a fresh and invigorating aroma. If you have particularly stubborn stains on your furniture, consider pre-treating them with a paste of baking soda and water before applying the DIY cleaner. For delicate surfaces, always test the solution in an inconspicuous area first to ensure it doesn’t cause any damage. You could also try infusing your cleaning solution with citrus peels for an extra boost of cleaning power and a delightful fragrance. Consider adding a tablespoon of white vinegar to your solution for extra degreasing power, especially useful in the dining area where food spills are common.
This spring cleaning DIY trick is not just about cleaning; it’s about creating a healthier and happier home. It’s about simplifying your life and making your living and dining spaces a true reflection of your personal style and values. It’s about embracing a more sustainable and mindful approach to cleaning, one that benefits both your home and the environment.
We are confident that once you try this DIY trick, you’ll be amazed by the results. It’s a simple, effective, and affordable way to transform your living and dining spaces into havens of cleanliness and comfort. So, grab your supplies, roll up your sleeves, and get ready to experience the joy of a truly clean home.
We’d love to hear about your experience! Share your before-and-after photos, your favorite variations, and any tips or tricks you discover along the way. Let’s create a community of DIY cleaning enthusiasts who are passionate about creating beautiful and healthy homes. Use the hashtag #DIYSpringCleaning and tag us in your posts. We can’t wait to see your amazing results! Let us know how this **spring cleaning** trick worked for you!
FAQ
Q: What are the benefits of using a DIY cleaning solution compared to store-bought products?
A: DIY cleaning solutions offer several advantages over commercial products. Firstly, they are often more cost-effective, as you’re using ingredients you likely already have at home. Secondly, they are generally safer and healthier, as they avoid harsh chemicals, artificial fragrances, and other potentially harmful ingredients found in many store-bought cleaners. This is especially important for households with children, pets, or individuals with sensitivities. Thirdly, DIY solutions are more environmentally friendly, reducing your reliance on plastic packaging and minimizing the release of pollutants into the environment. Finally, DIY cleaning allows for customization, enabling you to tailor the solution to your specific needs and preferences.
Q: Can I use this DIY cleaning solution on all surfaces in my living and dining areas?
A: While this DIY cleaning solution is generally safe and effective for most surfaces, it’s always a good idea to test it in an inconspicuous area first, especially on delicate materials like wood, leather, or painted surfaces. Avoid using abrasive scrubbers or excessive pressure, as this could damage the surface. For porous surfaces like unsealed stone or grout, consider sealing them after cleaning to prevent staining and make future cleaning easier. If you’re unsure about a particular surface, consult the manufacturer’s instructions or a professional cleaner.
Q: How long will the DIY cleaning solution last?
A: The shelf life of your DIY cleaning solution depends on the ingredients you use. Solutions containing fresh ingredients like citrus peels or herbs are best used within a week or two, as they may spoil over time. Solutions made with vinegar, baking soda, and essential oils can typically last for several months if stored properly in a cool, dark place. To extend the shelf life, use distilled water instead of tap water and store the solution in an airtight container. Always label your DIY cleaning solutions with the date they were made to keep track of their freshness.
Q: What essential oils are best to use in this DIY cleaning solution?
A: The best essential oils to use in your DIY cleaning solution depend on your personal preferences and the desired effect. Lavender is known for its calming and relaxing properties, while lemon and orange offer a fresh and invigorating scent. Eucalyptus is a great choice for its antibacterial and antiviral properties, making it ideal for disinfecting surfaces. Tea tree oil is another powerful antibacterial and antifungal option. Peppermint can help to repel insects and provide a refreshing aroma. Experiment with different combinations to find your favorite blend. Remember to use high-quality, pure essential oils for the best results.
Q: How often should I use this DIY cleaning solution for spring cleaning?
A: The frequency of your spring cleaning routine depends on your lifestyle and the level of dirt and grime in your living and dining areas. As a general guideline, aim to deep clean these spaces at least once every three to six months. However, you may need to clean more frequently if you have children, pets, or a busy household. Regular maintenance cleaning, such as dusting, vacuuming, and wiping down surfaces, should be done weekly to prevent dirt and grime from building up. This DIY cleaning solution can be used for both deep cleaning and regular maintenance, making it a versatile and effective tool for keeping your living and dining areas clean and fresh.
Q: Can I use this DIY cleaning solution to clean upholstery?
A: Yes, you can use this DIY cleaning solution to clean upholstery, but it’s crucial to proceed with caution. Always test the solution in an inconspicuous area first to ensure it doesn’t cause any discoloration or damage. Use a clean, soft cloth to gently blot the upholstery, avoiding excessive rubbing or saturation. For delicate fabrics like silk or velvet, it’s best to consult a professional upholstery cleaner. You can also use a vacuum cleaner with an upholstery attachment to remove loose dirt and debris before cleaning with the DIY solution. After cleaning, allow the upholstery to air dry completely, and avoid sitting on it until it’s dry.
Q: What if I don’t have all the ingredients listed in the recipe?
A: Don’t worry if you’re missing some of the ingredients! The beauty of DIY cleaning is that you can easily substitute or omit ingredients based on what you have available. For example, if you don’t have essential oils, you can simply leave them out or use a few drops of lemon juice for a fresh scent. If you don’t have baking soda, you can use washing soda instead. The key is to experiment and find what works best for you. Remember that the basic principles of cleaning remain the same, regardless of the specific ingredients you use.
Q: Is this DIY cleaning solution safe for pets?
A: While this DIY cleaning solution is generally safer for pets than commercial products, it’s still important to take precautions. Avoid using essential oils that are known to be toxic to pets, such as tea tree oil, pennyroyal, and wintergreen. Keep pets away from the area while you’re cleaning and allow surfaces to dry completely before allowing them back in. If your pet ingests the cleaning solution, contact your veterinarian immediately. As a general rule, always err on the side of caution when using any cleaning product around pets.
Leave a Comment